
HP StoreOnce 4500 and 4700 Capacity Upgrade Booklet

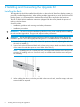

1. Connect the square HD connector on the 2–meter cable to the single high-density SAS port
on the RAID controller in slot 1 on the rear of the HP StoreOnce Backup system.
Ensure that the cable connector is plugged in the correct way on the rear of the HP StoreOnce
Backup system. This connector is square and is not keyed.
Insert the connector with the blue removed tab at the top and push in until the connector clicks
into place.
2. Connect the mini-SAS connector on the other end of the cable to the P1 connector on the rear
of the Capacity Upgrade Kit.
3. Use the supplied power cords to connect the Capacity Kit to the mains power supply
4. Power on the Upgrade Kit. You may need to hold down the power on button for a few seconds.
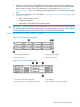
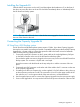
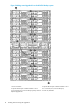
Figure 4 Cabling the first Upgrade Kit to the HP StoreOnce 4700 Backup system
2. HD SAS port on RAID controller 2 in slot 41. Square HD SAS port on RAID controller 1 in slot 1
4. Power on/off button3. Capacity Upgrade Kit
6. Power connectors5. P1 connector (on I/O-A mini-SAS port)
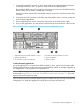
To add subsequent Upgrade Kits:
A second Upgrade Kit is connected to the RAID controller in slot 4, again using a 2-meter cable.
Subsequent Upgrade Kits are daisy-chained using the half-meter cables; for example, Upgrade Kit
3 to Upgrade Kit 1 and Upgrade Kit 4 to Upgrade Kit 2.
NOTE: When adding second and subsequent Upgrade Kits, it is necessary to expand the storage
as described in Applying the License and Completing the RAID Expansion (page 11). This is not
required with the first expansion shelf.
Various cabling options are possible depending upon available rack space, but the recommended
configuration is to install the Upgrade Kits evenly above and below the head unit.
Connecting the Capacity Upgrade Kit 9