
HP B6000 Capacity Upgrade Booklet (EJ022-90938, June 2012)

Installing the Enclosures into the Rack
WARNING! To reduce the risk of personal
injury or damage to the equipment, before
installing equipment be sure that:
• The leveling jacks are extended to the floor.
• The full weight of the rack rests on the
leveling jacks.
• The stabilizing feet are attached to the rack
if it is a single-rack installation.
• The racks are coupled together in
multiple-rack installations.
• Only one component is extended at a time.
A rack may become unstable if more than
one component is extended for any reason.
WARNING! The enclosure weighs
33.6 kg (74 lb) full. At least two people are
required to lift, move, and install the enclosure.
If only one person is to perform the installation,
remove the power modules and hard drives from
an enclosure before installing it, and if possible
position it on top of another device or shelf in
the rack to hold it as you attach all the brackets.
Please note that hard disks are RAID parity
initialized. If disks are removed, they MUST be
returned to the same physical slots.
CAUTION: Make sure that the rack and all
equipment mounted in the rack has a reliable
ground connection. Verify that the total current
of the rack components does not exceed the
current rating of the power distribution unit or
outlet receptacles.
Parts can be damaged by electrostatic
discharge. Keep parts in their containers until
needed. Ensure that you are properly grounded
when touching static sensitive components.
When positioning an enclosure in the rack,
ensure the air vents at the front and back of the
enclosure are not blocked.
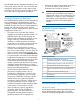
To install the capacity kit into the rack:
1. Install the side brackets onto the enclosures using
the instructions provided with the rack mounting
hardware kit.
2. Remove the blanking plates at the appropriate
rack positions. You may find it easier to work if
you remove several of the surrounding blanking
plates as well.
3. Install the rails into the rack using the instructions
provided with the rack mounting hardware kit.
The kit recommends installing components from
the bottom to the top of the rack; disregard those
instructions and use the positions given in “Rack
Positions” (page 3).
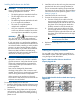
4. Install the enclosures into the rack.
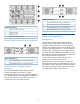
5. Connect the enclosure power cables:
a. Connect a black power cable to the left
power supply of each enclosure, route the
cables through the left side of the rack, and
plug them into a PDM (power distribution
module) mounted on the left vertical post.
b. Connect a gray power cable to the right
power supply of each enclosure, route the
cables through the right side of the rack, and
plug them into a PDM mounted on the right
vertical post.
IMPORTANT: Equally distribute the
current between the PDMs.
6. Replace the blanking plates to any unused rack
positions.
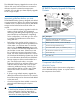
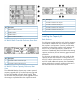
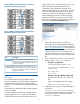
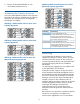
Cabling the Capacity Enclosures
You can add one to three capacity upgrade kits to
each B6000 couplet. Cable the capacity enclosures
using the figures and table below.
Figure 1 RAID Controller Enclosure A with One
Capacity Upgrade Kit
Figure 2 RAID Controller Enclosure B with One Capacity
Upgrade Kit
4