
HP Data Protector Configuring and integrating DP Cell Manager with Veritas Cluster Server on Windows


6
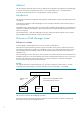
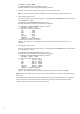
CellServer Virtual_NAME
C:\Users\administrator.IPR>omnisv –start
HP Data Protector services successfully started.
5. Manually import Virtual IS, and remove the physical IS server name of the node.
Note: You can also importing a client as installation server and client through the Data Protector GUI.
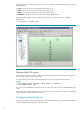
6. Stop the Cell Manager services.
Go to the command prompt to the following path “C:\Program Files\OmniBack\bin” and execute the
command “Omnisv –stop”:
C:\Program Files\OmniBack\bin>omnisv –stop
HP Data Protector services successfully stopped.
C:\Program Files\OmniBack\bin>omnisv –status
ProcName Status [PID]
===============================
rds : Down
crs : Down
mmd : Down
kms : Down
uiproxy : Down
omniinet : Down
Sending of traps disabled.
===============================
Status: At least one of Data Protector relevant processes/services is not
running.
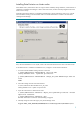
7. Start the Cell Manager services.
Go to the command prompt to the following path “C:\Program Files\OmniBack\bin” and execute the
command “Omnisv –start”:
C:\Program Files\OmniBack\bin>omnisv –start
HP Data Protector services successfully stopped.
C:\Program Files\OmniBack\bin>omnisv –status
ProcName Status [PID]
===============================
rds : Active [3288]
crs : Active [5636]
mmd : Active [1848]
kms : Active [2544]
uiproxy : Active [3408]
omniinet : Active [4888]
Sending of traps disabled.
===============================
Status: All Data Protector relevant processes/services up and running.
Note: Start the Cell Manager services only on the active node of the cluster, on which the virtual IP and shared
disks reside.
After configuring the Cell Manager on the first node of the cluster, stop the Cell Manager services, migrate the
VCS services to the second node of the cluster and follow the same steps to install and configure the Cell
Manager. Follow the same steps on all the nodes of the cluster.