
HP Data Protector Software Cell Manager Planning and Sizing
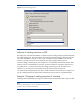


Table Of Contents
- Executive summary
- Solution description
- Cell Manager software topology
- IDB architecture
- Why should you configure the IDB?
- Regular IDB backups
- IDB notifications
- Limitations
- IDB Growth and Performance
- IDB key growth factors
- IDB key performance factors
- IDB key growth and performance parameters
- Influence of logging level on IDB
- Example: Changing of logging level for filesystem backup
- Influence of catalog protection on IDB
- Example: Changing of catalog protection of a backup
- Recommended usage of logging level and catalog protection
- Use different logging levels in the same cell
- Different logging levels for ObjectCopies
- Specifics for small cells
- Specifics for large cells
- Maintenance of DCBF directories
- Cell Manager hardware aspects to consider
- Cluster support for Data Protector software Cell Manager
- Security
- IDB space consumption example
- Cell Manager requirements
- For more information

You can browse directories and files before restoring, and Data Protector can fast position on the tape
when restoring a specific file or directory. The information does not occupy much space, since not all
file details (file attributes) are logged to the database.
Option value: Log directories
When this logging level is selected, all detailed information about backed up directories (names,
versions, and attributes) is logged to the IDB.
You can browse only directories before restoring. However, during the restore Data Protector still
performs fast positioning because a file is located on the tape near the directory where it actually
resides. This option is suitable for filesystems with many auto-generated files, such as news and log files.
Option value: No log
When this logging level is selected, no information about backed up files and directories is logged to
the IDB. You will not be able to search and browse files and directories before restoring
Example: Changing of logging level for filesystem backup
The logging level determines the volume of detail on files and directories written to the IDB during backup,
object copy, or object consolidation sessions, and the convenience of browsing data for restore.
Note:
You can restore your data regardless of the logging level used.
The default logging level is Log All
Note:
Logging levels are not available for disk image backup.
You can modify an already-configured and saved backup specification.
Steps:
1. In the Data Protector software GUI Context List, click Backup.
2. In the Scoping Pane, expand Backup Specifications and then expand the appropriate type of
backup specification (for example, Filesystem). All saved backup specifications are displayed.
3. Click the backup specification that you want to modify.
4. In the Options property page click on Advanced in the Filesystem Options section.
5. In the Filesystem options box, click on Other.
6. Select your desired logging level in the Logging drop-down menu
7. Click on Ok and then on Apply.
22