Integrating HP Data Protector 6.1 with SAN Virtualization Services Platform Table of contents Abstract .............................................................................................................................................. 2 Limitations........................................................................................................................................... 2 Introduction .................................................................................................
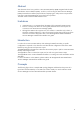
Abstract This document shows how to perform a Zero Downtime Backup (ZDB) integrated with the SAN Virtualization Services Platform (SVSP). To do this, we’ll be using the Virtual Service Manager (VSM) Command Line Interface (CLI) and the accompanying pre- and post-exec scripts. Please note that no typical DP ZDB agents are involved in this operation. The SVSP version mentioned and tested here is 2.1. Limitations • • • Instant Recovery is not supported until the SVSP is fully integrated in Data Protector.
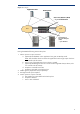
Figure 1: Concepts Application Host Backup Host Data Path Module (DPM) -- 2 per SVSP Domain SAN SAN Virtualization Services Managers (VSM) -- 2 per Domain During the ZDB the following actions take place: 1. Session pre-exec script is executed. a. (Optional) The database on the application host goes into Backup mode. Note: This should be done from within the application host through scripts which are not covered in this document. b. Point in time of the application host’s volume is created. c.
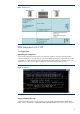
Figure 2: Backup flow ZDB Integrated with SVSP Configuration SVSP CLI support configuration A user name and password are used in any SVSP CLI operation as the first operation before running commands. For security reasons, you should define an SVSP user, which will run the CLI commands. To create an SVSP user through the VSM GUI and configure your SVSP system, see Appendix B. To check if your system is ready, test the interactive CLI (VSM_CLI.
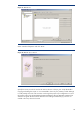
scripts into a different folder, but then you must use the full path in the Data Protector Backup Specifications instead of just the filename. Figure 4: Copy location The scripts must be edited to match your environment needs. Right click on the “svsp_pre_exec.bat” script and select edit.
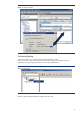
Figure 5: Virtual disk LUN Performing Backup This section shows how to create a backup specification from scratch. Select the Backup context in the Data Protector GUI and create a new filesystem backup specification by right clicking “Filesystem” and selecting “Add Backup….”. Figure 6: Add backup Select the “Blank Filesystem Backup” template and click “OK”.
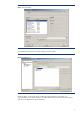
Figure 7: Create backup In the backup items panel, don’t select anything, just click “Next”. Figure 8: Backup items Select the device or drive that will be used for this backup and then click “Next”. It is recommended to use a device “directly” (via SAN) attached to the backup host (local backup) and also to the application host (local restore).
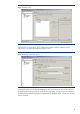
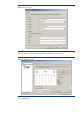
Figure 9: Backup device Optionally fill in a “Description” for the “Backup Specification Options” and then click the “Advanced” in the “Backup Specification Options” area. Figure 10: Backup specification options In the Backup Options panel, type the filenames of the pre-exec and post-exec scripts and select the backupHost.
Figure 11: Specify scripts Select the date(s) on which the backup should be performed and click “Next”. Figure 12: Backup scheduling Click “Manual add…”.
Figure 13: Manual add Select “Windows filesystem” and click “Next”. Figure 14: Manual object selection Specify the mount point which must be the same as the one in the pre_exec script described in Copying and editing the scripts”. It is recommended to have only one partition per disk although it could possibly also work with more than one through the proper script configuration. For more information refer to the HP StorageWorks SAN Virtualization Services Manager command line interface user guide.
Figure 15: Mount point There’s no need to select a Tree so simply click “Next”. Figure 16: Tree addition Enter your general object options and click “Next”.
Figure 17: General object options Give your advanced object options and click “Next”. Figure 18: Advanced object options Enter your Windows object options and click “Finish”.
Figure 19: Windows object options Review that the correct objects are selected. If there are more disks to backup, repeat the process decribed from Figure 13: Manual add until here and then press “Next” in the Review panel. Note that if you need to backup more than one disk, the scripts will need further modifications not mentioned here. Figure 20: Review backup Click “Save as…”.
Figure 21: Finishing template Specify the name of the backup specification and click “OK”. Figure 22: Save backup You can now run the newly created backup. A typical backup session output can be found in Appendix A. During the next time you open this backup specification, and try to expand the source tree a message will come up stating that there’s a reference to an inexistent mountpoint. Please click “Yes” to leave this orphan object in the backup specification.
Figure 23: Restoring Select Restore “As..” the drive and the location in which the data should be restored. Figure 24: Restore As Make sure that the destination is set to the application host.
Figure 25: Restore destination A confirmation window appears. Click “Finish” to start the restore session.
Appendix A Currently we use 4 scripts, 2 pre-exec and 2 post-exec. In each execution phase (pre- and postexecution), one file is the .bat file executed by Data Protector and the other serves as a template for the actual SVSP script executed by the .bat file. Both .bat files need to be modified to suit the actual environment, i.e. at least all the variables values enclosed in “<…>”. Note that the ‘<’ and ‘>’ signs must be removed as well.
CleanPiT: AllowExecErrors # --- Resume application (if applicable) DeletePiTOrSnapshot -name "_POINTINTIME1_", -TIMEOUT 10800 DisallowExecErrors ExitScript: Quit Sample Post-exec Scripts Filename svsp_post_exec.bat Contents cd "" vsm_cli -sd -I post_exec_%SESSIONID:/=-%.txt :: Delete session created scripts. del pre_exec_%SESSIONID:/=-%.txt.bak del post_exec_%SESSIONID:/=-%.txt.bak del pre_exec_%SESSIONID:/=-%.txt del post_exec_%SESSIONID:/=-%.
27-28/g" pre_exec_2009-05-27-28.txt C:\Program Files\OmniBack\bin>perl -pi.bak -e "s/_POINTINTIME1_/pit1_2009-0527-28/g" post_exec_2009-05-27-28.txt C:\Program Files\OmniBack\bin>perl -pi.bak -e "s/_SNAPSHOT1_/snap1_2009-05-2728/g" pre_exec_2009-05-27-28.txt C:\Program Files\OmniBack\bin>perl -pi.bak -e "s/_SNAPSHOT1_/snap1_2009-05-2728/g" post_exec_2009-05-27-28.txt C:\Program Files\OmniBack\bin>vsm_cli -sd my_domain admin password -I pre_exec_2009-05-27-28.
Operation ended successfully. Returned status: OK.
Time: 5/27/2009 6:34:16 PM Starting to execute "svsp_post_exec.bat" on host backupHost... C:\WINDOWS\system32>cd "C:\Program Files\Omniback\bin" C:\Program Files\OmniBack\bin>vsm_cli -sd my_domain admin password -I post_exec_2009-05-27-28.txt ============================================================================ >>> Selected VSM domain: 'my_domain' for user: 'admin'.
Appendix B In this section we will create an SVSP SANAPI virtual disk and a user for SVSP. Before we go on to the VSM GUI you should install the VSM CLI Library on the system used (in our example the backup host). Figure 27: VSM CLI installation To access the VSM GUI: 1. Connect your Internet browser to :, where is the IP address of the VSM server, and is the TCP port number through which the VSM server is exposed to the IP network. 2.
Figure 28: SVSP login After a successful login the VSM client window appears. Figure 29: Main Screen To create a VSM CLI Virtual Disk and assign it to the server, select Tools > Maintenance.
Figure 30: Maintenance Click Create SANAPI Virtual Disk. Figure 31: Configuration manager Enter the name of the Virtual Disk and click Next.
Figure 32: Virtual Disk name To select the storage pool and the size of the virtual disk: 1. In the top area of the screen, select a storage pool from which you wish to create the Virtual Disk. 2. Click Add. The object you selected appears in the lower area of the screen. If you want to deselect the object, select the object in the lower area and click Remove. 3. In the lower area, double click on the disk capacity to change it. 4. Click Next.
Figure 34: Host presentation Select the LUN used for the disk and click Next. Figure 35: LUN Confirm your settings and click Finish.
Figure 36: Create SANAPI Virtual Disk You should also check if the disk is presented to the host that is going to use it. This can be done in Computer Management (right click my computer and select manage). Then select the Disk Management and search for the disk. Figure 37: Computer management To create a user go to the navigation tree and expand the “User Management” node. Right-click “User” and select “New”.
Figure 38: New user The “Create User” wizard opens for entering the “User parameters”. 1. In the “User name” field, enter a name for the user. 2. In the “User password” field, optionally enter a password for the user. 3. If you entered a password, reenter the password in the “Confirm new password” 4. In the “User e-mail” field, optionally enter the e-mail address for the user. 5. Click “Next”. Figure 39: User parameters A confirmation screen appears. Click “Finish”. The new user is created.
Figure 40: Add user By default, the VSM client automatically adds new users to the read-only user group. Right-click the user to which you want to assign permission to access objects and select “Set Permissions”. Figure 41: Setting permissions The Set Permissions wizard opens to the Set Permissions To Object(s) screen. 1. In the Select Permission Type dropdown list, select the type of permission you want to assign to the user for the objects that you will specify. 2.
Figure 42: Setting permissions type A selection screen appears displaying the objects of the type that you selected. For example, if you selected Virtual Disk from the Select Object Type dropdown list, the Select Virtual Disk(s) screen appears. 1. In the top area of the screen, select an object to which you would like to assign the user permission. 2. Click Add. The object you selected appears in the lower area of the screen.
A confirmation screen appears. Click Finish. The user now has permission to access the objects specified.
For more information For more information on HP SVSP, please visit: www.hp.com/go/svsp Further reading • Learn more about HP StorageWorks virtualization at: www.hp.com/go/StorageVirtualization • You can find white papers about the EVA and other HP StorageWorks array solutions at: http://h18006.www1.hp.com/storage/arraywhitepapers.html • SNIA Virtualization Tutorials: http://snia.org/education/tutorials/ © 2009 Hewlett-Packard Development Company, L.P.