hp designjet hp designjet 815mfp scanner 4200 user’s reference guide
legal notices notice The information contained in this document is subject to change without notice. Hewlett-Packard makes no warranty of any kind with regard to this material, including, but not limited to, the implied warranties of merchantability and fitness for a particular purpose. Hewlett-Packard shall not be liable for errors contained herein or for incidental or consequential damages in connection with the furnishing, performance, or use of this material.
contents welcome to the hp designjet 815mfp/scanner 4200 ...................... 1 how do I make copies?............................................................... 2 quick copying ...................................................................................... 2 how do I set the printer media width? ..................................................... 3 how do I select an original template?...................................................... 4 how do I set the input size?........................
how how how how how how how how how how how do do do do do do do do do do do I I I I I I I I I I I connect to a network?............................................................ 35 configure TCP/IP settings? ...................................................... 35 create a workgroup?.............................................................. 37 automatically log in (in network configuration)?......................... 38 set the scanner system power up/down timer? ..........................
tell me about accounting ..................................................................... 69 tell me about WIDEsystem ................................................................... 71 tell me about copy and layout features and options ...................... 73 tell tell tell tell tell tell tell tell tell tell me me me me me me me me me me about about about about about about about about about about the copy size ..................................................................
iv hp designjet 815mfp & scanner 4200
welcome to the hp designjet 815mfp/scanner 4200 In this guide we present all you need to know to use your HP Designjet 815mfp or Scanner 4200. Information is organized in three major categories. how do I…? …helps you carry out procedures, like loading media, making copies, or maintaining your scanner. the problem is… …helps you solve problems that may occur while copying/ scanning. tell me about… …contains reference information about your scanner.
how do I make copies? quick copying If you are copying a freshly printed plot, make sure that it has dried completely before placing the document in the scanner insertion slot. If it is not dry, you could damage your plot and dirty the glass plate on your scanner. Remember to set your printer media width in your copy system software. See how do I set the printer media width? on page 3. to make copies… 1. Place the document face down with the intended top edge forward in the scanner insertion slot.
If a new Account has been created, every time you press: the Copy button, the Scan to file button, or the Collate copy button the Account dialog list opens for you to select an account. See tell me about accounting on page 69. You can preview the image before printing. The preview will give you a “What You See Is What You Get” (WYSIWYG) picture of your copy. Press the Preview button to load a preview of your copy. Use the Stop button to cancel the current copy process.
3. Select the Unprintable Area button (or the Tool button and then the Unprintable Area button if Setup tab > Options > Quick select lists is selected). 4. Press the Media width button to enter a new value and press the Enter key to confirm. 5. Select OK to finish. how do I select an original template? 1. Press the Type of original button in the Copy tab dialog. 2. Select from the list a Type of Original template that best describes your current input.
2. Press the Input size button to open the input size menu. You can use Auto size detection for input size, standard sizes or custom size presets. Press the dialog’s Input size button to display the list of available sizes. 3. Select an input size or use the Tool button size setup dialog. to open the Input 4. To set the input size you can: • Specify the width and length. The original’s width can be read off the ruler at the scanner’s insertion slot.
prescan of the original and copying thus requires more time than with manual size settings. 5. Press OK to return to the Copy tab. see also tell me about the copy size on page 73 how do I set the output size? on page 6 how do I set the output size? 1. Press the Copy tab. 2. Press the Output size button to open the Output size menu. You can use Auto size detection for output size, standard sizes or custom size presets. 3. Select an output size or use the Tool button Output size setup dialog.
4. To set the output size you can: • Specify the width and length. The original’s width can be read off the ruler at the scanner’s insertion slot. • Select Auto Width and/or Auto Length to let the scanner detect the physical input width and/or length of the inserted document. • Press the dialog’s Output size button to display the list of available sizes. Both Auto Width and Auto Length can be applied for total output size detection.
Normally, only stiff media will affect stitching. Flexible media will usually be stitched correctly regardless of thickness. If the lines seem uneven, do the following: 3. Select the Setup tab. 4. Select the Scan Options button. 5. Select Scanner Setup. 6. Select the Extended Thickness tab. 7. Check the box labeled Use extended thickness paper handling. 8. Change the value for each of the scanner’s cameras— normally, only positive values should be used. 9.
to change the insertion slot height… 1. Open the insertion slot cover. 2. Press down on the platen as you pull first one slider and then the other (left and right) towards the scanner’s center until the media thickness adjustment sliders found at each side are the same setting. 3. Close the cover. To return the insertion slot height to its Normal position: 1. Press down on the platen as you push first one slider and then the other (left and right) towards the sides of the scanner. 2.
3. Select the media profile from the list. see also how do I create a new media profile? on page 33 how do I set the output quality? 1. Press the Copy tab. 2. Press the Settings button. 3. Press the Copy Quality button.
4. Select an output quality or select the Custom button to define a new one. 5. For scanning, select an output quality or press the Custom button to define a dpi setting for your scanner output or, if one is active, press the dpi button to change the dpi setting. 6. For printing, select an output quality or press Manual to let the printer control output quality. 7. Enter a value and press the Enter key. 8. Press OK to finish.
2. Press the Scale button to display the list of standard or customized scaling factors predefined in your system. 3. Select the Scale value that fits your copy intentions. A Scale factor of 100% makes a 1:1 duplicate. Below 100% reduces the image in the copy and above 100% magnifies it. 4. Press OK to return to the Copy Tab. tip Make a fast miniature version of your big copy by setting the Scale factor to 25%.
• to another Folder group, press the File Folder button. In the Change Folder dialog you can: • use the arrows to select the folder on your disk. • use the folder up button (marked “..”) to move up a level. • create a new folder in the current folder with the New Folder button. • press a folder name to move your search to that folder’s level. Click OK in the Change Folder dialog when you have selected the destination folder for your file. 3. Press the Scan to file button process and save the image.
how do I use copy options and tools? how do I use the previewing tools? The Preview button time it is selected. loads a fresh preview of the copy each The loaded image always uses the last settings made and the effects of the settings will be visible in the new preview. This feature allows you to fine-tune your settings as you watch them take effect before committing the copy to print. to display the whole image You can use the Zoom All tool to view large format originals in the preview window.
When activated, the Resize Paper Frame Tool partitions the areas around the paper frame into sections. When a section is touched, the closest frame side or corner is resized to the new position. to move the image There are two ways to use the move image tool: • Dragging: Dragging anywhere in the image window. Imagine you are gripping hold of the image and dragging it around inside the window. • Centering: Touch a point on the screen and that point will then be centered in the preview window.
to align the image The original may have been inserted slightly off balance and appears crooked in the preview window. Correcting this does not mean you have to reload the original and start again. Use the perfectly aligned sides of the paper frame as references when realigning. Press the Align Left tool to tilt the image left. Press the Align Right tool to tilt the image right. Press the Copy button to output the image as you realigned it in the preview window.
how do I collate copies—create copy sets? The Collate Copy function allows you to group your copies into sets, and then output a selected number of these sets on your printer. All the previewing and enhancement options available for single document copying are also available when using Collate Copy. collate copy—copy sets 1. Insert the first document of your set into the scanner. 2. Make your copy settings in the Copy tab dialog.
tip For jobs that require a high level of control and flexibility, use the Scan tab and Print tab to create and print your copy sets. how do I use nesting? 1. Select the Setup tab. 2. Select the Layout button. 3. Select the Nesting option. 4. Make your nesting settings. 5. Make your Copy tab and Setup tab settings (such as Type of original, Margins, Lightness, Media profile) as with normal copies, or else select the files for copying from your print list.
how do I use paneling? 1. Select the Setup tab. 2. Select the Layout button. 3. Select the Paneling option. 4. Make your paneling settings. 5. Set your large Output size in the Copy tab. Your Output size value is set to the size you want for the end result: that is, the size of the total image after the panels are assembled. 6. Make your Copy tab and Setup tab settings (such as Type of original, Input/Output Size, Margins, Lightness, Number of copies, Media profile) as with normal copies. 7.
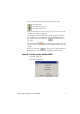
setting up the print list 1. Press the Print tab. You can use the Clear List button to start afresh with an empty list. 2. Press the Add to List button to reach the Add Files to List dialog shown below: Only a folder's image files will be shown. Select files for the Print List by checking the box to the left of the file name. The folder up button (marked “..”) will move you up a level. Clicking on a folder name will move you onto its level.
• View will display the file’s image in the preview window. Previewing can be canceled by pressing the Stop button. 3. Press OK when you have selected the files you want in your Print list. You can also put only one file in your list if you want to print a single file. You can always go back and add more files from another folder with the Add to List button. how do I print from files? Printing your files is set up and controlled through a convenient Print List. to print from files 1. Press the Print tab.
the Print button, the Copy button, the Scan to file button, or the Collate copy button the Account dialog list opens for you to select an account. See tell me about accounting on page 69. The scanner software’s print from file functionality is designed specifically for printing files created with the scanner software’s Scan tab and is not recommended for outputting files from other sources.
3. Select (press) a file name in the list to change the file’s settings. The following context menu appears. • Remove: removes the selected file from the list (not from your disk). • Output Size: selecting this option takes you to a dialog similar to the Input Size, Output Size and Scale button group found on the Copy Tab. The file’s Input size is retrieved from information in your file and you have the option to rescale the original size in the output copy. Use Output size or Scale to resize the copy.
how do I maintain/recover my system? maintenance procedures Maintenance procedures should all be performed in a single maintenance session, starting with Cleaning the scan area and ending with Camera alignment and calibration. The scanner maintenance procedure should be performed once per month. cleaning the scan area 1. Turn the scanner power off. 2. Disconnect the scanner power cable. 3. Open the scanner cover.
Press down on the platen as you pull the left and right sliders towards the scanner’s center until the metal safety buttons on each side of the scanner, pop up. 5. Use the two handles to lift out the pressure platen as soon as you feel the sliders disengage. 6. Gently wipe the glass plate. Caution: do not use abrasives, acetone, benzene or fluids that contain these chemicals. Do not spray liquids directly onto the scanner glass plate or anywhere else in the scanner.
The white scanning area background platen is on the backside of the pressure platen you removed. 7. Turn the pressure platen, which was removed in step 4, upside down. 8. Clean the white platen. Caution: do not use abrasives, acetone, benzene or fluids that contain these chemicals. Wipe the white metal area with a lint-free cloth and a mild, streak-free, glass cleaner. 9. Clean the platen rollers. Caution: do not use abrasives, acetone, benzene or fluids that contain these chemicals.
10. Dry the platen and rollers completely using a separate clean, dry lint-free cloth. 11. Replace the pressure platen. Lift the pressure platen into its original position. Press down on the metal safety buttons to let the two sliders move back and lock the platen into place. 12. Close the scanner cover. Now continue with the camera alignment and calibration procedure.
1. Connect the scanner power cable. 2. Power ON the scanner. The scanner should be warm. Make sure that the scanner has been turned on for at least one hour prior to camera alignment and calibration. Slight light intensity changes and camera shifting can occur just after turning the scanner on and the warm-up time will ensure that light conditions and camera heights have stabilized. 3. Select the Setup tab. 4. Press the Scan Options button. 5.
The maintenance wizard will guide you step by step through the whole maintenance process: Camera Alignment, Stitching, and Calibration. 6. Insert the Maintenance Sheet that came with your system. The wizard will ask you to insert the Maintenance Sheet that came with your scanner. The sheet’s printed side must be inserted face down. Align the midpoint arrow with the scanner’s midpoint arrow and feed the sheet into the scanner. 7.
2. Power OFF your touch screen and then power ON again. Once recovery has started, it is automatic. A menu will appear providing options—you must ignore it. 3. When recovery is complete, remove the System Recovery CD. 4. Power OFF your touch screen and then power ON again. 5. Perform System Maintenance. See maintenance procedures on page 24. how do I calibrate my touch screen? 1. Press the Quit button scanner software. and select Exit to exit your 2. Press the System Setup button. 3.
how do I customize my copy tools? how do I define an original template? 1. Press the Copy tab. 2. Set the copy mode to Color or B&W. 3. Press the Type of original button to open the Type of original (template) menu. 4. Use the Tool button to open the Type of original Setup dialog. If a preview of the copy is currently loaded, the Type of original Setup dialog will start up with the Image Filter Preview and split screen for online assessment of your change’s effects. 5.
6. Enter the name for your new template. Select a name that represents the type of copy job you are working with, such as “Fruit Photos”. 7. Press the Save button to create the new Type of Original template. Your new Type of Original template will be added to the list of those already available. You can start with one of the predefined Type of Original presets that is closest to your original, save it under a new name and then change it to fit your specific needs. Use the preview to test your settings.
4. Set a name for your new scale. 5. Press the Value button and set the scale value. 6. Press the Save button and then OK to confirm. Your new scale will join the standard scales in the Scale presets list. how do I create a new media profile? Before starting the following procedure, make sure that you have color-calibrated the scanner, and make sure that the media profile you intend to create is not there in the list already. to create a new media profile… 1. Press the Setup tab. 2.
4. Press the Calibrate RIP button. 5. Set the ink level and the gray balance, then press OK to return to the Media Setup menu. For details, see tell me about calibrating RIP settings on page 97. 6. Press the Print Color Sheet button to print a color patch reference sheet. 7. Load the color sheet into the scanner face down, aligning the arrow to the 10.5-inch mark (26.7 cm) measured from the right side of the scanner. 8. Press the Name and Scan Sheet button to assign a name to your new media profile. 9.
how do I set up the system? how do I connect to a network? 1. Connect the RJ45 network cable to the Ethernet port at the back of your touch screen. 2. Check your TCP/IP settings. 3. Create a workgroup on the network. 4. Share the Images folder in your touch screen so that it can be accessed by other computers on the network. You will probably want to connect your printer to the same network. See your printer’s documentation for further information.
4. Double-click on Local Area Connection. The Local Area Connection Status dialog box will appear. 5. Click the Properties button. The Local Area Connection Properties dialog box will appear. 6. Select (single-click) Internet Protocol (TCP/IP), and click the Properties button. The Internet Protocol (TCP/IP) Properties dialog box will appear. 7. If you know that your network has a DHCP or BOOTP server, you can select “Obtain an IP address automatically” and “Obtain DNS server address automatically”.
Panel. But, in this case, add 50 to the fourth (final) part of the IP address. If the resulting number is greater than 255, change it to 255. 8. Click OK until all dialog boxes have closed. You have now configured your TCP/IP settings. how do I create a workgroup? You need to create a workgroup in order to Scan to Network. to create a workgroup… 1. Press the Quit button scanner system software. and select Exit to exit your 2. Press the System Setup button. 3. Press the Network Domain button.
how do I automatically log in (in network configuration)? This procedure must be performed by System Administrators only, and is applicable to the scanner in network configuration. to log in automatically… 1. Press the Quit button scanner software. and select Exit to exit your 2. Press the Start button on the Windows taskbar, and select Run. 3. Type regedit and then press the OK button. 4.
to set the scanner system power up/down timer… 1. Press the Quit button scanner system software. and select Exit to exit your 2. Press the System Setup button. 3. Press the WIDEsystem button. 4. Select the Timer tab. 5. To activate the automatic power on, in the On column select the check box for the day. 6. To modify the time, select the hours digits and press the up or down buttons and then select the minutes digits and repeat the process. 7. Select AM or PM, and press the up or down buttons. 8.
2. Press the Scan Options button. 3. Press the Scanner Setup button. paper load 1. Select between Manual load or Automatic load. 2. Set the delay factor for automatic paper loading to give you time to position the original correctly. See paper loading on page 81. media offset To get very high accuracy, modify the vertical precision from zero to a value between -1% and 1%.
Positive settings mean that the distance between scan lines will be increased, and negative settings mean that the distance between scan lines will be decreased. When you exit the Scanner Setup dialog, the modified value is stored in non-volatile memory in the scanner and can only be changed by re-doing the setup. See correction factor in scanning on page 81. extended thickness settings Normally, only stiff media will affect stitching.
3. In the Accounting dialog, press the New button. 4. Enter and accept a name for your new account. The new account will automatically become the currently active account. Every time you press the Copy button, the Scan to file button, or the Collate copy button the Account dialog list opens for you to select an account. to delete an account… 1. Press the Setup tab. 2. Press the Account button. If Setup tab > Options > Quick select lists is selected, then press the Tool button. 3.
3. In the Accounting dialog, press the Disable button. 4. Select the Disable button and press OK. how do I select/activate an existing account? Only one account (besides the Total account) can be active at a time. to activate/select an existing account… 1. Press the Setup tab. 2. Press the Account button. 3. In the Accounting dialog, press the Account you want. A list of existing accounts appears. Use the arrows to scroll through the list and press on an account name to select it. 4.
how do I set preferences? units of measurement Before setting any size parameters, you should determine the unit of measurement (millimeters, centimeters, or inches) you prefer to use throughout the application. To set your preference of size measurement units: 1. Press the Setup tab. 2. Press the Options button and then the Units of Measure button. 3. Select the preferred units: millimeters, centimeters, or inches. loading preferences To set loading preferences: 1. Press the Setup tab. 2.
2. Press the Scan Options button or the Options button. see tell me about the scan options on page 65 tell me about the user interface options on page 66 how do I change the scanner system interface language? 1. Press the Quit button scanner software. and select Exit to exit your 2. Press the System Setup button. 3. Press the Change Language button. 4. Select the language from those available.
2. Select the Printer button. 3. Select the Printer Setup button (or the Tool button and then the Printer Setup button if Setup tab > Options > Quick select lists is selected). 4. Check the Printer profile radio button in the formatting part of the window. 5. Select OK to finish.
the problem is with the scanner the problem is the diagnostics light is flashing An error is detected by the built-in diagnostic. 1. The scanning area needs cleaning. For cleaning instructions see maintenance procedures on page 24. 2. If the Diagnostic light continues to flash after maintenance, then there may be camera position errors. See tell me about hp customer care on page 90.
the problem is the wait and diagnostics lights are flashing Simultaneous flashing by both the “Diagnostic” and the “Wait (Warm-up)” lights may mean that that the scanning area needs cleaning. 1. For cleaning instructions see maintenance procedures on page 24. 2. Restart the scanner after cleaning. If the Diagnostic and the Wait lights continue to flash after cleaning and restarting, then there may be camera position errors. See tell me about hp customer care on page 90.
the problem is a software system error the problem is no scanner was found 1. Check that the scanner power is ON. 2. Check that the FireWire cable between the scanner and the touch screen is inserted correctly. 3. Press the Rescan button. the problem is an error message and error code The following table lists error messages, error codes, and the recommended course of action in each case. If the recommendation does not solve your problem, try restarting the system.
message code recommendation No scanner was found. none Check that the scanner is powered on, and that the FireWire cable between the scanner and the touch screen is correctly connected at both ends. Then press the Rescan button. The printer cannot be detected. none Check that the name of the printer is displayed on the printer button in the Setup tab, that the printer is powered on, and that the printer is connected to the scanner.
message code The scanner is currently on standby. Please press the soft power button on the scanner to activate it. recommendation 8 Press the button. Error printing colorsheet 1003 Check the printer. Error detecting index-mark 1013 Reinsert the sheet and ensure it is aligned correctly and in the right position. Sheet bad aligned 1014 Reinsert the sheet and ensure it is aligned correctly and in the right position. Error detecting left margin 1015 Reinsert the sheet.
the problem is a printing error message If you see a printing error message, the printer cannot be detected. 1. Select the Setup tab and check that the printer is displayed next to the printer button. If it is not, see how do I set up my printer in my scanner system software? on page 45. 2. Check that the printer is powered on. 3. If you have an HP Designjet Scanner 4200, check that the printer is connected to the network.
the problem is with the interface language if the user interface is not in the correct language When you installed your scanner system, the wrong language was installed in the final step. You need to change the interface language. See how do I change the scanner system interface language? on page 45. the problem is with the touch screen if you have problems pressing buttons on your screen You need to re-calibrate your touch screen. 1. Press the Quit button scanner software.
the problem is what is printed the problem is a cropped image If your image is cropped and no error message was displayed, make sure that you have set the media width for your printer in the copy system software. See how do I set the printer media width? on page 3. the problem is white space with nesting If there is space for another image on your media when using nesting, then make sure you have set the printer media width in your copy system software. See how do I set the printer media width? on page 3.
tell me about my scanner tell me about my scanner operator panel and lights The scanner’s operator panel shown above is divided into two main areas: • scanner control area with 1 key and 3 red/green indicator lights. • paper control area with 2 keys and 1 red/green indicator light. scanner control area power button and indicator light When you connect the scanner to the power outlet it starts up in ON mode: the light is green.
If the Diagnostic and the Wait lights continue to flash after cleaning and restarting, then there may be camera position errors that require professional service. wait light The Wait light comes on when the scanner power is turned on, and stays on during the internal diagnostic and stabilization phase. The Wait light reveals the status of the scanner’s self-adjustment procedure, which consists of both stitching and light profile adjustment.
will take place automatically as soon as the original enters the insertion slot. A delay factor can be set for automatic paper loading giving you time to position the original correctly. Pressing the Paper Forward Key during scanning will stop the scanning process and the original will be fed through the scanner while the key is held down. The Reverse key stops the current scanning process and reverses the original. The original will be fed backwards through the scanner while the key is held down.
Calibration is the process of setting the scanner device to known color conditions so that it performs in accordance with an established standard. When you calibrate your scanner to the ANSI IT8 color standard, you minimize color deviations between scanned ANSI IT8 reference color patches (on the IT8 Calibration reference sheet) and known color reference values. The calibrating wizard lets you select between sRGB and NTSC color spaces.
see also maintenance procedures on page 24 tell me about the scanner insertion slot You can change the insertion slot height from 2 to 16 mm (0.08 to 0.63 inches). The Normal position (Step 0: 2 mm/0.08 in) is detected by a sensor in the scanner. The insertion slot is marked with a measurement ruler for inches and millimeters. The ruler corresponds to right side aligned original loading. Just below the ruler are marked common standard sizes that help guide you with optional centered loading.
tell me about scanner operating modes The scanner can work in the following operating modes: • RGB mode • graytone mode • B/W modes • 2D-sharpening, 2D-softening, and 2D-blur rgb mode Full 24-bit true color mode for 16.8 million colors. Use the true color mode for precise reproduction of all color shades. This mode creates large files, especially when scanning large formats.
by adding toned shades of gray in regions between black and white.
tell me about my scanner software tell me about the hp designjet scanner software The application is designed to interface your scanner with your printer for large format copying. The scanner software is a powerful, professional tool enabling easy production of vivid high quality color corrected copies and also exploits the scanner’s monochrome enhancement features for demanding black and white copy assignments.
• Extra flexibility with 2-step copying through scan-to-file and print-from-file options. • Advanced layout selections: paneling for combining largeformat image sections to create huge enlargements and Nesting for economizing usage of expensive printing media. • You can save time by making copies on two printers simultaneously. You define your Synchronous Printers though printer setup options.
• The Account option in the Setup tab. • The Print tab. entering numbers and names There are some dialogs and option fields in the scanner software that will require written values or texts. These are especially common in connection with customizing and creating new presets. The scanner software incorporates two types of on-screen keyboards: a text keyboard and a value keyboard. They appear in the touchscreen interface whenever written information is required to set the option.
tell me about the scan options preview dpi Determine the image resolution (between 50 and 300 dpi) for on screen previewing. Lower resolutions give faster previewing. scan speed Sometimes, the performance of your workstation will cause the scanner to make repeated “back-ups” during scanning in order to ensure correct and continuous processing of scanned data. Backups can be avoided by reducing the maximum scanning speed thus refitting the scanner’s performance to that of your workstation.
load With this option you can select whether to load your original in the center of the scanner or aligned to the right. See loading preferences on page 44. auto-size method There are two methods the scanner software can use to detect the length of the image: Paper detects the end of the paper by mechanical means, while Image performs a prescan of the image and uses software to work out the length of the prescanned image.
color balance This option tells your scanner software whether to display color values in Cyan, Magenta, and Yellow, or Red, Green, and Blue when setting Type of Original options. paper lists show This option tells the scanner software whether to display paper sizes (dimensions) or paper titles (such as E-0, A3) where possible.
activate the Input Size Setup dialog, and the Input size button in the Input Size Setup dialog will activate the Input Size dialog. print settings Checking this option tells the scanner software to print out an overview of all your settings together with the copy. enable reprint In the Copy Settings dialog box is a Reprint button, which can be enabled or disabled here. If Reprint is enabled, it will reprint the last image printed.
can create or change accounts and passwords on the system (or turn off this option). Other users must select an account and give the correct password for that account in order to use the system. If this option is deselected, any account may be freely created or used by anyone, without giving a password. paper series You can determine which types of size presets you want to appear in the size preset list through the Setup Tab dialog.
accounting criteria The activities that update an account are: Copy, Collate Copy, Scan to File, Print from File. The accounting system records the number of times the system scans, prints, and copies (straight-through scan and print). Scan to File updates only the scan fields, Print from File only the print fields, while Copy and Collate Copy update both. The number of square feet or square meters for scanning and printing activities are calculated from the Input size and Output size settings.
tell me about WIDEsystem WIDEsystem is an application designed to monitor and control the functionality of your scanner and contains the drivers required by your system. Its main features are: • View the scanner system’s status, called the Scanner Mode, by exiting your scanner system and on the Active Desktop, selecting the WIDEsystem scanner icon on the system tray. Status messages include remaining warm-up time, interface connection errors, and an indication that the scanner is ready for scanning.
standby. See how do I set the scanner system power up/down timer? on page 38. • View information on the scanner system’s firmware and hardware revisions. The information helps you keep track of your upgrades and is useful for support purposes. • Initiate a scan of the SCSI or USB interface bus.
tell me about copy and layout features and options tell me about the copy size overview The Input size, Output size, and Scale settings work together to determine the image capture area and the size of the resulting copy. The three are connected and changing one will automatically adjust the others following a defined order. You can select your size values from a list containing standard and custom predefined sizes.
input size/output size settings The Input size setting determines the scope of the scanner’s image capture area. You can use the variable Input size setting to capture selected portions of the original and thus make printed copies of specific image details. You also might want to print small strips of difficult areas for testing purposes before committing the whole copy to the printer. The Output size setting refers to the printed result.
For most copy assignments, the HP Designjet scanner software contains standard Type of original templates with optimal default settings. For example, a brochure is typically a mix of photos and text while maps are line-oriented. To make small adjustments to a standard Type of original template or to define one of your own, see how do I define an original template? on page 31.
lightness This same setting can also be accessed directly from the Copy tab dialog. The default Lightness value is set to zero which works well with most documents. You can change this value to make the copy lighter (positive value) or darker (negative value) and compensate for dull or faded originals. saturation Saturation indicates the intensity of a hue, or in other words the strength of a color. A high saturation makes a color’s hue more intense than the same color with a low saturation value.
background clean value. As with black enhance, background clean should be used with caution, as it can also affect some of the other light colors. Both black enhance and background clean function as ‘cutoff’ values in which pixels under or over a certain value are affected by the setting. You define cutting points on a scale of low to high lightness measured in values from 0 to 255. The default value of both options is zero (no effect).
tell me about copy quality settings This facility is available from Copy > Settings > Copy quality > Custom. scanning and printing quality settings The Custom button leads to options for making scanner and printer quality settings separately. For each device you can select standard Fast, Normal, Best settings.
tell me about unprintable areas ‘account for unprintable area’ option The margins we set in the Setup tab dialog are the copy’s ‘output margins’. But the printer itself also creates margins. The size of your printer’s margins or so-called ‘unprintable area’ depends on the printer model and cannot be changed. You should consider the printer’s margins as your minimum margins and they will be in your output whether you want them to or not.
If you do not select ‘Account for unprintable area’: • The output margins you set will be added to the printer’s and applied as if measuring inwards from the paper’s physical edges. • Only the specified output margins will crop the copy as displayed in your preview. You would typically want to use precise margins when copying on standard-format-sized sheets manually fed into the printer. When you print on paper rolls, you will often have to cut out the copy anyway.
paper loading manual/automatic With manual loading, you position the original in the slot and then press the down button on the scanner. With automatic loading, the scanner detects and loads the original as soon as you insert it. See how do I define scanner setup options? on page 39. side/center You can load your original into the scanner from the scanner’s center or side. Center loading is handy with standard sized originals (A4, A3, E-size, and so on).
If you require very high accuracy, you can modify the vertical precision to a value between -1% and 1%. Positive settings mean that the distance between scan lines will be increased, and negative settings mean that the distance between scan lines will be decreased. When you exit the Scanner Setup dialog, the modified value is stored in non-volatile memory in the scanner and can be changed only by re-doing the setup.
• Overlap: determines the width of the overlap areas—that is, the edges that contain equal image data on two adjacent panels. Large, heavy panels will need wider overlap and gluing areas than smaller panels. • Glue Marks: small gray arrows are printed on the panel’s edges to help guide you when you connect the panels. The glue marks will hardly be distinguishable in your large copy. The arrows vary in size: the larger the Overlap width, the larger the arrows printed. Maximum arrow size is 1" high.
glue mark arrows After cutting the edges at the cut line, bring your panels together by overlapping with the rightmost panel on top of the panel on its left. The second panel in a row overlaps the first panel, the third overlaps the second and so on. Use the glue mark arrows to fit and glue the panels together with perfect seams (see the illustration below). You assemble the panels by bringing the arrows printed on the overlapping panel down on top of the arrows printed on the underlying panel.
tell me about nesting Often you will need to make sets of copies that only take up a fraction of the full printer width. Normally, multiple printing of “notso-wide” copies on large format media (rolls or sheets) will result in considerable paper waste as each new copy is output on a new strip starting at the left edge of the paper. With Nesting you can fit multiple copies side by side using the roll/ sheet width optimally and economically.
nesting will give equal results no matter how the files are ordered in the print list. tell me about previewing and the paper frame previewing Creating a preview is not absolutely necessary. If you know your settings work well with the current original, then you can skip previewing. The Preview button can be pressed at any time, and always creates a fresh preview of the whole image while using the currently active settings.
the paper frame The paper frame defines the area of the image that will be copied. Its size is determined by the size settings made in the Copy Tab dialog. Your scanner software let you position the paper frame directly in the preview and thus visually set your copy area.The paper frame in the preview window fulfills two functions: • It frames the area in the original that will be copied. • It shows how the margins will crop the image in the end result.
The paper frame gives a complete “What You See Is What You Get” (WYSIWYG) impression of your copy. The frame’s visual outer boundaries are determined by the Input size setting. The area inside the frame shows what will be copied. The frame’s thickness visualizes the margins in relation to the copy’s size and shows how they crop the image. With margins at the value of zero, a thin frame will still be displayed to show the capture area.
tell me about lists creating and printing lists You can select single or multiple files for printing by putting one file or many files in your list. Multiple selections enable you to use business hours to create files for copying and then let the program print your copies overnight. You can set the number of copies you want by defining the number for each file individually, by determining the number of sets (how many times the whole list will be printed), or by using a combination of both.
tell me about hp designjet support tell me about hp customer care As your strategic support partner, we make it our business to help keep your business running smoothly. HP Customer Care offers award-winning support to ensure you get the most from your HP products. HP Customer Care provides comprehensive, proven support expertise and leverages new technologies to give customers unique end-to-end support.
• The printer you are using with your scanner (the product number and the serial number, found on the label at the back of the printer). • Any special equipment or software you are using (for example, spoolers, networks, switch-boxes, modems, or special software drivers). • The cable you are using (by part number) and where you purchased it. • The software driver and version you are currently using.
tell me about www.designjet.hp.com HP Designjet Online is a free, Web-based user club exclusive to HP Designjet users. Having registered, the user has unrestricted access to a range of useful services, the emphasis being on ‘useful’, as this is definitely not a sales-oriented site. • Direct access to HP and the information you want, when you need it. • Register now! Go to the HP Designjet Online Web site at: http://www.designjet.hp.
tell me about media tell me about copying thick media There are a number of factors that affect copying of thick media: • media thickness positions • modifying stitching parameters • treating edge distortion • supporting thick originals media thickness positions Auto-adjustment of the scanner’s light profile, stitching, and so on only takes place with the insertion slot in the Normal position. With extended media thickness positions, the last performed autoadjustment is stored and utilized.
supporting thick originals To facilitate scanning of thick originals in the extended media thickness positions it is important to insert the original center aligned and to help support the original during scanning. This should be done both at the entrance side and the exit side of the scanner. Specially designed support tables can be attached behind the scanner for those who perform a lot of thick media scanning.
tell me about paper sizes Select by: • series • area (size) series Series Name Size Size Area Area Aspect Mpixels inches mm in² mm² ratio 300 dpi ANSI A 8.5×11 216×279 93.5 60322 1.29 8.03 ANSI B 11×17 279×432 187.0 120645 1.55 16.05 ANSI C 17×22 432×559 374.0 241290 1.29 32.10 ANSI D 22×34 559×864 748.0 482580 1.55 64.20 ANSI E 34×44 864×1118 1496.0 965159 1.29 128.40 ARCH A 9×12 229×305 108.0 69677 1.33 9.27 ARCH B 12×18 305×457 216.
area Series Name ANSI A ISO A (JIS A) A4 ARCH A ISO B B4 ANSI B ISO A (JIS A) A3 ARCH B ISO B B3 ANSI C ISO A (JIS A) A2 ARCH C ISO B B2 ANSI D ISO A (JIS A) A1 ARCH D ISO B B1 ARCH F ANSI E ISO A (JIS A) A0 ARCH E 96 Size Size Area Area Aspect inches mm in² mm² ratio 8.5×11 216×279 93.5 60322 1.29 8.3×11.7 210×297 96.7 62370 1.41 9×12 229×305 108.0 69677 1.33 9.8×13.9 250×353 136.8 88250 1.41 11×17 279×432 187.0 120645 1.55 11.
tell me about calibrating RIP settings Use this feature if you are using media that is not available in your profile list and you wish to fine tune the output results. The Calibrate RIP dialog (available from Setup > Printer > Add Media Profile) lets you adjust two parameters: Ink level and Gray balance. ink level You can adjust the ink level if you are using a printer setup with the RIP CMYK, RIP CMY, RIP CMYKcm.
gray balance Gray Balance configuration offers the adjustment of gamma values for red, green, and blue. The purpose is to ensure a 100% neutral appearance of printed gray. To assist you in setting the Gray Balance values for your printer, you can print out a set of gray scales with varying combinations of gamma by pressing the Print Gray Balance Sheet button.
tell me about advanced gray balance This facility is available from Setup > Printer > Add Media Profile > Calibrate RIP > Advanced. advanced gray balance The Advanced Gray Balance calibration is necessary if no satisfactory standard Gray Balance can be found. While the standard Gray Balance adjusts the shape of simple gamma curves, the Advanced Gray Balance can adjust the RGB curves to any shape via the LUT file.
100 hp designjet 815mfp & scanner 4200
index A E accounting log files 70 accounting overview 69 accounts how to activate 43 how to create 41 how to delete 42 how to disable 42 how to select 43 align the image 16 align the scanner 27 auto-size method 66 error codes 49 error messages 49 extended thickness paper handling 80 extended thickness, how to adjust for 41 B gray balance, adjust 98 gray balance, advanced 99 graytone mode 60 groups of copies 17 B/W mode 60 background clean 76 black enhance 76 blur 61, 77 C calibrate RIP settings 97 ca
N printer setup 45 nesting how to use 18 overview 85 too much white space 54 network login 38 network, how to connect 35 newsletter 92 no scanner was found 49 number of copies, how to set 16 Q O on/off timer 38 output margin 78 output quality, how to set 10 output size, how to select 6 P paneling overview 82 paneling, how to use 19 paper control keys 56 paper frame 87 paper load delay factor 81 manual or automatic 40, 81 side or center 44, 81 paper sizes or titles 67 paper sizes, standard 95 password o
straighten the image 16 support 90 support, Web 92 system failure 52 system recovery 29 workgroup, how to create 37 Z zoom the preview image 14 T TCP/IP settings, how to configure 35 telephone support 90 template how to define 31 how to select 4 overview 74 settings 75 thick media 7, 93 tiling overview 82 timer, power on/off 38 touch screen calibration 30 touch screen stops responding 52 touch screen, hard to use 53 training videos 92 troubleshooting tool 92 type of original template how to define 31 how
printed on recycled paper © 2003 Hewlett-Packard Company part number: not known first edition printed in Hewlett-Packard Española S.L.