HP Designjet 3D Removal System User Guide
© 2010 Hewlett-Packard Development Company, L.P. Legal Notice The information contained herein is subject to change without notice. The only warranties for HP Products and services are set forth in the express warranty statement accompanying such products and services. Nothing herein should be construed as constituting an additional warranty. HP shall not be liable for technical or editorial errors or omissions contained herein.
Table of contents 1 Introduction ............................................................................................................................. 1 How to use this guide.............................................................................................. 1 Learn more! ........................................................................................................... 1 Safety information ...........................................................................................
9 Supplemental Information ...................................................................................................... 20 HP Limited Warranty Statement .............................................................................. 20 Declaration of conformity....................................................................................... 23 Regulatory and Environmental Information ............................................................... 24 Glossary ..................................
Introduction Introduction 1 This manual provides the user with operating information on the HP Designjet 3D Removal System. How to use this guide This User Guide is laid out in easy to follow sections which cover Set-up, Operation, Maintenance, and Troubleshooting. Read each section carefully so that you will get the best performance from your HP Designjet 3D Removal System. Learn more! An electronic User Guide is available for the HP Designjet 3D Removal System.
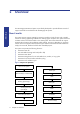
2 Overview The HP Designjet 3D Removal System is specifically developed to provide efficient removal of support material from models built with HP Designjet 3D printers. Overview How it works The system removes support material by immersing models in a bath of water with a specific amount of cleaning agent bags added to the cleaning agent receptacle. The system heats and circulates solution around the models in the cleaning tank.
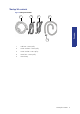
Startup kit contents Figure 2 Startup Kit Contents 2 3 4 Overview 1 5 1 Inlet hose - 1.52 m (5 ft.) 2 Power cord Euro - 1.52 m (5 ft.) 3 Power cord UK - 1.52 m (5 ft.) 4 Drain hose - 1.52 m (5 ft.
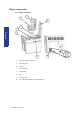
Major components Figure 3 Major components 4 5 6 3 2 Overview 1 7 4 1 Cleaning Agent Receptacle 2 Cleaning Tank 3 Strainer 4 Model Basket 5 Model Bag 6 Lid 7 Control Panel 8 On/Off Switch and Power Cord Receptacle Chapter 2 Overview 8
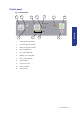
Control panel Figure 4 Control Panel 8 3 5 6 4 1 Cleaning tank level button 2 Full cleaning tank level LED 3 Half cleaning tank level LED 4 Cycle length button 5 Long cycle length LED. 6 Medium cycle length LED. 7 Short cycle length LED.
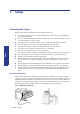
3 Setup Connecting the system Make sure the following preparations of the physical site are met: • • • • • • • Setup • • • • • • The system must be placed on a flat and stable surface able to support 36 kg (80 lbs.) to avoid the risk of falling. The work area for unpacking the system should be 76.2 cm (30 in.) high, 76.39 cm (28.5 in.) wide and 69.95 cm (27 in.) deep. The system must be located at least 20 cm (8 in.) higher than the wastewater drain.
Connect the water hose Screw on the end of the water supply hose to the back panel of the system. Securely tighten the fitting clockwise. Turn on the water and make sure there are no leaks. Figure 6 Water hose connections Plug in the system Setup Securely plug one end of the supplied power cord into the receptacle at the back of the system and the other end of the power cord into a grounded receptacle. Only use the power cord provided.
4 Operation Cleaning Models Power on the system Power on the system using the On/Off switch above the power cord receptacle on the back of the system. Add models All models must be placed in the model basket and the model lid adjusted. The model basket lid ensures the models remain submerged during the cleaning process. The lid can be adjusted to two heights. Operation • • • Use the upper lid position for larger models > 8.89 cm (3.5 in.). Use the lower lid position for smaller size models ≤ 8.
Cleaning tank level Based on the model lid position, select either a full (upper lid position) or half (lower lid position) cleaning tank level by pressing the cleaning tank level button. A full cleaning tank level is approximately 15.14 L (4 gals.) and a half cleaning tank level is approximately 7.57 L (2 gals). Cleaning agent bag(s) Select the number of cleaning agent bag(s) to be used based on Table 1 below.
3. Empty all the contents of the specified number of cleaning agent bag into the cleaning agent receptacle as directed (see Table 1). NOTE: Do not use more than the specified amount of cleaning agent bags. Doing so will exceed pH levels for wastewater disposal. 4. Avoid handling the contents of the cleaning agent bag. After adding all the contents of the cleaning agent bag(s), properly dispose of bag(s) and close the system lid.
Table 2 should also be used as a general guideline for selecting cycle lengths for most models.There are some factors that cause the support removal process to take longer such as model geometry, small support filled crevices, small blind holes, or low water temperature coming into the system. Table 2 Cycle Length Settings Combined Build Times Cycle Selection Approximate Cycle Times ≤ 4 hrs. Short 3 hrs. 4 to 12 hrs. Medium 6 hrs. > 12 hrs. Long 12 hrs.
Canceling the cleaning cycle To cancel the cleaning cycle at anytime, press the cancel button on the control panel. The system will stop and drain the cleaning tank. Before the system completely turns off, the cleaning tank may refill with water for a final rinse (depending on where the system is in the cleaning cycle) and then drains again. After the cleaning tank has drained, the lid unlocks so the model basket can be removed. The drained solution cannot be reused.
5 Maintenance Inspecting and cleaning the strainer The strainer at the bottom of the cleaning tank should be cleaned before every use of the system to maintain optimal system performance. Remove the strainer from the cleaning tank and rinse under water until the strainer is clean. Place the strainer back in the cleaning tank after cleaning. Cleaning The system should be cleaned once a month or sooner as needed.
Troubleshooting 6 Troubleshooting In the presence of unusual electromagnet phenomena, such as strong electromagnetic fields or severe electrical disturbances, the system might behave strangely, or even stop working. In this case, turn off the system, wait until the electromagnetic environment has returned to normal and then turn it on again. If you still experience problems, call Customer Service.
Recommendation Models not clean Make sure all the contents of the specified number of cleaning agent bag(s) is used. Make sure the correct cleaning tank level is selected. Make sure the correct cycle length is selected. Repeat the cleaning cycle. Make sure the model basket is used to submerge models in the cleaning solution and the correct lid position is selected. The system is leaking Verify that the inlet and drain hose connections are tight.
7 Support Introduction Support HP Customer Care offers award-winning support to ensure you get the most from your HP Designjet Removal System, providing comprehensive, proven support expertise and new technologies to give you unique end-to-end support. Services include setup and installation, troubleshooting tools, warranty upgrades, repair and exchange services, phone and Web support, and self-maintenance services. To find out more about HP Customer Care, please visit us at: http://www.hp.
HP Care Packs and Warranty Extensions HP Care Packs and Warranty Extensions allow you to extend your system’s warranty beyond the standard period. They include remote support. On-site service is also provided if necessary, with two alternative response-time options. • • Next business day. Same business day, within four hours (may not be available in all countries). For more information on HP Care Packs, please visit http://www.hp.com/go/printservices/.
8 System Specifications Physical specifications Height 43.85 cm (17.25 in.) Width 48.33 cm (18.24 in.) Depth 43.18 cm (17.00 in.) Weight 16.40 kg (36 lbs.) Facility specifications System Specifications Installation Location Stable level surface capable of holding 36 kg (80 lbs.) Power Requirements A grounded electrical outlet (220–240V~ 9A 50 Hz 1200W) located within 2 M (5 ft.) of the system.
Environmental specifications Temperature range 15°C to 30°C (59°F to 86°F) Relative humidity range 20% to 80% Heat emission 2500 BTU/hr typical Acoustic specifications 60 dB (A) System Specifications Operating sound pressure at bystander Environmental specifications 19
9 Supplemental Information HP Designjet 3D Removal System HP Limited Warranty Statement A. HP Product Limited Warranty Period HP Designjet 3D Removal System 1 year Extent of HP Limited Warranty Supplemental Information 1. HP warrants to you, end-user customer, that the HP hardware products, accessories and supplies specified above will be free from defects in materials and workmanship under normal usage during the Limited Warranty Period specified above.
7. Customer self-repair warranty service. HP products are designed with many Customer Self Repair (CSR) parts to minimize repair time and allow for greater flexibility in performing defective parts replacement. If during the diagnosis period, HP identifies that the repair can be accomplished by the use of a CSR part, HP will ship that part directly to you for replacement. There are two categories of CSR parts: 1) Parts for which customer self repair is mandatory.
15. You are responsible for the security of your proprietary and confidential information and for maintaining a procedure external to the system for reconstruction of lost, or altered files, data, or programs. HP IS NOT RESPONSIBLE FOR DAMAGE TO OR LOSS OF ANY FILES, STORED BY YOU ON THE SYSTEM'S HARD DISK OR OTHER STORAGE DEVICES. HP IS NOT RESPONSIBLE FOR THE RECOVERY OF LOST FILES OR DATA. B.
Declaration of conformity According to ISO/IEC 17050-1 and EN 17050-1 Declaration of conformity number BCLAA-0904 Supplier’s name: Hewlett-Packard Company Supplier’s address: Cami de Can Grasells, 1-21 08174 Sant Cugat del Vallès Barcelona, Spain declares that the product Product name and model: HP Designjet 3D Removal System Regulatory Model Number(1): BCLAA-0904 Product options: All conforms to the following product specifications Safety: IEC 61010-1:2001 (2nd Edition)/ EN 61010-1:2001 CAN/CS
Regulatory and Environmental Information Regulatory Model Identification Number For regulatory identification purposes, your product is assigned a Regulatory Model Number. The Regulatory Model Number for your product is BCLAA-0904. This regulatory number should not be confused with the marketing name (such as HP Designjet 3D Removal System) or product numbers (such as Z####X, where Z and X are any single letter and # is any number). EMC Class A Warning WARNING This is a Class A product.
MSDS (Material Safety Data Sheet) You can obtain current Material Safety Data Sheets for the HP Designjet 3D Removal Cleaning Agent Bag used in the system by mailing a request to this address: Hewlett-Packard Customer Information Center, 19310 Pruneridge Avenue, Dept. MSDS,Cupertino, CA 95014, U.S.A. There is also a Web page: http://www.hp.com/hpinfo/globalcitizenship/environment/ products/msds-specs.
Glossary Glossary of terms Cleaning agent bag A package containing the chemical substances used to activate dissolving support material from models produced with HP Designjet 3D printers. Cycle length The time required for one complete cleaning cycle. Users may choose between short, medium, or long cycle lengths. Model bag A flexible mesh device used to hold models securely in place within the Model Basket. Used for delicate or flat parts.