
HP Designjet T2500 eMFP - Image-quality troubleshooting guide


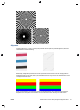
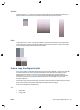


Streaks
Looking at patterns 1, 2, 3, 9 and 16, you may find vertical streaks as in the examples shown below, if the
printer’s printhead is not working correctly. Replacing the printhead may solve the problem.
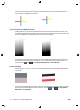
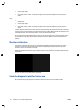
Grain
Looking at patterns 1, 2, and 3, you may find problems in the printer’s paper advance or the printhead that
cause visible grain in area fills. The following examples show this defect: original on the left, printed image
on the right. Replacing the printhead may solve the problem.
Scan or copy the diagnostic plot
There are two options for evaluating the diagnostic plot: scanning into a JPEG file, or copying onto paper. We
recommend using the scan option, so that the generated file can be analyzed more easily by a remote
support engineer if necessary. If you decide to scan the plot, first adjust your computer’s monitor as
described in
Monitor calibration on page 50. Once you have scanned the diagnostic plot, please remember
to open the scanned file in any image viewer software and select a zoom of 100% for correct visual
evaluation of patterns.
If you decide to copy, make sure that a paper roll at least 36 in (914 mm) wide is loaded in the printer. Ideally,
the same type of paper used to print the diagnostic plot should be used for copying it.
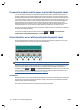
These are the settings that you should select:
Scan
●
Quality: Max
●
File type: JPG
ENWW Scan or copy the diagnostic plot 49