
HP StorageWorks Clustered File System 3.6.0 Windows Storage Server Edition Administration Guide (403103-005, January 2008)
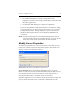
Table Of Contents
- Contents
- HP Technical Support
- Quick Start Checklist
- Introduction to HP Clustered File System
- Cluster Administration
- Administrative Considerations and Restrictions
- Tested Configuration Limits
- Volume and Filesystem Limits
- User Authentication
- Start the Management Console
- Cluster Management Applications
- The HP CFS Management Console
- View Installed Software
- Start HP Clustered File System
- Stop HP Clustered File System
- Back Up and Restore the Cluster Configuration
- HP Clustered File System Network Port Numbers
- Configure Servers
- Configure Network Interfaces
- Configure the SAN
- Configure Dynamic Volumes
- Configure PSFS Filesystems
- Manage Disk Quotas
- Manage Hardware Snapshots
- Configure Security Features
- Configure Event Notifiers and View Events
- Overview
- Install and Configure the Microsoft SNMP Service
- Cluster Event Viewer
- Configure Event Notifier Services
- Select Events for a Notifier Service
- Configure the SNMP Notifier Service
- Configure the Email Notifier Service
- Configure the Script Notifier Service
- View Configurations from the Command Line
- Test Notifier Services
- Enable or Disable a Notifier Service
- Restore Notifier Event Settings to Default Values
- Import or Export the Notifier Event Settings
- Using Custom Notifier Scripts
- Cluster Operations on the Applications Tab
- Configure Virtual Hosts
- Configure Service Monitors
- Configure Device Monitors
- Advanced Monitor Topics
- SAN Maintenance
- Other Cluster Maintenance
- Management Console Icons
- Index

Chapter 5: Configure Servers 44
a. Start the HP Management Console on the new server (select Start >
Programs > On the HP Clustered File System Connect window,
specify the server, click the Connect button, and select Configure. If
you are prompted for the user name and password, specify the
appropriate values.
b. When the Configure Cluster window appears, click Import. Then,
on the Import window, type the IP address or DNS name of the
server from which you want to import the configuration.
4. Add the new server to the cluster. Go to the Cluster Wide
Configuration tab. The Address list shows the servers currently in the
cluster. Click the Add button to add the new server to this list. You
will be asked for the IP address or hostname of the new server. When
the operation is complete, the new server will appear in the Address
list.
5. Start HP Clustered File System on the new server. Select the new
server from the Address list, and click Start Service to start HP
Clustered File System on that server. When HP Clustered File System
is running on the server, click OK to close the Server Configuration
window.
6. Connect to the cluster. Specify any server in the cluster on the HP
Clustered File System Connect window. The new server now appears
on the Management Console. In the following example, server ar53
has been added.
7. Check the drive mappings. When you add a server, the operating
system may assign drive letters that do not match the assignments you
have made for your shared filesystems on the other nodes. There are
several ways to correct this situation:
•Use the mx fs unassign command to remove the incorrect drive
assignments and the mx fs assign command to establish the correct
assignments.