
hp e-commerce server accelerator sa7100/7120 quick start guide

Before You Begin
This Quick Start Card is intended to guide you from initial
physical installation of the HP e-Commerce Server
Accelerator SA7100/SA7120 to an active command line
prompt (i.e., the “test” configuration). To proceed from the
test configuration to production, refer to the HP e-Commerce
Server Accelerator SA7100/SA7120 User Guide.
Before you begin installation, you must:
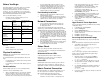
• Determine the type of network cables you need
according to the following table:
If you intend to install the SA7100/SA7120 in a rack, you will
also need:
• Phillips screwdriver
• Rack-mounting screws (not provided)
Physical Installation
WARNING: Do not remove the cover. There are no user-
servicable parts inside.
The SA7100/SA7120 is physically installed in either of two
ways:
• In a standard 19” rack, cantilevered from the provided
mounting brackets
• Free-standing on a flat surface with sufficient space for
air-flow
Rack Installation
Rack mounting requires the use of the mounting brackets
and all four of the included Phillips screws.
1. Attach a mounting bracket to each side of the SA7100/
SA7120, using two of the provided screws for each
bracket. Use the holes near the front of the SA7100/
SA7120’s sides. The brackets have both round and oval
holes; the flange with round holes attaches to the
SA7100/SA7120; that with the oval holes to the rack.
2. Position the SA7100/SA7120 in the desired space of
your 19” rack and attach the front flange of each
mounting bracket to the rack with two screws each.
(Rack-mounting screws are not provided.)
Free-Standing Installation
1. Attach the provided self-adhesive rubber feet to the
SA7100/SA7120’s bottom.
2. Place the SA7100/SA7120 on a flat surface and make
sure that there is adequate airflow surrounding the unit
(allow at least one inch of air space on all sides).
Network Connections
1. Use the “Network Cable Requirements” table near
the beginning of this guide to select and install the
the appropriate cables.
NOTE: Never connect both ports to the same network
segment (e.g., to the same hub or switch). Doing so creates
a feedback loop that adversely effects network bandwidth.
2. Connect the provided power cable to the back of the unit.
(There is no power switch.) Under normal circumstances,
the SA7100/SA7120 requires approximately 30 seconds
to boot. When the boot is complete, the unit’s Power LED
is steadily illuminated. (If the Power LED is not steadily
illuminated, please see
Chapter 9, “Troubleshooting” in
the User Guide.)
3. If the Inline LED is neither steadily illuminated or blinking,
press the Bypass switch.
4. At this point both the Network and Server LEDs should
be steadily illuminated. If not, please see
Chapter 9,
“Troubleshooting” in the User Guide.
Status Check
Before proceeding to the Admin Terminal Connection
section, take a moment to verify that the SA7100/SA7120 is
correctly connected.
Network and Server LEDs
Verify that the Network and Server LEDs are both
illuminated. If one or both are not, refer to Chapter 9,
“Troubleshooting” in the User Guide.
Inline LED
A blinking Inline LED indicates that the system is online in
Fail-safe mode. Refer to Chapter 9, “Troubleshooting,” or
Appendix B, for details on Fail-safe and Fail-through modes.
Admin Terminal Connection
Run HyperTerminal* or a similar terminal emulator on your
PC. The steps below are illustrative of HyperTerminal*.
Other terminals will require different procedures.
1. Use the serial cable provided with the SA7100/
SA7120 to connect the device’s serial port (the left-
hand serial port labeled “Console”) to the serial port
of any terminal. (A PC running Windows
HyperTerminal* is used here as an example.) Type
an appropriate name in the Name field of the
Connection Description window (e.g.,
“Configuration”), and then click the OK button. The
Phone Number panel appears.
2. In the Connect Using… field specify “COM1” (or the
serial port through which the PC is connected to the
SA7100/SA7120 if different from COM1).
3. Click the OK button. The COM1 Properties panel
appears. Set the values displayed here to 9600, 8, none,
1, and none.
4. Click the OK button.
HyperTerminal* Paste Operations
If you’re using HyperTerminal* you must make the following
configuration change:
1. In the File menu, click Properties.
2. Click the Settings tab.
3. Click the ASCII Setup button.
4. Change the values of Line and Character delay from 0 to
at least 1 millisecond.
5. Click OK to exit ASCII Setup.
6. Click OK to exit Connection Properties.
Accessing the Command Prompt
After the SA7100/SA7120 boots up, the password prompt
appears.
NOTE: The password is not echoed on the command line.
1. Type admin at the password prompt and press
Enter to access the prompt:
Password: admin (password is not echoed at prompt)
Current date: 2000 08/28 05:01
HP SA7120>
You are now ready for operations at the Command Line
Interface (CLI) of the SA7100/SA7120. A typical way to
begin would be as follows:
1. Optionally, change your password from admin to
another password. Use the password command.
HP SA7120> password
2. Use set date to correct the date/time, if necessary.
The date and time affect the validity of the certificate.
HP SA7120> set date
3. Use the help command to list available commands (or
refer to the Command Reference in Chapter 5 of the
User Guide).
HP SA7120> help
4. Perform key/certificate setup. (See Chapter 3 of the User
Guide for details.)
SA7100/
SA7120’s
network
connector
SA7100/SA7120’s
server
connector
Workstation or
Server
Crossover cable Straight-through
cable
Switch or Hub Straight-through
cable
Crossover cable
Router Crossover cable Not recommended
SA7100/
SA7120’s
network
connector*
N/A Straight-through
cable
SA7100/
SA7120’s
server
connector*
Straight-through
cable
N/A
* Applicable only to multiple, cascaded units.