
HP StorageWorks EML E-Series Library Robotics Controller Replacement Instructions (May 2005)

Removal
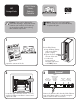
Private
Ethernet port
(not used)
Reserved
port
(not used)
CLI port
(RS-232 –
not used)
Public
Ethernet port
(connect to
Interface
Manager
Card)
HP
StorageWorks
EML E-Series
Library
Robotics
Controller
Caution: Parts can be damaged by
electrostatic discharge. Keep parts in their
containers until needed. Ensure that you
are properly grounded when touching
static sensitive components.
Note: This part is not hot-pluggable.
It is necessary to power down the library
to replace this part.
2
3
1
Locate the card in the base module. You will
need a #1 Phillips screwdriver to remove and
replace this card.
Re
mova
l
Priv
a
t
e
Et
h
ernet
p
or
t
(no
t u
sed)
R
eser
ved
port
(
n
ot u
s
ed)
C
L
I
p
o
r
t
(
RS
-232
–
not used
)
P
ublic
Et
h
ernet
p
or
t
(
c
o
n
n
e
c
t
t
o
a
c
e
r
C
a
rd)
HP
S
torage
W
o
r
k
s
ESL
E-S
e
ries
R
o
bo
tics
C
o
ntrol
le
r Ca
r
d
)
Caution: Par
ts ca
n b
e
d
a
m
a
g
e
d
by
electro
s
t
a
tic d
ischarge
.
Keep pa
r
t
s i
n t
h
eir
co
n
t
a
in
ers
u
n
t
il
n
e
e
d
ed. E
n
s
u
re that
y
o
u
ar
e
pr
o
per
ly
g
rou
nded
e
n
touchi
ng
s
ta
t
ic
s
ensiti
ve
co
mp
o
n
en
ts.
N
ote: T
h
i
s
p
a
r
t is not
hot
-plugg
a
b
l
e.
I
t is
n
e
c
e
ss
a
r
y
to power
d
own
t
he libra
ry
to r
e
p
l
ac
e th
i
s
p
a
r
t
.
2
3
1
L
oc
ate
t
h
e
ca
r
d
in
the
t
o
p
c
a
rd
c
a
g
e
slo
t
in
the
b
a
s
e
m
od
u
le
. Th
is
car
d con
t
a
i
ns
one Ethe
r
n
e
t
con
nect
ion that connec
ts
t
o the
I
n
ter
f
ace M
anag
e
r
ca
rd. T
he f
unc
ti
o
n
of
this
c
ar
d
is
to
co
n
t
r
o
l
th
e
r
o
bo
t.
Yo
u
wil
l
nee
d
a
#
1
P
hi
ll
ips
sc
r
ew
dr
i
v
er t
o
r
emo
ve
a
nd
r
e
p
lac
e
t
his
ca
r
d
.
h
p
S
t
o
r
a
g
e
W
o
r
k
s
E
S
L
E
-
s
e
r
i
e
s
I
n
t
e
rf
a
c
e
M
a
n
a
g
e
r
C
a
u
t
i
o
n
:
P
a
r
t
s
c
a
n
b
e
d
a
m
a
g
e
d
b
y
e
le
c
t
r
o
s
t
a
t
i
c
d
i
s
c
h
a
r
g
e
.
K
e
e
p
p
a
r
t
s
i
n
t
h
e
i
r
c
o
n
t
a
i
n
e
r
s
u
n
t
i
l
n
e
e
d
e
d
.
E
n
s
u
r
e
y
o
u
a
r
e
p
r
op
e
r
l
y
g
r
o
u
n
d
e
d
w
h
e
n
t
o
u
c
h
i
n
g
s
t
a
t
i
c
-
s
e
n
s
i
t
i
v
e
c
o
m
p
o
n
e
n
t
s
.
N
o
t
e
:
T
h
i
s
p
a
r
t
i
s
n
o
t
h
o
t
-
p
l
u
g
g
a
b
l
e
.
I
t
i
s
n
e
c
e
s
s
a
r
y
t
o
p
o
w
e
r
d
o
w
n
t
h
e
l
i
b
r
a
r
y
t
o
r
e
p
l
a
c
e
t
h
i
s
p
a
r
t
.
2
3
1
1
0
0
2
6
O
p
e
n
t
h
e
ba
c
k
d
o
o
r
o
f
t
h
e
l
i
b
r
a
r
y
.
I
n
s
p
e
c
t
t
h
e
c
o
n
t
e
n
t
s
o
f
t
h
e
k
i
t
.
P
o
w
e
r
d
o
w
n
t
h
e
li
b
r
a
r
y
.
a
.P
l
a
c
e
t
h
e
l
i
b
r
a
r
y
o
f
f
-
l
i
n
e
b
y
p
r
e
s
s
i
n
g
t
h
e
S
t
a
n
d
b
y
b
u
t
t
o
n
o
n
t
h
e
l
i
b
r
a
r
y
'
s
f
r
o
nt
p
a
n
e
l
.
T
h
e
l
i
b
r
a
r
y
r
o
b
o
t
i
c
s
c
o
m
p
l
e
t
e
s
a
n
y
c
u
r
r
e
n
t
c
o
m
m
a
n
d
s
a
n
d
t
h
e
n
s
t
o
p
s
.
b
.
V
e
r
i
f
y
t
h
at
t
h
e
f
r
o
n
t
p
a
n
e
l
d
i
s
p
l
a
y
i
n
d
i
c
a
t
e
s
“
S
y
s
t
e
m
O
f
f
-
l
i
n
e
”
.
c
.
V
e
ri
f
y
t
h
a
t
t
h
e
p
i
c
k
e
r
i
s
e
m
p
t
y
.
I
f
t
he
r
e
i
s
a
t
a
p
e
c
a
r
t
r
i
d
g
e
i
n
t
h
e
p
i
c
k
e
r
,
p
e
r
f
o
r
m
a
M
o
v
e
c
o
m
m
a
n
d
t
o
p
l
a
c
e
t
h
e
c
a
r
t
r
i
d
g
e
i
n
a
n
a
v
a
i
l
a
b
l
e
s
l
o
t
.
[
C
o
n
t
e
n
t
n
e
e
de
d
.
]
d
.
P
r
e
s
s
a
n
d
h
o
l
d
t
h
e
p
o
w
e
r
b
u
t
t
o
n
l
o
c
a
t
e
d
o
n
t
h
e
f
r
o
n
t
o
f
t
h
e
l
i
b
r
a
r
y
b
e
h
i
n
d
t
h
e
l
a
pt
o
p
t
r
a
y
u
n
t
i
l
t
h
e
f
r
o
n
t
p
a
n
e
l
g
o
e
s
b
l
a
n
k
.
4
Fl
i
p
t
h
e
t
w
o
b
r
e
a
k
e
r
s
w
i
t
c
h
e
s o
f
f
a
t
t
h
e
p
o
w
e
r
d
i
s
t
r
i
b
u
t
i
o
n
u
n
i
t
.
I
ns
pect
the
conte
nts of
t
he
kit.
P
ower off t
he
l
ibrary.
a
.
S
t
op
al
l
libra
ry activ
i
t
y
and
ensur
e
t
hat
t
he
p
ic
ke
r
is
em
p
ty.
b
.
Ope
n
t
h
e do
o
r at the
r
ear of t
he
r
ack
.
c
.
Se
t t
he
r
ac
k
power swit
c
h
a
t the upper right
c
orner
to the
OF
F posi
t
ion
.
d
.
E
nsur
e
t
hat a
l
l
power indi
cators
on th
e p
o
wer
s
u
ppl
ies a
r
e o
f
f
.
4
R
e
move
al
l c
a
b
l
in
g
to
th
e
l
ib
r
a
ry ro
b
ot
i
c
s
co
n
t
ro
l
l
er c
a
rd
wh
il
e
not
i
ng
cab
l
e
l
ocations
fo
r
l
ater
r
ec
o
nnec
t
ion
.
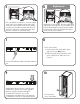
Inspect the contents of the kit.
Power off the library.
a. Stop all library activity
and ensure that the
picker is empty.
b. Open the doors at
the rear of the rack.
c. Set the rack
power switch at
the upper right corner
to the OFF position.
4
Remove the Ethernet cable from the Public Ethernet
port on the library robotics controller noting the
cable location for later reconnection.