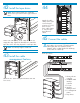
42 Install the tape drives 44 26 NOTE: HP recommends that you install tape drives from top to bottom with no gaps between them. Attach the cable clamps to the right rear rack at the positions 37T, 26T, and 15T. Use these cable clamps to route the tape drive Ethernet cables. At the rear of the library, insert a tape drive into an empty drive bay. Tighten the thumbscrew to attach the tape drive to the drive bay. Repeat for each tape drive.
LTO4 tape drives 1 Plug an Ethernet cable (included) into the Ethernet port on the interface controller (middle card) and into the TO FIBRE CHANNEL CONTROLLERS port on the Interface Manager card (bottom card in the card cage). 2 Plug an FC cable (not included) into the FC0 port on the interface controller (middle card) and into either the host bus adapter (HBA) port on a host or into an FC switch that is connected to the host. 3 4 5 6 8 9 8 7 10 1. Switch for the internal network 2.
46 Attach the bar code labels to the tape cartridges 48 Power on the library CAUTION! Handle tape cartridges with care. Do not drop or mishandle them, or place them near sources of electromagnetic interference. Rough handling can damage the tape cartridge making it unusable and potentially hazardous to the tape drives. CAUTION! The misuse and misunderstanding of bar code technology can result in backup and restore failures.
51 Initial Interface Manager card setup If an IPv4 DHCP network is available and the fault LEDs are not illuminated, verify that the NETWORK port on the Interface Manager card is connected to that DHCP network for proper setup. Skip the rest of this step. If the Interface Manager card does not have access to an IPv4 DHCP network during initial power up, the Interface Manager must be configured manually.
54 Identify the parts of the library Install HP StorageWorks Library and Tape Tools (L&TT) on the management station. Download this software from http://www.hp.com/support/tapetools. 1. Customer reserved space. If your library contains LTO4 tape drives, this space contains the switch for the internal network. 2. 8U base module 3. 4U base module 4. Robotics unit 5. Viewing windows 6. Operator control panel (OCP) 7. 5-Cartridge load port 8.
Getting help • HP product information: http://www.hp.com/go/storage • HP technical support and phone numbers: http://www.hp.com/support • HP manuals: http://www.hp.com/support/manuals • HP StorageWorks Library and Tape Tools (L&TT) diagnostic software: http://www.hp.com/support/tapetools • Interface Manager and HP StorageWorks Command View TL: http://www.hp.
Printed on at least 50% total recycled fiber with at least 10% post-consumer paper © Copyright 2006-2008 Hewlett-Packard Development Company, L.P. Third edition (November 2008) Printed in the US. www.hp.com Part no.