
HP StorageWorks Enterprise Modular Library E-Series Getting Started (AD560-96069, May 2010)


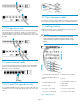

3 Remove the hold-down brackets
4 Move the library to the location where
you want to install it
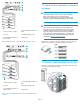
5 Remove the shipping restraints
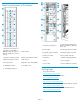
1. Turn the center-door knob one-quarter turn counter-clockwise and
open the center door of the library.
2. Pull down the yellow gear lock that is inside the library on the right
side of the robotics unit to disengage it from the reduction gear.
The gear lock remains attached to the robotics unit.
NOTE:
If you cannot reach the yellow gear lock, remove the
arrays from the top, right wall inside the library. Press
the release lever on the array and lift the array out of
the slot on the wall.
3. Remove the two shipping straps from the bottom of the robotics unit.
Remove each strap by pulling down near the front end and moving
it to the side until the strap releases from the slot on the front of the
library, and then lift the strap out of the slot on the back of the
library.
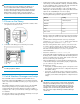
6 Connect the cables
CAUTION:
To avoid damaging Fibre Channel (FC) cables, do not pinch
or sharply bend the cable tighter than a 5-centimeter (2-inch)
diameter. Allow a radial bend when attaching an FC cable to
a cable clip.
At the back of the library, plug an FC cable (not included) into the FC0
port on the interface controller and plug the other end into either the
host bus adapter (HBA) port on the host or into an FC switch that is
connected to the host. Attach labels to each end of the cable.
Page 2