
HP StorageWorks Enterprise Modular Library E-Series Getting Started (AD560-96069, May 2010)


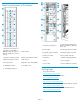

16 Configure the interface controller
If this is the first time the library has been powered on after delivery, or
if a new interface controller was installed, configure the interface
controller so that it is recognized by the Interface Manager card. Do
one of the following:
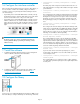
• If your library has an e2400-FC 2Gb interface controller, wait ap-
proximately two minutes, and turn off the main power switch. Wait
several seconds and then turn on the power switch again.
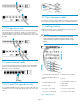
• If your library has an e2400-FC 4Gb interface controller, reset the
interface controller twice. To reset the interface controller, insert a
paper clip into the reset hole. After resetting the interface controller,
wait three minutes for the interface controller to reset, then reset it
again.
NOTE:
The library requires up to an hour to initialize and perform an
inventory. While the library is performing an inventory, continue
with the next step.
17 Install the software
1. Install HP StorageWorks Command View TL on the management
station. Install this software from the included CD.
2. Install HP StorageWorks Library and Tape Tools (L&TT) on the
management station. Download this software from http://
www.hp.com/support/tapetools.
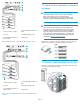
18 Configure the library
Use the touch screen (called the Operator Control Panel or OCP) on the
front of the library to configure the library. Do the following commands:
• Configuration > Library Configuration > Change
Password
The library ships with a null password. Passwords must be set to ex-
actly eight characters consisting of the numbers 0 through 9 and the
period character.
• Configuration > Library Configuration > Configure
Load Ports
This command shows the number of installed load ports and enables
you to toggle between using each for import/export or for storage.
Configure it as a load port to move tapes in and out of the library.
Configure it as slots to increase the number of storage slots in the
library. Changing a load port configuration will cause a library re-
boot.
• Configuration > Library Configuration > Change
Network Settings
This configures the network settings for the Interface Manager card,
which can be set automatically using DHCP (the default) or manually
using a static IP address. Use the Address Config: button to toggle
between these two options. If you are setting the network addresses
manually, set each address element separately.
• Configuration > Library Configuration > Configure
Barcode Reporting Formats
This command defines how bar codes are displayed on the OCP
and sent to the host. Bar code reporting can be configured as six to
eight characters and left or right aligned. If you choose six characters
with left alignment, any characters after the six are truncated. If you
choose six characters and right alignment, only the last six characters
are shown with the beginning characters truncated.
• Configuration > Library Configuration > Configure
Reserve Slots
Up to nine slots can be reserved for special purposes, such as
cleaning tapes. The default is none. Select the number you want to
reserve and press Save.
• Configuration > Library Configuration > Configure
Inventory Mode
This command allows you to require bar codes on tape cartridges,
or to make them optional. Requiring bar codes significantly shortens
inventory time.
Page 6