
HP StorageWorks ESL E-Series Ultrium 1840 and Ultrium 3280 FC Tape Drive Upgrade or Replacement (AH194-96006, November 2010)

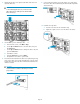

10. Connect the cables.
CAUTION:
To avoid damaging FC cables, do not bend them
sharply or pinch them. Allow a radial bend when
reattaching the FC cables.
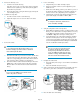
a. Connect the end of the FC cable you disconnected from the
old tape drive to port A on the new drive. The FC cable con-
nector clicks into place. Verify that the other end of the FC
cable is connected to its corresponding port on the SAN.
b. Connect the Ethernet cable included with the tape drive to the
MGMT port on the new drive. Verify that the other end of the
Ethernet cable is connected to the internal network switch in-
stalled in the library.
IMPORTANT:
Do not connect the MGMT port or internal network
switch to the public or site LAN.
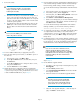
11. If the tape drive did not power itself on, use the OCP to power on
the drive now.
a. From the Home screen, select Menu > Ops.
b. Use the Up and Down buttons to select the drive, then press
the Select button.
c. Use the Up and Down buttons to change the drive to on-line,
then press the Select button.
d. Select the Back button to return to Menu.
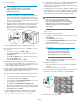
12. Verify connectivity by checking that the FC port A LED on the new
tape drive is green when connected to a switch and linked.
13. Close the back door of the library.
14. Make sure that the tape drive has the latest firmware for correct
operation. If necessary, upgrade the drive firmware using the
Command View TL firmware upgrade wizard or the Interface
Manager card Command Line Interface (CLI). See the HP
StorageWorks Interface Manager and Command View TL User
Guide for detailed procedures on upgrading drive firmware.
NOTE:
If the Interface Manager is running 2.61 or older
firmware, connect to the Interface Manager card CLI
using ssh or telnet, once logged into the CLI use the
sync sec command to force the mapping changes
into the new drive.
NOTE:
After a drive replacement, you may also be required
to run specific OS commands from the HPUX host in
order to verify the drive path. See Ensure the new drive
is CLAIMED and online.
Ensure the new drive is CLAIMED and
online
In an HPUX 11.31 (or newer) environment, there is a new SCSI software
behavior which identifies a device through its World Wide Identification
(WWID). When drive firmware is changed, or the drive is replaced, it
is possible that the WWID information is also changed. This will cause
HPUX SCSI stack to stop all IO communication to the device. In this case,
an ioscan shows the device in a NO_HW state, and the new WWID
must be validated on the HPUX host side to allow SCSI IO
communication. If this situation occurs or is suspected, view the file /
var/adm/syslog/syslog.log and look for the message similar to
this example:
Evpd inquiry page 83h/80h failed or the current
page 83h/80h data do not match the previous
known page 83h/80h data on LUN id 0x0 probed
beneath the target path (class = tgtpath,
instance = 3). The lun path is (class = lunpath,
instance = 0). Run 'scsimgr replace_wwid'
command to validate the change.
If this message appears, perform the following procedure for HPUX host
commands.
1. Verify that HPUX 11.31 patch ID PHKL_41474 is installed.
2. Login (at root level) to the HPUX server.
3. Run ioscan –fnN, ioscan –fnC tape, and ioscan –m lun
to establish the drive path before the change was done, place the
drive online, and determine the device file needed for the
replace_wwid command used later in this procedure.
4. From CVTL or the Interface Manager CLI, execute the firmware
update of the appropriate drive.
Page 11