
HP StorageWorks ESL E-Series Ultrium 1840 and Ultrium 3280 FC Tape Drive Upgrade or Replacement (AH194-96006, November 2010)
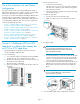

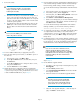

4. Remove the drive bay cover.
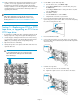
a. Locate the next vacant drive bay.
Tape drives must occupy consecutive drive clusters, beginning
with drive cluster 0 (at the top of the cabinet) moving right to
left, and from top to bottom.
b. Remove the face plate covering the drive bay by removing the
screw holding it in place.
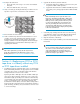
5. Install the new tape drive.
a. Insert the new drive into the vacant drive bay.
b. Tighten the captive screw to secure the drive to the cluster.
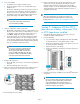
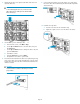
6. Connect the cables.
CAUTION:
To avoid damaging Fibre Channel (FC) cables, do not
bend them sharply or pinch them. Allow a radial bend
when reattaching the FC cables.
a. Connect the FC cable to port A on the new drive. The FC cable
connector clicks into place. Connect the other end of the FC
cable to its corresponding port on the SAN. Attach a label to
each end of the cable to mark the port designations.
b. Connect the Ethernet cable included with the tape drive to the
MGMT port on the new drive. Connect the other end of the
Ethernet cable to the internal network switch installed in the
library.
IMPORTANT:
Do not connect the MGMT port or internal network
switch to the public or site LAN.
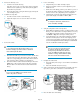
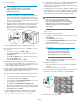
7. Power on the library.
a. Verify that the power cables are firmly in place.
b. Flip the two breaker switches on (to the right) at the power
distribution unit.
c. On the front of the library, push the power button to power on
the library (the button will depress). The library will take 20
minutes or more to boot, depending on the configuration.
d. Verify that the current state of the library that appears in the
System State display on the OCP is “Online, OK”.
NOTE:
To change the cabinet state, from the Home
screen of the OCP, select Ops.
8. Verify the configuration of the new tape drive.
a. On the OCP, verify that the number of configured drives in the
library is correct. If the number of configured drives is incorrect,
use the OCP to change the number. From the Home screen,
select Menu > Setup. This will require a library reboot.
b. Use Command View TL or the Interface Manager card Com-
mand Line Interface (CLI) to enter the host mapping/access
control, topology, and FC speed settings for the new tape drive.
See the HP StorageWorks Interface Manager and Command
View TL User Guide for detailed procedures.
NOTE:
If you do not see the drive in Command View
TL, determine whether the library found the
drive by looking at the OCP: from the Home
screen, select Ops. If the OCP shows the drive
information correctly, check the Ethernet cabling
to the drive and the internal network switch.
9. Configure the SAN switch.
a. Rezone the SAN, if necessary, to account for the new hardware
and paths.
b. Reboot the SAN FC switch, if necessary.
10. Verify connectivity by checking that the FC port A LED on the new
tape drive is green when connected to a switch and linked.
11. Close the back door of the library.
Page 4