
HP StorageWorks ESL E-Series Ultrium 1840 and Ultrium 3280 FC Tape Drive Upgrade or Replacement (AH194-96006, November 2010)
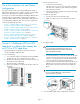

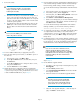

9. Connect the cables.
CAUTION:
To avoid damaging FC cables, do not bend them
sharply or pinch them. Allow a radial bend when
reattaching the FC cables.
a. Connect the FC cable you removed from the old tape drive to
port A on the new drive. The FC cable connector clicks into
place. Connect the other end of the FC cable to its correspond-
ing port on the SAN. Attach a label to each end of the cable
to mark the port designations.
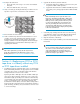
b. Insert the Ethernet cable included with the tape drive into the
MGMT port on the new drive. Connect the other end of the
Ethernet cable to the internal network switch installed in the
library.
IMPORTANT:
Do not connect the MGMT port or internal network
switch to the public or site LAN.
10. Insert new LTO4 or LTO5 media, as appropriate, if desired.
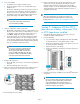
11. If the tape drive did not power itself on, use the OCP to power on
the drive now.
a. From the Home screen, select Menu > Ops.
b. Use the Up and Down buttons to select the drive, then press
the Select button.
c. Use the Up and Down buttons to change the drive to on-line,
then press the Select button.
d. Select the Back button to return to Menu.
12. Migrate the tape drive configuration settings. For IM firmware
version I240 or earlier and LTO4 drives, use the instructions in Step
13 (the next step in this procedure); for IM firmware version I250
or later and LTO4 and LTO5 drives, skip to Step 16.
13. Reset the Interface Manager card defaults from Command View TL
or the Interface Manager card CLI. Retain the Interface Manager
Network Settings, SNMP Settings, and Trace and Event logs.
To reset the Interface Manager card defaults from Command View
TL:
a. In the Launcher window, select the library to be configured.
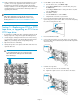
b. In the Library window, click the Support tab.
c. In the left panel, select Restore Factory Defaults. A list of com-
ponents appears in the right panel.
d. Select Actions > Restore Defaults on All Components.
e. On the screen that appears you can retain Interface Manager
Network Settings, SNMP Settings, and Trace and Event Logs.
Click Next and then click Finish.
To reset the Interface Manager card defaults from the Interface
Manager card CLI, log in and enter the following command:
restore system defaults imnet logs snmp
14. To configure the new tape drive, on the OCP, verify that the number
of configured drives in the library is correct. If the number of
configured drives is incorrect, use the OCP to change the number.
From the Home screen, select Menu > Setup. This will require a
library reboot.
15. Use Command View TL or the Interface Manager card CLI to enter
the host mapping/access control, topology, and FC speed settings
for all components. See the HP StorageWorks Interface Manager
and Command View TL User Guide for detailed procedures.
NOTE:
If you do not see the drive in Command View TL,
determine whether the library found the drive by
looking at the OCP: from the Home screen, select Ops.
If the OCP shows the drive information correctly, check
the Ethernet cabling to the drive and the internal
network switch.
Skip to Step 17.
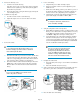
16. Run the LTO Drive Upgrade Wizard.
a. From CVTL, on the Support tab, in the Navigation tree, select
Drive Upgrade.
b. Select the Actions pull-down menu.
c. Select Launch Drive Upgrade Wizard. This launches the LTO
Drive Upgrade Wizard.
d. Follow the instructions in the LTO Drive Upgrade Wizard.
CAUTION:
Heed the note in the Wizard and DO NOT
restore system defaults. The wizard migrates
all necessary settings automatically. Restoring
system defaults can cause the upgrade to fail.
e. When the “Drive Upgrade Complete...” status message dis-
plays, click Finish to exit the Wizard.
Page 6