
HP Disk Drive Replacement Instructions (5697-1679, June 2012)

Removing a disk drive
1. Determine the status of the disk drive from the
hot-plug disk drive LEDs. See Table 1 (page 3).
2. Back up all data on the disk drive.
CAUTION: To prevent insufficient cooling
and thermal damage, do not operate the
storage enclosure unless all bays are
populated with either a disk drive or a
blank.
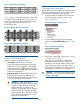
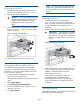
3. Press the drive latch on the disk drive to unlatch
the lever (1, Figure 11 (page 5)), and move the
lever to the left (2).
Figure 11 Removing a disk drive
4. Pull the disk drive out of the drive bay (3).
Changing the Device Addition Policy
To prevent the storage system from automatically
grouping a new disk that might have the incorrect
firmware on it, verify the Device Addition Policy and
set it to manual if necessary:
1. In the HP P6000 Command View navigation
pane, select the storage system.
The Initialized Storage System Properties window
opens.
2. Click System Options.
3. Select Set system operational policies.
4. If the Device Addition Policy is set to Automatic,
change it to Manual.
5. Click Save changes.
NOTE: To return the Device Addition Policy
to automatic, repeat this procedure after you
verify that the disk has the correct firmware
version.
Installing a disk drive
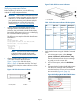
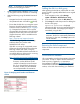
1. Insert the disk drive into the drive bay (1,
Figure 12 (page 5)) until it clicks, locking the
drive. Push firmly on the front of the drive carrier
to ensure the drive is fully seated into the
enclosure.
2. Rotate the drive lever to the right until it locks (2).
IMPORTANT: When the drive is inserted
and the enclosure is powered, the drive
LEDs flash for two seconds to indicate that
the drive is seated properly and receiving
power.
Figure 12 Installing a disk drive
3. As the drive begins to spin, verify that the drive
LEDs illuminate one at a time and then turn off
together to indicate that the system has
recognized the new drive.
In fault-tolerant configurations, allow the
replacement drive to be reconstructed
automatically with data from the other drives.
While reconstruction is in progress, the online
LED flashes.
Verifying operation
After replacing the disk, observe the following to verify
that the disk is operating properly:
Page 5