
HP EVA Updating Product Software Guide (xcs10001000) (5697-2423, December 2012)


12. The installation summary window opens. Click Finish.
All software components are installed in the directory
<system drive>:\Program Files\Hewlett-Packard
Verifying installation on the management server
To verify that the software was installed successfully:
1. Ensure that the software icons for HP P6000 Command View , HP Command View EVAPerf
, and/or HP System Scripting Utility appear on the desktop.
2. Run HP P6000 Command View.
3. Verify the display of array resources in the interface. In the navigation pane, click Hardware
and verify that:
• New, uninitialized arrays appear as uninitialized arrays.
• Previously initialized arrays appear with their previous names and correct status. (Select
each storage array to view the Properties window.)
• Previous disk groups, hosts, virtual disks, and other resources appear in the navigation
pane.
If the information is not displayed properly, you may need to configure your browser settings. See
the HP P6000 Command View Installation Guide for more information.
Upgrading the management module
Estimated time to complete: 25 minutes
When to perform: Anytime before the upgrade
If you have an EVA4400, P6300 EVA or P6500 EVA, follow the procedures in this section to:
• Upgrade HP P6000 Command View on the management module (for array-based
management).
• Upgrade the management module software.
NOTE: Management module software is bundled with the array-based management version of
HP P6000 Command View. Thus, when you upgrade HP P6000 Command View on the
management module, you are also upgrading the management module software.
Even if you are not using array-based management, you must complete the procedure in this section
for the EVA4400, P6300 EVA, or P6500 EVA, to ensure that the array has the current management
module software.
To upgrade the management module:
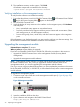
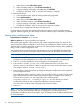
1. Connect a server with a DVD drive to the management module port (1, Figure 8 (page 32))
on the controller enclosure.
Figure 8 Management module
2. Insert the installation DVD into the drive.
3. Open a browser and navigate to the P6000 Control Panel:
https://HP array IP address:2373
32 Preparing for the upgrade