
HP Disk Drive Replacement Instructions (5697-1679, June 2012)

Verifying component failure
Before replacing a disk drive, use the following
methods to verify component failure:
CAUTION: If HP P6000 Command View does
not present a status consistent with the disk status
indicators, or if HP P6000 Command View or
your system monitoring tool indicates multiple
hardware failures, contact HP support for
assistance (http://www.hp.com/support).
• Analyze all failure messages received. Error
messages identify each disk drive by its rack,
enclosure, bay, and UUID (World Wide Name).
Record this information to assist you in identifying
the correct disk before replacing it.
The following is a sample of the disk identification
information:
FRU List:
Storage System Name: EVA_1
Storage System World Wide ID: 5000-1FE1-0015-42A0
Disk Drive UUID: 2000-0000-871D-FE60
Drive Location ---
Enclosure ID: 8
Bay ID: 1
Rack Number: 0
NOTE: The Disk Drive UUID corresponds
to the disk Node World Wide Name
displayed in HP P6000 Command View.
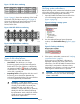
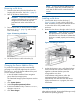
• Observe the disk status indicators (Figure 6 (page
3) for Fibre Channel disk drives and
Figure 7 (page 3) for SAS disk drives;
Table 1 (page 3) describes the LEDs). If a hard
failure has occurred, the amber indicator will be
on solid.
Figure 6 FC disk drive status indicators
2. Status1. Locate/Fault
Figure 7 SAS disk drive status indicators
2. Status1. Locate/Fault
Table 1 Disk drive status indicator LED descriptions
DescriptionLED statusLED colorLED
Locate driveSlow
blinking (0.5
Hz)
Blue1.
Locate/Fault
Drive faultSolidAmber
Drive is
spinning up
Blinking (1
Hz)
Green2. Status
or down and
is not ready
Drive activityFast blinking
(4 Hz)
Ready for
activity
Solid
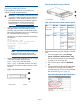
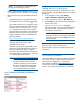
• Verify the disk status using HP P6000 Command
View:
1. In the Navigation pane, select Storage
system→Hardware→Disk enclosure→Bay.
Use the information from the error message
to guide you to the correct disk.
2. In the Content pane, select the Disk Drive
tab.
3. Compare the disk Node World Wide Name
with the error message UUID information
recorded earlier to ensure you have selected
the correct disk (Figure 8 (page 3)).
Figure 8 Identifying Node World Wide Name
Page 3