
HP StorageWorks 3000/5000 Enterprise Virtual Array release notes (VCS 4.100) (5697-7028, November 2007)

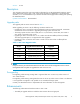

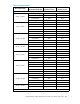

Fibre Channel disk
HP model displayed in
HP C om m and View EVA
Minimum supported
firmware version
Recommended
firmware version
ND2505823A
HP00
HP04
250GB
ND25058238 HP00 HP04
400GB NB40059392
HP02 HP03
500GB
NB5005885 5
HP02 HP03
Important notes and workarounds
This section identifies important notes and workarounds specific to the EVA3000/5000 hardware and
VCS software
. Operating constraints for related software applications are included in the following
documents:
• HP StorageWorks Comm a nd View EVA release notes
• HP StorageW
orks EVA replication software consolidated release notes
These docum
ents can be downloaded from the following website:
h
ttp://www
.hp.com/support/manuals
Click Storage S oft ware under storage and then select your product.
Information on avoiding problem situa tions specific to operating systems can be found in the individual
operating system release notes. See “ Supported operating system specifications”onpage6.
Connecting an EVA3000/5000 to a 4 GB McData switch
When connecting an EVA3000/5000 to a 4 GB-capable McD ata switch, do not connect any of the EVA
ports to port 0 on the McData swi tch. Other wise, the storage system will not start up.
The por t 0 restriction will remain effective until a firmware fix is available.
Login failure occurs for EV A connected to a Brocade 4100 switch with 2 GB
SFP cables
An EVA3000/5000 running VCS 4.100 that is connected to a Brocade 4100 switch with 2 GB SFP
cables may intermittently experience a login failure. This issue is not experienced if the Brocade switch
has 4 GB S
FP cables.
To resolve this issue, do one of the following:
• Power down and then power up the storag e system.
• Remove t
he cable from the port that is experiencing the login failure and then reconnect it.
Disk Resource Pending Timeout for Microsoft Windows cluster configurations
If the disk resource count is greater than 8, HP recommends increasing the Pending Timeout parameter
for each disk resource from 180 seconds to 360 seconds. Increasing the timeout value helps maintain
continuous operation of disk resources across SAN perturbations.
To view and set the Pending Timeout parameter:
1. Open the Microsoft Cluster Administrator.
2. Select a disk group resource in the left pane.
3. Right click each disk resource in right pane, one at a tim e, and select Properties.
4. Select the Advanced tab from the Properties menu.
5. Locate the Pending Timeout value and change it to 360.
8