
HP StorageWorks Cache Battery Replacement Instructions (5697-5699, April 2006)


CAUTION:
If Command View EVA does not present a status consistent
with that of the battery status indicator, or if Command View or
the System Event Analyzer indicates multiple hardware failures,
contact HP support for assistance. The HP support web site is
located at h
ttp://www.hp.com/support
• Analyzeanyfailuremessagesyoumayhavereceivedfromsystem
monitoring (System Event Analyzer).
• Check status using Command View EVA:
CAUTION:
If yo u are running HP Stor ageWorks Command View EVA
4.0, the battery numbering presented in the management
interface is inconsistent with the numbering used in the storage
system and reported by the ISEE/WEBES monitoring tool. HP
Command View EVA 4.0 identifies the top battery as 1 and
thebottombatteryas2. Thecorrectnumberingshouldbe0
and 1 respectively. Remember to make this conversion when
replacing a battery. This inconsistency is corrected in later
versions of HP Command View EVA.
1. In the Navigation pane, select Storage system > Hardware >
Rack > Controller enclosure > Controller
2. In the Content pane, select the Enclosure tab. The status is
displayed in the Cac he Battery Modules field. The status should
be Fai
led
3. To he
lp identify the correct enclosure, click Locate > Locate On
to di
splay Locate Confirmed on the c ontroller operator
cont
rol panel (O CP). The blue Unit ID indicator will also turn on.
• Che
ck the b attery status indicators. See Figure 1. The battery fault
ind
icator should be on. To view the status indicators it is necessary
to r
emove the front panel as described in Removing a battery.
Figure 1 Battery status indicators
1. Status indicator
2. Fault indicator
3. Battery 0
4. Battery 1
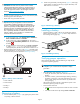
Removing a battery
1. Remove the front panel (1, Figure 2) by grasping the panel at each
end pulling it off the enclosure.
2. While moving the
battery mounting latch (2, Figure 2 )totheright,
pull the battery out of the enclosure (3) . Support the battery with
bothhandsasitisremoved.
3
1
2
0180a
Figure 2 Removing a batter y
Installing a batter y
• Position the battery as high in the slot as possible, then slide th e
battery into the enclosure (1, Figure 3) until it is fully seated and
the mounting latch engages (2) .
1
2
0179a
Figure 3 Installing a battery
Verifying proper operation
After replacing the battery, check the following to verify that the
component is operating properly:
NOTE:
It may take up to 10 minutes for the component to display
good status.
• Check the battery status indicators. See Figure 1
•Duringthefirst minute, both status indicators may be on or
flashi
ng.
•Thest
atus indicator (1) should then begin flashing, indicating
the battery is charging. It may take several hours for a new
batt
ery to fully charge. The fault indicator (2) should be off
duri
ng charging.
After checking the status indicator, install the front panel on the
enc
losure by pressing it firmly into place.
• Fro
mCommandViewEVA
•Nav
igate back to the component and check the status. It should
be
• TurnoffthelocatefunctionbyclickingLocate > Locate Off
Page 2