
HP StorageWorks Disk Enclosure Power Supply/Blower Replacement Instructions (5697-6790, June 2007)
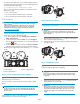

2. Lift up on the win
e-colored mounting latch (2), then grasp the
blower (3) and pull the power supply out of the enclosure.
3. Remove the blower from the defective power supp ly and install it
on the replacement power supply.
1
2
3
0009
a
Figure 4 Removing a pow er supply
Installing a p ower s upply
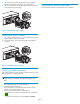
1. Lift up on the module latch (1, Figure 5) a nd slide the power supply
into the enclosure until it is fully seated.
2. Connect th e power cord to the power supply and engage the
cord lock.
1
2
0010
a
Figure 5 Installing a power supply
Verifying proper operation
After replacing the power supply or blower, check the following to verify
that the component is operating properly:
NOTE:
It may take up to 10 minutes for the component to display good
status.
• Ensure the blower begins operating immediately.
• Verify that he status in dicator is on.
• On an MSA1000, the controller LCD panel should no longer
indicate a power supply/blower failure.
• FromHPCommandViewEVAonanEVAproduct:
• Navigate to the component and check the status. It should be
.
• TurnoffthelocatefunctionbyclickingLocate > Locate Off.
Returning the failed component
Follow the return instructions provided with the new component.
Page 3