
A9782A & A9784A PCI-X 2 Gigabit Fibre Channel and Gigabit Ethernet Combination Card Installation Guide


HP-UX Installation
Step 4: Connect the fibre channel devices
Chapter 1
9
Step 4: Connect the fibre channel devices
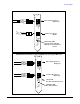
• Attach the LC connector from a fibre channel cable to the fibre channel connector on the card (Figure 1).
For fibre channel, the cable must be 50 micron MMF. If the remote connection is type SC, you will need an
LC-to-SC conversion cable.
• Plug the other end of the fibre channel cable into the connector on your fibre channel switch or device.
• Ensure power cable is connected to system. Power up the system.
Step 5: Prepare to install the software
• Log in as root.
• Check that the /usr/bin, /usr/sbin and /sbin directories are in your PATH using the command: echo
$PATH
• Check the HP-UX version your system is running by entering: uname -r
# uname -r
B.11.11
or
B.11.23
The version must be B.11.11 (11i v1) or B.11.23 (11i v2).
• Install the appropriate firmware and patches for your system as described in the Release Notes, which
are available on the Web at http://docs.hp.com under Networking and Communications and then
Combination Cards.
Step 6: Install the latest software.
• Load the software media into the appropriate drive. The Gigabit Ethernet software bundle
(GigEther-01) is on the September 2003 (or later) OE or application software disk. You will need to
install additional patches if using the September 2003 version--please see the first section of this
document for details.
• Run the swinstall program to install the software using the command: swinstall.
• Change the host name after “Source Host Name,” if necessary.
• Click the Source Depot Path to identify the registered depot for the appropriate source depot path and
activate the OK button to return to the Software Selection Window.
• Highlight the 1000Base-SX/T software GigEther-01 (for cards such as A9782A and A9784A).
• Choose Mark for Install from the “Actions” menu to choose the product to be installed.
• Choose Install from the “Actions” menu to begin product installation and open the Install Analysis
Window.
• Activate the OK button in the Install Analysis Window when the Status field displays a “Ready” message.