
AH402A/AH403A HP PCIe 8Gb 1 port and 2 port Fibre Channel Emulex HBAs using Windows and HP-UX Installation Guide, Second Edition


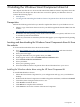


Installing the HBA
Use the following procedure for installing the HBA into a computer.
CAUTION: Be sure to observe the ESD precautions for this procedure as described in Regulatory
compliance and safety.
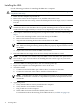
1. Make sure the computer is powered off.
2. Remove the screws on the computer cover, and then remove the cover.
3. Wearing an anti-static wrist strap, remove the blank panel from an empty x4, x8, or x16 PCIe
bus slot.
NOTE: The HBA comes with a standard PCI bracket installed. A low-profile bracket is
included in the box with the HBA. The low-profile mounting bracket is shorter than the
standard bracket: approximately 7.9 cm (3.11 in.) compared to 12.06 cm (4.75 in.) long.
4. If you require a different mounting bracket, change the bracket as follows. Otherwise, go to
Step 5.
a. Remove the mounting bracket screws from the top of the HBA.
b. Remove the bracket and store it for future use.
c. Align the new mounting bracket tabs with the holes in the HBA.
NOTE: Be careful not to push the bracket past the transceiver housing's grounding
tabs. Make sure the light emitting diodes (LEDs) are properly aligned with the holes in
the bracket.
d. Replace the screws that attach the HBA to the bracket.
5. Insert the HBA into the empty PCIe slot. Press firmly until the HBA is seated.
NOTE: In some HP server models only PCle HBAs can be inserted in the optional PCLe
riser cards or cages. For instructions on installing the riser card or cage, see your server
documentation.
6. Secure the HBA's mounting bracket to the case with the panel clip.
7. Replace the computer case and tighten the screws on the case.
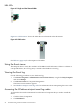
8. Attach the media:
a. Connect one end of the fiber optic cable to the LC connector on the HBA.
b. Connect the other end of the cable to the Fibre Channel device.
NOTE: The HBA does not allow normal data transmission on an optical link unless
the link is connected to a similar or compatible laser product. Both products must be
multimode.
9. Apply the power:
a. Verify that the HBA is securely installed in the computer.
b. Verify that the correct media is attached.
c. Plug in and turn on the computer.
d. Watch LEDs for Power On Self Test (POST) status results.
For information about the meaning of the LED indicators, see Table 4-1 (page 19).
16 Installing HBAs