
HP-UX and Windows OS Installation Guide for HP PCIe 8Gb and 4Gb 2 Port Fibre Channel Emulex Mezzanine HBA


Once the HP Fibre Channel Mass Storage software and hardware are installed and running, use
the following steps to verify connectivity:
1. Check the state of all Fibre Channel hardware and interfaces. Enter the ioscan command
and verify the Hardware State and the hw Interface state are CLAIMED.
If the Fibre Channel device file has not been created, enter the following commands:
# insf -e
# ioscan -f
2. Verify that all devices you have attached to the Fibre Channel adapter are listed in the
ioscan output.
If all the attached devices are listed and appear as CLAIMED, the HP Fibre Channel Mass Storage
installation is verified.
If all the attached devices are not listed or appear as CLAIMED, see the Troubleshooting and
Maintenance chapter of the HP Fibre Channel Adapters Support Guide.
Interpreting hardware paths
The following examples illustrate the Fibre Channel hardware path format.
NOTE: With HP-UX 11i v3, there is a new option for displaying the hardware path format
called agile (new-style) display format.
In this new display format, there are two components in the hardware path: 1) the target port
worldwide name (for example, 0x500508b300925641); and 2) the LUN ID (for example,
0x1000000000000)
To display hardware path information in the agile (new-style) format, use the N option in the
command line; for example, ioscan -fNH /0/4/0/0/0/0 .
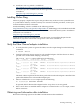
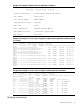
Example 3-5 Legacy (pre-HP-UX 11i v3) hardware path for a direct fabric attach device
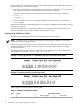
Example 3-6 Hardware path for a private loop device
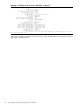
Table 7 describes each field in the hardware path.
Table 3-1 Hardware path field descriptions
Fibre channel topologyValueField
Private loopFabric topologies
20 Installing the HP-UX Operating System Components