
HP FlexFabric 11900 Switch Series Installation Guide


7
• To ensure rack stability, install the slide rails to the lowest possible position when installing a single
switch on the rack. To install multiple switches on the rack, mount the heaviest switch at the bottom
of the rack.
• Identify the chassis and slide rail positions for the switch. For the height and other specifications, see
"Appendix A Chassis views and technical specifications."
Slide rail installation varies with rack type. This section uses the slide rails in the HP rack mounting kit
(JC665A) as an example.
To install a slide rail:
1. Read the signs on the slide rail (see Table 6) to avoid
making a mistake.
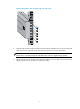
Figure 2 Right slide rail
(1) Guide rail (2) Sign (3) Installation hole
Table 6 Description of signs on the slide rails
Si
g
n Meanin
g
Remarks
F/L Front end of the left slide rail Mount this end to the front left rack post.
F/R Front end of the right slide rail Mount this end to the front right rack post.
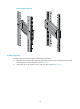
2. Mark the position on the rack for installing the slide rail:
a. Make sure the bottom edge of the slide rail aligns with the middle of the narrower metal area
between holes, as shown in Figure 3.
b. E
ach rack post requires six screws to attach the slide rail. Mark the uppermost square hole and
lowermost square hole for installation.
c. Mark the square holes at the same height on the other three rack posts.