
HP FlexFabric 11900 Switch Series Installation Guide


15
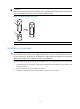
IMPORTANT:
Before you hammer the shank to the workbench or floor, insert the spade-shaped wed
g
es into the
g
rooves
on the shank. Otherwise, the wall anchor cannot be installed correctly.
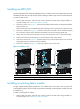
Figure 11 Installing the shank to the plug
(1) Shank (2) Groove
(3)
Plu
g
(4) Spade-shaped wed
g
e
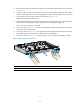
Installation procedures
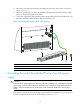
CAUTION:
Do not use the fan tray handles, power supply handles, chassis air vents, or handle of chassis back cover
for moving the chassis. These parts are not designed for weight support. Any attempt to carry the chassis
w
ith these parts might cause equipment damage or even bodily injury.
This task requires at least two people. HP recommends that you use a mechanical lift to move the chassis.
1. Hold the handles on the chassis or support the chassis bottom and steadily move the chassis to the
workbench or floor.
2. Gently put the chassis on the workbench or floor.
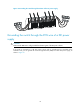
3. Attach the L-shaped brackets to the workbench or floor with wall anchors.
1
2
3
4