
HP FlexFabric 11900 Switch Series Installation Guide


52
1. Prepare an antistatic mat to place the removed card.
2. Wear an ESD wrist strap and make sure it makes good skin contact and is well grounded. For
more information, see "Installing FRUs."
3. R
emove all cables from the card.
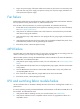
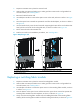
4. Use a Phillips screwdriver to remove the captive screw on the card, as shown in callout 1 on Figure
38.
5. Move the
ejector levers outwards to separate the card from the backplane, as shown in callout 2
on Figure 38.
6. Use on
e hand to slowly move the card outwards. Supporting the bottom of the card with the other
hand, pull the card out of the slot along slide rails, as shown in callout 3 on Figure 38.
7. Put the rem
oved card on the antistatic mat.
8. Install a new card. For the installation procedures, see "Installing FRUs."
Figure 38 Replacing a card
(1) Loosen the captive screw. (2) Move the ejector levers outwards.
(3) Take out the card.
Replacing a switching fabric module
1. Prepare an antistatic mat to place the removed switching fabric module.
2. Wear an ESD wrist strap and make sure it makes good skin contact and is well grounded. For
more information, see "Installing FRUs."
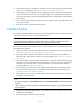
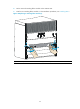
3. Use a Phillips scr
ewdriver to loosen the captive screws on the switching fabric module, as shown
in callout 1 on Figure 39.
4. Press the butt
ons on the ejector levers and then move the ejector levers outward to separate the
switching fabric module from the backplane, as shown in callout 2 on Figure 39.
5. Slowly move the switc
hing fabric module outward. Holding both sides of the switching fabric
module, pull the switching fabric module out of the slot along the slide rails, as shown in Figure 40.
2
3
2
1