
R21xx-HP FlexFabric 11900 Layer 3 IP Routing Configuration Guide

95
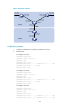
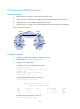
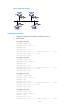
Figure 24 Network diagram
Configuration procedure
1. Configure IP addresses for interfaces.
2. Enable OSPF (see "Configuring basic OSPF").
3. Configure Area 1 as an NSSA area:
# Configure Switch A.
<SwitchA> system-view
[SwitchA] ospf
[SwitchA-ospf-1] area 1
[SwitchA-ospf-1-area-0.0.0.1] nssa default-route-advertise no-summary
[SwitchA-ospf-1-area-0.0.0.1] quit
[SwitchA-ospf-1] quit
# Configure Switch C.
<SwitchC> system-view
[SwitchC] ospf
[SwitchC-ospf-1] area 1
[SwitchC-ospf-1-area-0.0.0.1] nssa
[SwitchC-ospf-1-area-0.0.0.1] quit
[SwitchC-ospf-1] quit
NOTE:
• To allow Switch C in the NSSA area to reach other areas within the AS, you must provide the keyword
default-route-advertise for the nssa command issued on Switch A (the ABR) so that Switch C can obtain
a default route.
• Configuring the nssa command with the keyword no-summary on Switch A can reduce the routing
table size on NSSA Switches. On other NSSA Switches, you only need to configure the nssa command.
# Display OSPF routing information on Switch C.
[SwitchC] display ospf routing
OSPF Process 1 with Router ID 10.4.1.1
Routing Tables
Routing for Network