
BLADE OS™ Application Guide HP GbE2c Ethernet Blade Switch for c-Class BladeSystem Version 5.1 Advanced Functionality Software

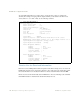
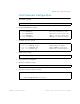

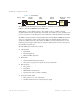
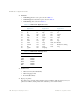
Table Of Contents
- Contents
- Figures
- Tables
- Preface
- Part 1: Basic Switching
- Accessing the Switch
- The Management Network
- Local Management Using the Console Port
- The Command Line Interface
- Remote Management Access
- Client IP Address Agents
- Securing Access to the Switch
- Setting Allowable Source IP Address Ranges
- RADIUS Authentication and Authorization
- TACACS+ Authentication
- LDAP Authentication and Authorization
- Secure Shell and Secure Copy
- Configuring SSH/SCP Features on the Switch
- Configuring the SCP Administrator Password
- Using SSH and SCP Client Commands
- SSH and SCP Encryption of Management Messages
- Generating RSA Host and Server Keys for SSH Access
- SSH/SCP Integration with Radius Authentication
- SSH/SCP Integration with TACACS+ Authentication
- End User Access Control
- Ports and Trunking
- Port-Based Network Access Control
- VLANs
- Spanning Tree Protocol
- RSTP and MSTP
- Link Layer Discovery Protocol
- Quality of Service
- Accessing the Switch
- Part 2: IP Routing
- Basic IP Routing
- Routing Information Protocol
- IGMP
- OSPF
- OSPF Overview
- OSPF Implementation in BLADE OS
- OSPF Configuration Examples
- Remote Monitoring
- Part 3: High Availability Fundamentals
- High Availability
- Layer 2 Failover
- Server Link Failure Detection
- VRRP Overview
- Failover Methods
- BLADE OS Extensions to VRRP
- Virtual Router Deployment Considerations
- High Availability Configurations
- High Availability
- Part 4: Appendices
- Index

BLADE OS 5.1 Application Guide
BMD00113, September 2009 Chapter 7: Link Layer Discovery Protocol 131
If SNMP trap notification is enabled, the notification messages can also appear in the system log.
This is enabled by default. To change whether the SNMP trap notifications for LLDP events appear
in the system log, use the following commands:
Changing the LLDP Transmit State
When the port is disabled, or when LLDP transmit is turned off for the port using the admstat
command’s rx_only or disabled options (see “Transmit and Receive Control” on page 128), a
final LLDP packet is transmitted with a time-to-live value of 0. Neighbors that receive this packet
will remove the LLDP information associated with the GbE2c port from their MIB.
In addition, if LLDP is fully disabled on a port (using admstat disabled) and later re-enabled,
the GbE2c will temporarily delay resuming LLDP transmission on the port in order to allow the port
LLDP information to stabilize. The reinitialization delay interval can be globally configured for all
ports using the following command:
where interval is the number of seconds to wait before resuming LLDP transmissions. The range is
between 1 and 10. The default is 2 seconds.
Types of Information Transmitted
When LLDP transmission is permitted on the port (see “Enabling or Disabling LLDP” on
page 128), the port advertises the following required information in type/length/value (TLV)
format:
Chassis ID
Port ID
LLDP Time-to-Live
>> # /cfg/sys/syslog/log lldp ena (Add LLDP notification to Syslog)
or
>> # /cfg/sys/syslog/log lldp dis (Do not log LLDP notifications)
>> # /cfg/l2/lldp/redelay <interval>