
HP-HSC ATM/622 & ATM/155 Adapters Hardware Installation Guide


12
HP 9000 B, C, D and J-Class systems
2
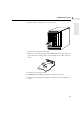
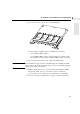
5 Install the ATM adapter in your system, referring to the system documentation
for installation instructions:
• Class B: “Owner’s Guide”
• Class C and J: “Owner’s Guide”
• Class D: “I/O Card Upgrade Guide”
Note If you have problems when installing the UTP Cat5 J2499A ATM adapter,
Hewlett-Packard recommends that you remove the cards in the adjacent slots, install
the ATM adapter and then reinstall the other cards.
6 If you are connecting to an ATM switch, consult your switch documentation.
7 To connect the ATM adapter to an ATM switch, or back-to-back with another
ATM adapter, you must:
• Connect the ATM cable to the ATM adapter and to a free port on other
device in such a way that the cables are “crossed over” so that the transmit
of one device connects to the receive of the other device. With UTP Cat 5
cables, you must use a cross-over cable. See the Configuration and
Troubleshooting Guide.
• Ensure that you connect the ATM adapter to the correct type of port on the
other device (MMF, SMF or UTP Cat5, 155 Mbits/s or 622 Mbits/s as
appropriate).
• Ensure that you use the correct type of cable (MMF, SMF or UTP Cat5).
Note Inverting the transmit and receive connectors when you connect the cable to the ATM
adapter will not damage your equipment.
8 Reconnect the power and telecommunications cables.
9 Switch on the system. Any error messages will appear on the system console.
Verifying the hardware installation
1 Look at the LEDs on the ATM adapter. If the hardware installation is successful
and the cables are correctly connected, both the Rx and Tx LEDs are off (unlit).
2 If the Rx LED is yellow:
a Ensure that the system is switched on and that the ATM switch is switched
on. Then swap the transmit and receive cables connected to the ATM
adapter.
b If the Rx LED is still yellow, consult the Configuration and Troubleshooting
Guide to troubleshoot your installation.