
HP PCI Multiplexer Family Cabling, Diagnostics, and Troubleshooting Manual
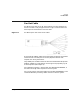

Install PCI MUX Card
PCI Mux Installation Procedure
Chapter 2 25
PCI Mux Installation Procedure
When adding new PCI MUX cards to an existing system, use the
following steps to install the hardware and software:
• Install the PCI Mux software using the swinstall program.
• Shut down the system.
• Install the Mux Cards in the appropriate slots and connect the port
modules and power supplies, if any. When installing Cards in an
A-Class platform, you can choose to install the Card in a “turbo” or
“twin turbo” slot, depending upon the performance desired. For more
information, refer to your A-Class platform documentation.
• Power up the system. Device files will be created automatically.
• Enter the command below to check for MUX card activation.
# ioscan -f | grep tty
• Run emux_diag program to verify the topology of the port module
connections.
• Finally, use the SAM utility to change the configuration or the device
file, to enable hardware handshaking and add getty entries. For more
information about creating the device files and adding getty entries
on HP-UX 11i v1 and HP-UX 11i v2, see “Creating Special Device
Files” on page 27.
NOTE System Administration Manager (SAM) is deprecated in HP-UX 11i v3.
HP System Management Homepage (HP SMH) is the system
administration tool for managing HP-UX 11i. SMH provides web-based
systems management functionality, at-a-glance monitoring of system
component health and consolidated log viewing. SMH also provides
Terminal User Interfaces (TUIs).
• Run the command below each time a new port module is added to the
Mux Card.
# insf -e -d pci_mux0