
Ethernet Support Guide for HP-UX 11i v3
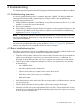

Example 11 Displaying the current MTU size
Use the following nwmgr command, where ppa identifies the device by the PPA number:
$nwmgr -g -A mtu -c lanppa
Sample output (port 2):
lan2 current values:
MTU = 1500
3.7.3 Setting MTU/Jumbo Frames
Example 12 Setting the MTU size
HP recommends setting the MTU size permanently to persist across reboots. To do so, edit the
driver's configuration file to set the HP_driver_MTU parameter, where driver is the name of
the driver. For example, to set the MTU size for all ports on the icxgbe driver to 9000 (enabling
Jumbo Frames), specify the following in the /etc/rc.config.d/hpicxgbeconf configuration
file:
HP_ICXGBE_MTU=9000
Alternatively, to set the parameter immediately and permanently, use the nwmgr command for
each port, specifying the --sa option, as in the following example:
nwmgr --sa -A mtu=9000 -c lanppa
3.7.4 Verifying the MTU size change
Verify any MTU changes by using the netstat -rn command. If the MTU size has not changed
as expected, enter the following commands:
$ifconfig lanppa unplumb
$ifconfig lanppa ip_address netmask netmask up
To check the current Ethernet frame size for your device, use the nwmgr command, as explained
in Section 3.7.2 (page 30).
3.8 Displaying and setting the multiple queue parameter
Multiple queues allow network traffic streams to be distributed into queues associated with specific
processor cores. This distributes the workload and prevents data traffic processing from
overwhelming a single core. With some exceptions, you can set both multiple receive queues and
multiple transmit queues. Multiple queues are only supported by 10GbE drivers. All 10GbE drivers
support multiple receive queues; not all 10GbE drivers support multiple transmit queues. For more
support information, see Table 4 (page 12).
3.8 Displaying and setting the multiple queue parameter 31