
HP High-Performance Secure Hard Disk Setup Guide


Install the HP Secure Hard Disk (J8018A)
Use the appropriate section to install the HP High-Performance Secure Hard Disk (J8018A).
NOTE: Before you begin the installation procedure, locate the setup or use guides provided with your
printer/MFP.
●
Install in the HP DS9250c digital sender
●
Install in the HP LaserJet M4345, M5025/M5035, or M9040/M9050
●
Install in the HP LaserJet CM3530
Install in the HP DS9250c digital sender
CAUTION: Verify that you have backed up any data that you need to keep from the non-encrypted
hard disks. Use Secure Disk Erase or a similar utility to erase the standard non-encrypted hard disks
before removal or deactivation.
1. Turn the digital sender off, and disconnect all power and interface cables.
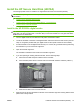
2. Locate the formatter in the back of the digital sender and loosen the two thumb screws. (See the
setup or use guides provided with your digital sender for the specific location of the formatter.)
3. Pull the formatter out of the digital sender and lay it on a clean, flat, grounded surface, positioning
the formatter so you can access the cage door.
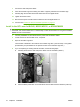
4. Open the formatter cage door.
The hard disk is attached to the inside of the formatter cage door.
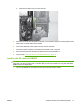
5. If you are replacing an existing internal hard disk, use the following steps:
a. Disconnect the data and power cables from the hard disk.
b. Press the black plastic latch on the left side of the hard disk inward to release it (callout 1).
c. Slide the hard disk to remove it from the slot.
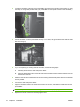
6. Slide the new HP Secure Hard Disk into the slot on the formatter cage door ensuring that the black
plastic latch is firmly seated.
ENWW Install the HP Secure Hard Disk (J8018A) 15