
HP High-Performance Secure Hard Disk Setup Guide
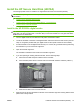


2. Locate the formatter at the rear of the printer/MFP and remove the thumb screws (callout 1). (See
the setup or use guides provided with your printer/MFP for the specific location of the formatter.)
1
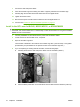
3. Pull the formatter out of the printer/MFP and lay it on a clean, flat, grounded surface with the hard
disk slot facing up.
2
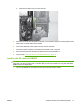
4. If you are replacing an existing internal hard disk, use the following steps:
a. Carefully disconnect the data and power cables.
b. Press the black plastic latch on the left side of the hard disk inward to release and then remove
the disk from the slot.
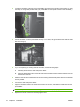
5. Slide the new HP Secure Hard Disk into the slot ensuring that the black plastic latch on the left side
is firmly seated.
6. Connect the data and power cables.
7. Align the formatter board in the tracks at the bottom of the slot, and slide the board back into the
printer/MFP.
NOTE: To prevent formatter board damage, ensure that it is properly aligned in the tracks.
8. Replace the thumb screws and carefully tighten them.
18 Chapter 2 Installation ENWW