
HP High-Performance Secure Hard Disk Setup Guide


9. Reconnect the power and all interface cables and turn the printer/MFP on.
10. Continue with
Confirm HP Secure Hard Disk operation on page 19.
Confirm HP Secure Hard Disk operation
After initially installing the HP Secure Hard Disk, confirm that it is operating correctly by using the
HP embedded Web server.
NOTE: Use this section when you first install the HP Secure Hard Disk and are initially verifying printer/
MFP operation. Otherwise, use the
Troubleshooting on page 29 section.
You can also use the printer configuration page to verify the installation.
1. Start a supported Web browser and enter the IP address or host name of the printer/MFP as the
URL.
See the setup or use guides provided with your printer/MFP for additional information about the
HP embedded Web server.
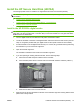
2. From the HP embedded Web server page, select the Settings tab, and then select Security.
3. In the Hard Drive and Mass Storage Security Settings section, select Configure.
The HP Secure Hard Disk status is displayed, which includes the type, serial number, drive status,
and encryption status, as in the following example:
Hard Disk: Internal (encryptable)
Serial Number: ABCDE1234567890abcde
Drive Status: Enabled
Encryption Status: Encrypted
Encrypted indicates that the HP Secure Hard Disk is locked to the printer/MFP. If the HP Secure
Hard Disk is removed from the printer/MFP, the data is unreadable.
NOTE: Automatic locking is enabled by default. Once installed, the HP Secure Hard Disk
automatically locks to the printer/MFP.
4. If the Hard Disk status is set to None installed, meaning that the printer/MFP is not detecting the
HP Secure Hard Disk, turn the printer/MFP off, disconnect the power cable, and try the following:
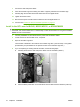
a. For the HP High-Performance Secure EIO Hard Disk (J8019A), check to see that it is properly
seated in the slot.
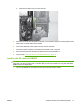
b. For an HP High-Performance Secure Hard Disk (J8018A) mounted on the inside of a formatter
door, ensure that the data and power cables are properly connected.
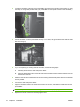
c. For an HP High-Performance Secure Hard Disk (J8018A) installed on a formatter, verify that
the data and power cables are properly connected and that the formatter is properly seated.
If these steps did not resolve the issue, see
Troubleshooting on page 29.
5. If the Drive Status option is Not applicable, this might also indicate that the HP Secure Hard Disk
is not properly installed. (The Hard Drive option is probably set to None installed.)
ENWW Confirm HP Secure Hard Disk operation 19