
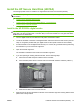
HP High-Performance Secure Hard Disk Setup Guide

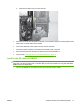


c. Slide the hard disk to remove it from the slot.
2
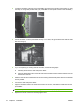
5. Slide the new HP Secure Hard Disk into the slot on the formatter cage door ensuring that the black
plastic latch on the left side is firmly seated.
6. Connect the data and power cables to the HP Secure Hard Disk.
7. Close the formatter cage door and replace the formatter cover, if required.
8. Reconnect the power and all interface cables and turn the printer/MFP on.
9. Continue with
Confirm HP Secure Hard Disk operation on page 19.
Install in the HP LaserJet CM3530
CAUTION: Verify that you have backed up any data that you need to keep from the non-encrypted
hard disks. Use Secure Disk Erase or a similar utility to erase the standard non-encrypted hard disks
before removal or deactivation.
1. Turn the printer/MFP off, and disconnect the power and all interface cables.
ENWW Install the HP Secure Hard Disk (J8018A) 17