
HP High-Performance Secure Hard Disk Setup Guide


Disable encryption
The HP embedded Web server option Disable encryption and continue, disables encryption on the
printer/MFP. Use this option when a printer/MFP is configured to use an HP Secure Hard Disk, but a
standard (non-encrypted) hard disk is installed in its place. Using this option assumes that you want to
disable encryption and continue using the standard (non-encrypted) hard disk. Otherwise, you must
locate and install the correct HP Secure Hard Disk that is locked to this printer/MFP.
When you disable encryption, the information on the previously encrypted HP Secure Hard Disk is
unreadable, since the encryption key no longer matches the key stored on the printer/MFP. Selecting
this option reboots the printer/MFP.
CAUTION: All data on the original HP Secure Hard Disk becomes unreadable. The printer/MFP
restarts at the conclusion of the process. The setting to enable encryption when the printer/MFP starts
(Automatically enable encryption when powered on) is disabled.
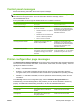
1. Start a supported Web browser and enter the IP address or host name of the printer/MFP as the
URL.
2. From the HP embedded Web server page, select the Settings tab, and then select Security.
3. In the Hard Drive and Mass Storage Security Settings section, select Configure.
The HP Secure Hard Disk status is displayed, which includes the type, serial number, drive status,
and encryption status.
4. To reset encryption, select Disable encryption and continue.
NOTE: Disabling encryption occurs almost immediately. However, the time required to reboot
the printer/MFP depends on the model.
Secure storage erase
Select this option to permanently remove all data from the encrypted HP Secure Hard Disk or the
standard (non-encrypted) hard disk(s). After the data is erased, the printer/MFP reboots. Erasing the
disk can take significant time (hours) to complete. (Unlike disabling encryption, which occurs almost
immediately, this option overwrites data.)
CAUTION: All data on the selected HP Secure Hard Disk or the standard (non-encrypted) hard disk
is erased. The printer/MFP restarts at the conclusion of the process.
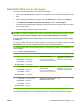
1. Start a supported Web browser and enter the IP address or host name of the printer/MFP as the
URL.
2. From the HP embedded Web server page, select the Settings tab, and then select Security.
3. In the Hard Drive and Mass Storage Security Settings section, select Configure.
The hard disk status is displayed, which includes the type, serial number, drive status, and
encryption status.
4. Select the device to erase.
NOTE: It can take a significant amount of time (hours) for the printer/MFP to complete this phase
and restart.
5. Click Perform Secure Storage Erase.
ENWW Reinitialize, Disable, or Erase the HP Secure Hard Disk 27