
R3102-R3103-HP 6600/HSR6600 Routers Interface Configuration Guide

75
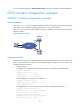
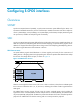
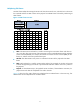
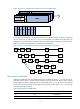
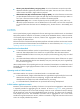
Figure 20 Network diagram for an E-CPOS application
In actual applications, the connection between these low-end routers and the E-POS interfaces might
span more than one transmission network and as such, might require relay. This is similar to the scenario
where low-end devices are connected to Router A through one or multiple E3/T3 leased lines.
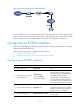
Configuring an E-CPOS interface
Before transmitting data over SONET/SDH optical interfaces and using low-speed ports for accessing,
configure the E-CPOS interface first.
Complete the following tasks to configure an E-CPOS interface:
• Configuring an E-CPOS interface
• Configuring the operating mode of an E
-CPOS interface/channel
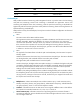
Configuring an E-CPOS interface
Ste
p
Command Remarks
1. Enter system view.
system-view
N/A
2. Configure the working mode
of an interface card.
card-mode slot
slot-number.subslot
subslot-number e-cpos
To make the newly configured working
mode take effect, you must restart the
device or hot swap the interface board (if
the interface board supports hot
swapping) after working mode switch.
For more information about configuring
the working mode of an interface card,
see Fundamentals Configuration Guide.
3. Set the interface description.
description text
Optional.
By default, the description of an E-CPOS
interface is interface name Interface, for
example, E-Cpos5/1/0 Interface.
4. Set the framing format.
frame-format { sdh | sonet }
Optional.
SDH by default.