HP A6600_HSR6602-CMW520-R3103P02 Release Notes © Copyright 2013 Hewlett-Packard Development Company, L.P. The information contained herein is subject to change without notice. The only warranties for HP products and services are set forth in the express warranty statements accompanying such products and services. Nothing herein should be construed as constituting an additional warranty. HP shall not be liable for technical or editorial errors or omissions contained herein.
Contents Important information ·····················································································································································1 Version information··························································································································································1 Version number ············································································································································
Resolved Resolved Resolved Resolved Resolved Resolved Resolved Resolved Problems Problems Problems Problems Problems Problems Problems Problems in in in in in in in in CMW520-R2603P08 ··············································································································20 CMW520-R2603P07 ··············································································································20 CMW520-R2603P06 ···································································
List of Tables Table 1 Version history ................................................................................................................. 1 Table 2 Hardware and software compatibility matrix 1 ..................................................................... 3 Table 3 Hardware and software compatibility matrix 2 ..................................................................... 3 Table 4 Hardware and software compatibility matrix 3 ......................................................
This document describes the features, restrictions and guidelines, open problems, and workarounds for version HP A6600_HSR6602-CMW520-R3103P02. Before you use this version in a live network, back up the configuration and test the version to avoid software upgrade affecting your live network. Use this document in conjunction with HP A6600_HSR6602-CMW520-R3103P02 Release Notes (Software Feature Changes) and the documents listed in "Related documentation.
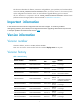
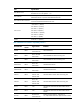
Version number Release date Last version Releas e type Remarks New feature: CMW520-R2604P01 CMW520-R2604 2012-5-3 Release version SR6600 router supports 1024 sessions of second level when BFD collaborate with static route, otherwise the specification is 512. SR6600 router supports disable USB port. SSH supports SCP. Fixes bugs. CMW520-R2604 CMW520-F2604 2012-3-23 Release version Fixes bugs.
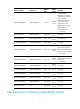
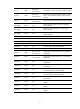
CAUTION: To avoid an upgrade failure, use Table 2 to verify the hardware and software compatibility before performing an upgrade. Table 2 Hardware and software compatibility matrix 1 Item Specifications Product family A6600/SR6600 series Hardware platform A6602/SR6602 Memory 2G/4G Flash/CF Card Min 256M Boot ROM version Updates automatically with Host software. After this version is updated, the BootWare version will update to 1.34. Host software A6602-CMW520-R3103P02.
Item Specifications Updates automatically with Host software. After this version is updated, the BootWare version will update to: RPE-X1:1.42 RSE-X1:1.12 MCP-X1/MCP-X2:1.13 FIP-100:1.36 Boot ROM version FIP-110:1.11 FIP-200:1.22 FIP-210:1.07 SAP-24GBP:1.05 SAP-48GBP:1.05 SAP-48GBE:1.05 Note: You can display the version number with the display version command in any view. Please see Note and Note. A6600-CMW520-R3103P02-RPE.
Item Specifications Boot ROM version Updates automatically with Host software. After this version is updated, the BootWare version will update to 1.13. Host software HSR6602_MCP-CMW520-R3103P02.bin – requires JG353A HP HSR6602-G Router or JG354A HP HSR6602-XG Router. Host software MD5 checksum HSR6602_MCP-CMW520-R3103P02.bin : 3ec6321a564eae60184602d16ea71427 i iMC EAD 5.1 (E0301) iMC MVM 5.1 (E0201) iMC NTA 5.1 (E0201) iMC PLAT 5.2 (E0401) iMC version iMC QoSM 5.1 (E0202) iMC UAM 5.
Module:200 FIP-110 VER.A FIP-200 VER.B FIP-210 VER.C SAP-24GBP VER.A 100 HP A6600 24-port GbE SFP Service Aggregation Platform Module SAP-48GBP VER.A 100 HP 6600 48-port GbE SFP Service Aggregation Platform Module SAP-48GBE VER.A 100 HP A6600 48-port Gig-T Service Aggregation Platform Module HIM-8FE VER.B 100 HP A6600 8-port 10/100Base-T HIM Module HIM-4GBE VER.B 200 HP A6600 4-port Gig-T HIM Module HIM-4GBP VER.A 200 HP A6600 8-port Gig-T HIM Module HIM-8GBE VER.
Table 6 MPU and FIP/SAP compatibility matrix MPU/FI FIP-100 FIP-110 FIP-200 FIP-210 FIP-10 FIP-20 P/SAP SAP-24GBP SAP-48 GBP SAP-48 GBE RPE-X1 √ √ √ √ × × × × × RSE-X1 × √ × √ × × √ √ √ MCP-X1 × × × × √ √ × × × MCP-X2 × × × × √ √ × × × Table 7 MPU and Host compatibility matrix MPU/Host A6604/SR6604 A6608/SR6608 A66016/SR6616 RPE-X1 √ √ √ RSE-X1 √ √ √ MCP-X1 √ √ √ MCP-X2 √ √ √ Note: The MPUs of SR6600/A6600 only support the host listed in this t
MIM: Multi-functional Interface Module RT-MIM-1POS-H3 √ × √ √ × √ √ RT-MIM-2SAE-H3 √ √ √ √ √ √ √ RT-MIM-4SAE-H3 √ √ √ √ √ √ √ RT-MIM-8SAE-H3 √ √ √ √ √ √ √ RT-MIM-2GBE-H3 √ × √ √ × √ √ RT-MIM-8E1(75)-H3 √ √ √ √ √ √ √ RT-MIM-1AMM-H3 √ × √ √ × √ √ RT-MIM-1ASL-H3 √ × √ √ × √ √ RT-MIM-1ASM-H3 √ × √ √ × √ √ RT-MIM-8E1(75)-F-H3 √ √ √ √ √ √ √ RT-MIM-1CE3-V2-H3 √ √ √ √ √ √ √ RT-MIM-1CT3-V2-H3 √ √ √ √ √ √ √ RT-MIM-1ATM-OC3
Upgrading restrictions and guidelines None. Hardware feature updates CMW520-R3103P02 None. CMW520-R3103P01 None. CMW520-R3102 CMW520-R3102 supports the following new hardware: SAP-48GBP: HP 6600 48-port GbE SFP Service Aggregation Platform Module.
CMW520-R2604P02 None. CMW520-R2604P01 None. CMW520-R2604 None. CMW520-F2604 None. CMW520-R2603P08 None. CMW520-R2603P07 None. CMW520-R2603P06 None. CMW520-R2603P05 None. CMW520-R2603P04 None. CMW520-R2603P03 None.
CMW520-R2603P02 None. CMW520-R2603P01 None. CMW520-R2603 None. Software feature and command updates For more information about the software feature and command update history, see HP A6600_HSR6602-CMW520-R3103P02 Release Notes (Software Feature Changes).
Item MIB file Module Description Modified None None None CMW520-R2604P04 New None None None Modified None None None CMW520-R2604P02 New None None None Modified None None None CMW520-R2604P01 New None None None Modified None None None CMW520-R2604 New None None None Modified None None None CMW520-F2604 New None None None Modified None None None CMW520-R2603P08 New None None None Modified None None None CMW520-R2603P07 New None None None Modified No
Item MIB file Module Description CMW520-R2603P01 New None None None Modified None None None CMW520-R2603 New None None None Modified None None None Operation changes Operation changes in CMW520-R2604 The super authentication blacklist feature is supported When you use the super command to switch the user privilege level for a user that has passed AAA authentication, if you enter the super password for five consecutive times, the super command is locked for the user and unlocked 15 minute
RTD60035 Symptom: In the version after F2604, the password encryption within configuration files has been enhanced and cannot be interpreted by earlier revisions of the agent code. This means that if a unit is downgraded to earlier code, it may no longer be possible to login and manage the device. Condition: Upgrade the code from the version before F2604 to F2064 or later version. Workaround: Before upgrading to the new code, it is necessary to ensure password control is disabled.
Condition: This symptom occurs when the following conditions exist: The router has two MPUs. OSPF NSR is enabled. An OSPF default route exists. RTD066144 Symptom: When the DHCP relay agent on the A6600 receives a DHCP packet in which the length value in Option 82 is larger than the actual field length, the A6600 reboots. Condition: This symptom occurs when the DHCP relay agent on the A6600 receives a DHCP packet in which the length value in Option 82 is larger than the actual field length.
Resolved Problems in CMW520-R3102 RTD065314 Symptom: The device fails to ping the IP addresses of some connected servers. Condition: This symptom might occur when the following conditions exist: The device forwards VPN traffic. Multiple IP addresses correspond to one MAC address. MAC address moves occur. RTD064945 Symptom: Because of the weak cryptographic algorithm there is a risk that the stored passwords possibly be cracked. Condition: Configure password in ciphertext.
Resolved Problems in CMW520-R2604P05 RTD063021 Symptom: LACP might fail to be enabled on a port. Condition: This symptom might occur on a port if the following procedure is performed: Remove the port from a link aggregation group when the port is shut down. Enable the port and add it another link aggregation group. Update the members in the original link aggregation group. RTD063369 Symptom: Some AAA servers cannot filter users by IMSI and SN.
Resolved Problems in CMW520-R2604P02 RTD061176 Symptom: In the IMC display, the interface status is showed always DOWN if the interface belongs to a link-aggregation group, in fact it is actually UP and passing data. Condition: None. RTD061265 Symptom: The link message cannot be deal with correctly, when the ICCN package does not contain the AVP associate with proxy. Condition: Configure L2TP at A6600. RTD061334 Symptom: A6600 will ignore those routes with 0.0.0.
RTD60497 Symptom: The result cannot be displayed completely. Condition: Display the message of IPSEC SA. RTD060853 Symptom: The rules cannot be greater than 106, otherwise, the rules greater than 96 cannot take effect. Condition: Configure PBR at the inner Ten-GigabitEthernet interface of SPE-FWM-200. Resolved Problems in CMW520-R2604 RTD58814 Symptom: The usage rate of CPU is too high. Condition: The device be configured as DHCP server, the conflict address pool is full.
Resolved Problems in CMW520-F2604 None Resolved Problems in CMW520-R2603P08 RTD55231 Symptom: The function of portal free rule of tcp/udp cannot work correctly. Condition: Forwarding by VLAN. RTD58592 Symptom: IPSec match error and package be dropped in multi tunnel DVPN environment. Condition: The amount of flow is more than 1 million. Resolved Problems in CMW520-R2603P07 RTD55231 Symptom: Uploading failure, and cannot upload again.
RTD58400 Symptom: The device takes this transceiver as not supported module incorrectly. Condition: ‘1000_BASE_LX_AN_SFP’ transceiver is installed at A6600 router. RTD58455 Symptom: IPSEC Packets be discarded in a large amount. Condition: IPSEC encrypts through software. RTD58575 Symptom: The device takes exception when the forwarding traffic is too large. Condition: ‘nat outbound’ and ‘session log’ be configured at tunnel interface.
RTD56939 Symptom: Nat address pool cannot support 128 addresses. Condition: None. RTD57063 Symptom: Tunnel interface cannot answer the query of ‘ifxtable’ correctly. Condition: None. RTD57134 Symptom: A6600 router cannot deal with the message correctly. Condition: The ICCN message send by LAC device does not contain Proxy auth attribute. RTD57263 Symptom: The statistics information cannot update correctly.
RTD57529 Symptom: The BGP neighborhoods flush frequently. Condition: The usage rate of CPU is too high. Resolved Problems in CMW520-R2603P02 RTD56361 Symptom: The RIP route bypass the link cannot be deleted normally Condition: RIP and BFD are configured, the data link is single pass, send direction is normal, but cannot receive data. RTD56470 Symptom: If the burst data package is too large, the amount of dropped package is too large. Condition: CBQ is configured at A6600 router.
Condition: None. RTD56243 Symptom: In some special condition, the result of ping has dropped packages. Condition: The device is configured with RPE-X1. RTD56301 Symptom: Configure flag j1 of both ends to the same, undo flag j1 ignore, the router receives RDI alarm message however. Condition: Configure "flag j1 ignore" at POS interface. RTD56417 Symptom: E1/E1-F module cannot pass TBR4 test. Condition: None.
HP 6600/HSR6600/HSR6800 Router Series Security Command Reference HP 6600/HSR6600/HSR6800 Router Series High Availability Command Reference HP 6600/HSR6600/HSR6800 Router Series Network Management and Monitoring Command Reference HP 6600/HSR6600/HSR6800 Router Series OAA Command Reference Obtaining documentation To find related documents, browse to the Manuals page of the HP Business Support Center website: http://www.hp.
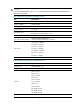
Appendix A Feature list Hardware features Table 10 hardware features-A6600 A6602 A6604 A6608 A6616 (JC176A) (JC178B) (JC177B) (JC496A) Chassis Standard 19-inch rack with a centralized architecture Standard 19-inch rack with a distributed architecture RPU slots — 2 (1+1 redundancy) LPU slots — 2 4 8 HIM 2 4 8 16 MIM 2 8 16 32 Interface module slot 2*GE (Combo) per FIP-210(JC167B) Fixed interfaces 4*GE (Combo) Console interface 1 AUX interface 1 USB interface 2 CF card
A6602 A6604 A6608 A6616 (JC176A) (JC178B) (JC177B) (JC496A) (1.73 × 17.40 × 18.11 in.) mm (8.66 × 17.17 × 18.90 in.) 476 mm (12.13 × 17.17 × 18.74 in.) 480 mm (34.88 × 17.17 × 18.90 in.) Weight (full configuration) 7.5 kg (16.53 Ib) < 38 kg (83.77 Ib) < 50 kg (110.23 Ib) <100 kg (220.46 Ib) Operating temperature 0°C to 45°C (32°F to 113°F) Operating humidity 10% to 95%, noncondensing Operating altitude -60 m to 3 Km (-196.85 ft. to +9842.52 ft.
Table 12 hardware features-Supported module Item Module JC166A HP FIP-100 A6600 Module JC166B HP A6600 FIP-110 Flexible Interface Platform Module JC167A HP FIP-200 A6600 Module JC167B HP A6600 FIP-210 Flexible Interface Platform Module JG357A HP 6600 FIP-10 Flexible Interface Platform Router Module JG358A HP 6600 FIP-20 Flexible Interface Platform Router Module JC567A HP A6600 48-port Gig-T Service Aggregation Platform Module JC568A Module HP A6600 24-port GbE SFP Service Aggregation Platfor
HDLC FR, MFR, FRF12 fragment, FR switching PPP, Hardware MP in CL2P/CL1P, and software MP in other modules PPPoE server ATM: IPoA, PPPoA server, IPoEoA, PPPoEoA server QinQ termination, Flexible QinQ Port isolation DLDP/LLDP for Layer 3 interfaces Layer-2 protocol tunnel (BPDU tunnel) GARP/GVRP STP/RSTP/MSTP Broadcast storm suppression Port mirroring RPR TCP, UDP, IP Option, IP unnumber IP services Policy routing Layer-3 interface binding POS interface binding Static routing Dynamic routing protocols: RIPv
IPv6 tunnel: manually configured IPv6 tunnel, IPv6-over-IPv4, GRE tunnel, automatic IPv6 over IPv4 tunnel, 6to4 tunnel, ISATAP tunnel, 6PE 6VPE (IPv6 MPLS L3VPN) NATPT NAT64 Static routing Dynamic routing protocols: RIPng, OSPFv3, IS-ISv6, BGP4+ IPv6 multicast protocols: MLDv1/v2, PIM6-DM, PIM6-SM, PIM6-SSM Traffic classification: based on port, MAC address, IP address, IP priority, DSCP priority, TCP/UDP port number, and protocol type Traffic policing: CAR rate limiting, granularity configurable Rate limit
BGP/BGP4+ support for GTSM Password control Attack detection and protection NAT, NAT for VPNs, VPN NAT, NAT session log, NAT Server (supporting load sharing) Connection limit GRE tunnel (supporting point to multi-point applications) IP features IPSec tunnel and IPSec multiple instances L2TP tunnel NetStream (supporting v5/v8/v9 packet frames; supporting IPv4, IPv6 and MPLS packets) sFlow (only supported by SAP-48GBE/24GBP/48GBP/4EXP) ADVPN(Auto Discovery VPN) L3VPN: Inter-domain MPLS VPN (Option1/2/3), nes
System logs Hierarchical alarms Ping and Tracert Fan status detection, maintenance, and alarming Power supply status detection, maintenance, and alarming CF card status detection and maintenance Temperature detection and alarming FAT format File systems CF card USB storage device Dual image Uploading/upgra ding Loading/upgrading through the XModem protocol Loading/upgrading through FTP, and TFTP Appendix B Upgrading software This section describes how to upgrade system software while the router is opera
Preparing for the upgrade Before you upgrade system software, complete the following tasks: Set up the upgrade environment as shown in Table 14 . Configure routes to make sure that the router and the file server can reach each other. Run a TFTP or FTP server on the file server. Log in to the CLI of the router through the console port. Copy the upgrade file to the file server and correctly set the working directory on the TFTP or FTP server.
Upgrading from the CLI You can use the TFTP or FTP commands on the router to access the TFTP or FTP server to back up or download files. Using TFTP to upgrade software This section describes how to upgrade system software by using TFTP. Backing up the running system software image and configuration file 1. Perform the save command in any view to save the current configuration. save The current configuration will be written to the device. Are you sure? [Y/N]:y Please input the file name(*.
File will be transferred in binary mode Sending file to remote TFTP server. Please wait... \ TFTP: 19386224 bytes sent in 70 second(s). File uploaded successfully. 4. Perform the tftp put command in user view to upload the startup.cfg file to the TFTP server. tftp 192.168.1.2 put startup.cfg File will be transferred in binary mode Sending file to remote TFTP server. Please wait... \ TFTP: 1245 bytes sent in 0 second(s). File uploaded successfully.
%Nov 28 15:38:59:822 2012 A6600 DEVM/5/SYSTEM_REBOOT: System is rebooting now. System is starting... 5. After the reboot is complete, perform the display version command to verify that the system software image is correct. display version HP Comware Platform Software Comware Software, Version 5.20.106, Release 3102 Copyright (c) 2010-2013 Hewlett-Packard Development Company, L.P.
4M bytes Flash Memory 128K bytes NVRAM PCB Version: Ver.B Logic Version: 2.0 Basic BootWare Version: 1.14 Extend BootWare Version: 1.22 [FIXED PORT] GE5/0/0 (Hardware)Ver.B, (Driver)1.0, (Cpld)1.0 [FIXED PORT] GE5/0/1 (Hardware)Ver.B, (Driver)1.0, (Cpld)1.0 (Driver)1.0, (Cpld)1.0 [SUBSLOT 1] The SubCard is not present [SUBSLOT 2] HIM-4GBE (Hardware)Ver.B, Using FTP to upgrade software This section describes how to upgrade system software by using FTP.
This example uses the default system software image file name main.bin and the default configuration file name startup.cfg. 3. Perform the ftp command in user view to access the FTP server. ftp 192.168.1.2 Trying 192.168.1.2 ... Press CTRL+K to abort Connected to 192.168.1.2. 220 3Com 3CDaemon FTP Server Version 2.0 User(192.168.1.100:(none)):user001 331 User name ok, need password Password: 230 User logged in 4. Perform the put command in FTP client view to upload the main.
3. Perform the boot-loader command in user view to load the file A6600 -CMW520-R3102.bin and specify the file as the main image file at the next reboot. boot-loader file A6600-CMW520-R3102.bin main This command will set the boot file. Continue? [Y/N]:y The specified file will be used as the main boot file at the next reboot on slot 0! 4. Perform the display boot-loader command in user view to verify that the file has been loaded.
[FIXED PORT] AUX (Hardware)Ver.A, (Driver)1.0, (Cpld)133.0 [FIXED PORT] MGE0/0/0 (Hardware)Ver.A, (Driver)1.0, (Cpld)133.0 Slot 2: FIP-100 uptime is 0 week, 0 day, 0 hour, 1 minute CPU type: FREESCALE MPC8548 1000MHz 1024M bytes DDR2 SDRAM Memory 4M bytes Flash Memory 128K bytes NVRAM PCB Version: Ver.B Logic Version: 1.0 Basic BootWare Version: 1.36 Extend BootWare Version: 1.36 [FIXED PORT] GE2/0/0 (Hardware)Ver.B, (Driver)1.0, (Cpld)1.0 [FIXED PORT] GE2/0/1 (Hardware)Ver.
Accessing the BootWare menu Power on the router (for example, an A6608 router), and you can see the following information: 1. System start booting... Press Ctrl+D to access BASIC-BOOTWARE MENU Press Ctrl+T to start memory test Booting Normal Extend BootWare.... **************************************************************************** * * * HP A6600 Router BootWare, Version 1.
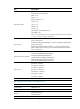
|<3> Enter Ethernet SubMenu | |<4> File Control | |<5> Restore to Factory Default Configuration | |<6> Skip Current System Configuration | |<7> BootWare Operation Menu | |<8> Clear Super Password | |<9> Storage Device Operation | |<0> Reboot | ========================================================================== Enter your choice(0-9): Table 14 BootWare menu options Item Description <1> Boot System Boot the system software image.
|<1> Download Application Program To SDRAM And Run | |<2> Update Main Application File | |<3> Update Backup Application File | |<4> Update Secure Application File | |<5> Modify Ethernet Parameter | |<0> Exit To Main Menu | | | ========================================================================== Enter your choice(0-5): Table 15 Ethernet submenu options Item Description <1> Download Application Program To SDRAM And Run Download a sy
Field Description Target File Name Set a file name for saving the file on the router. By default, the target file name is the same as the source file name. Server IP Address Set the IP address of the FTP or TFTP server. If a mask must be set, use a colon (:) to separate the mask length from the IP address. For example, 192.168.1.2:24. Local IP Address Set the IP address of the router. Gateway IP Address Set a gateway IP address if the router is on a different network than the server.
|<3> Update Backup Application File | |<4> Update Secure Application File | |<5> Modify Serial Interface Parameter | |<0> Exit To Main Menu | ============================================================================ Enter your choice(0-5): Table 17 Serial submenu options Item Description <1> Download Application Program To SDRAM And Run Download an application to SDRAM through the serial port and run the program. <2> Update Main Application File Upgrade the main system software image.
Figure 2 Disconnect the terminal connection NOTE: If the baud rate of the console port is 9600 bps, jump to step 9. 4. Select File > Properties, and in the Properties dialog box, click Configure. Figure 3 Properties dialog box 5. Select 115200 from the Bits per second list and click OK.
Figure 4 Modify the baud rate 6. Select Call > Call to reestablish the connection. Figure 5 Reestablish the connection 7. Press Enter.
Enter your choice(0-5): 8. Enter 0 to return to the Serial submenu.
Figure 8 File transfer progress 13. When the Serial submenu appears after the file transfer is complete, enter 0 at the prompt to return to the BootWare menu. Download successfully! 17404928 bytes downloaded! Input the File Name:main.bin Updating File cfa0:/main.bin.............................................. .....................................................
|Note:the operating device is cfa0 | |<1> Display All File(s) | |<2> Set Application File type | |<3> Set Configuration File type | |<4> Delete File | |<0> Exit To Main Menu | ========================================================================== Enter your choice(0-4): Table 18 File Control submenu options Item Description <1> Display All File Display all files. <2> Set Application File type Change the type of a system software image.
NOTE: You cannot remove or assign the S attribute in the File Control submenu. To change the type of a system software image: 1. Enter 2 in the File Control submenu. 'M' = MAIN 'B' = BACKUP 'S' = SECURE 'N/A' = NOT ASSIGNED ========================================================================== |NO. Size(B) Time |1 19386224 May/07/2011 11:21:38 M Type |0 Exit Name | cfa0:/main.bin | | ======================================================================== Enter file No: 2.
The file you selected is cfa0:/default.diag,Delete it? [Y/N]Y Deleting........Done! Updating Applications for the Standby MPU When the router is configured with two MPUs, you need to ensure that the main application files for the active and standby MPUs are of the same version. Otherwise, the standby MPU cannot normally start up. As a result, the active and standby MPUs cannot back up each other and file operations; hence high reliability of the device cannot be ensured.
Note that: If you do not know which file is the current main application file, upload the current main application file from the CF card of the active MPU to the file server through TFTP or FTP before updating the main application file for the standby MPU. Method 3 Use the tftp command to download the current main application file to the standby MPU, specify the file as the main application file, and reboot the standby MPU.
Use the display boot-loader [ slot slot-number ] command to view the application files to be used by Step5 the active and standby MPUs for booting the system. Make sure the application files are of the same version. After rebooting the standby MPU using the slave restart command in system view, use the display Step6 version command to view the current version of the application files. If the application files have the new version, you have succeeded in updating the application files on the standby MPU.
On a device configured with an RPE-X1 copy b54D002main.bin slot41#cfa0:/ Copy cfa0:/mainb54d002.bin to slot14#cfa0:/mainb54d002.bin?[Y/N]:y %Copy file cfa0:/mainb54d002.bin to slot14#cfa0:/mainb54d002.bin...Done. On a device configured with an RSE-X1 copy b54D002main.bin slot2#cfa0:/ Copy cfa0:/mainb54d002.bin to slot2#cfa0:/mainb54d002.bin?[Y/N]:y %Copy file cfa0:/mainb54d002.bin to slot2#cfa0:/mainb54d002.bin...Done.
1 RSE-X1 Normal Master 0 2 RSE-X1 Normal Slave 0 3 FIP-110 Normal N/A 4 4 FIP-210 Normal N/A 2 Handling software upgrade failures If a software upgrade fails, the system runs the old software version. To handle a software failure: 1. Check the physical ports for a loose or incorrect connection. 2. If you are using the console port for file transfer, check the HyperTerminal settings (including the baud rate and data bits) for any wrong setting. 3.
Figure 9 Dealing with password loss Password lost Reboot the router to access EXTEND-BOOTWARE menu Yes Console login password lost Password recovery capability enabled? No User privilege level password lost Enter 6 to skip console login authentication Enter 8 to clear user privilege level password Enter 5 to restore the factory-default configuration Reboot the router Configure new passwords in system view Save the running configuration Examining the state of password recovery capability Reboot the
BASIC CPLD Version : 133.0 EXTEND CPLD Version : 133.0 PCB Version : Ver.A BootWare Validating... Backup Extend BootWare is newer than Normal Extend BootWare,Update? [Y/N] Press Ctrl+B to enter extended boot menu... 2. Press Ctrl + B within three seconds after the "Press Ctrl+B to enter extended boot menu..." prompt message appears. BootWare password: Not required. Please press Enter to continue. 3.
|<5> Restore to Factory Default Configuration | |<6> Skip Current System Configuration | |<7> BootWare Operation Menu | |<8> Clear Super Password | |<9> Storage Device Operation | |<0> Reboot | ============================================================================ Ctrl+Z: Access EXTEND-ASSISTANT MENU Ctrl+F: Format File System Enter your choice(0-9): 6 After the configuration skipping flag is set successfully, the following message appears: Flag Set Success. 2.
|<2> Enter Serial SubMenu | |<3> Enter Ethernet SubMenu | |<4> File Control | |<5> Restore to Factory Default Configuration | |<6> Skip Current System Configuration | |<7> BootWare Operation Menu | |<8> Clear Super Password | |<9> Storage Device Operation | |<0> Reboot | ============================================================================ Ctrl+Z: Access EXTEND-ASSISTANT MENU Ctrl+F: Format File System Enter your choice(0-9): 8 The router deletes the user privilege level password c
|<8> Clear Super Password | |<9> Storage Device Operation | |<0> Reboot | ============================================================================ Ctrl+Z: Access EXTEND-ASSISTANT MENU Ctrl+F: Format File System Enter your choice(0-9): 5 2. At the prompt for confirmation, enter Y. The router deletes its main and backup next-startup configuration files and restores the factory-default configuration. The current mode is no password recovery.