HP HSR6800-CMW520-R3103P02 Release Notes © Copyright 2013 Hewlett-Packard Development Company, L.P. The information contained herein is subject to change without notice. The only warranties for HP products and services are set forth in the express warranty statements accompanying such products and services. Nothing herein should be construed as constituting an additional warranty. HP shall not be liable for technical or editorial errors or omissions contained herein.
Contents Version information··························································································································································1 Version number ·································································································································································1 Version history ······································································································································
Dealing with password loss when password recovery capability is disabled ···············································43 iii
List of Tables Table 1 Version history ................................................................................................................. 1 Table 2 Hardware and software compatibility matrix ........................................................................ 1 Table 3 Hardware and software compatibility matrix 2 ..................................................................... 2 Table 4 MPU and FIP compatibility matrix .................................................................
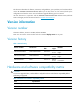
This document describes the features, restrictions and guidelines, open problems, and workarounds for version HP HSR6800-CMW520-R3103P02. Before you use this version in a live network, back up the configuration and test the version to avoid software upgrade affecting your live network. Use this document in conjunction with HP HSR6800-CMW520-R3103P02 Release Notes (Software Feature Changes) and the documents listed in “Related documentation”. Version information Version number Comware software, Version 5.
Item Specifications RSE-X2: 4G FIP-110: 2G/4G FIP-210: 2G/4G FIP-600: 4G Memory SAP-24GBP: 2G/4G SAP-48GBP: 2G/4G SAP-48GBE: 2G/4G SAP-4EXP: 4G Flash/CF Card Min 256M Updates automatically with Host software. After this version is updated, the BootWare version will update to: RSE-X2:1.04 FIP-110:1.11 FIP-210:1.07 BootWare version SAP-24GBP/SAP48GBP:1.05 SAP-48GBE:1.05 SAP-4EXP:1.09 FIP-600:1.09 Note: You can display the version number with the display version command in any view.
Fixed 2GE:100 Module:200 FIP-210 VER.C FIP-600 VER.B SAP-24GBP VER.A 100 HP A6600 24-port GbE SFP Service Aggregation Platform Module SAP-48GBP VER.A 100 HP 6600 48-port GbE SFP Service Aggregation Platform Module SAP-48GBE VER.A 100 HP A6600 48-port Gig-T Service Aggregation Platform Module SAP-4EXP VER.A 100 HP HSR6800 4-port 10GbE SFP+ Service Aggregation Platform Router Module HIM-8FE VER.B 100 HP A6600 8-port 10/100Base-T HIM Module HIM-4GBE VER.
Table 4 MPU and FIP compatibility matrix MPU/FIP FIP-110 RSE-X2 √ FIP-210 FIP-600 √ √ Table 5 MPU/SFE and Host compatibility matrix MPU/Host HSR6802 HSR6804 HSR6808 RSE-X2 √ √ √ SFE-X1 × × √(Only can be configured at slot 6) Note: The MPUs of HSR6800 only support the host listed in this table.
RT-MIM-8T1-H3 √ √ × RT-MIM-8T1-F-H3 √ √ × RT-MIM-1CE3-V2-H3 √ √ × RT-MIM-1CT3-V2-H3 √ √ × Note: Ticks indicate supported modules while crosses indicate unsupported modules. Sample:To display the host software and BootWare version, perform the following: display version HP Comware Platform Software Comware Software, Version 5.20.106, Release 3103P02 ------- Note① Copyright (c) 2010-2013 Hewlett-Packard Development Company, L.P.
PCB Version: Ver.C Logic Basic Version: 2.0 BootWare Version: 1.06 Extend BootWare Version: 1.06 [FIXED PORT] GE3/0/0 (Hardware)Ver.A, (Driver)1.0, (Cpld)1.0 [FIXED PORT] GE3/0/1 (Hardware)Ver.A, (Driver)1.0, (Cpld)1.0 (Driver)1.0, (Cpld)1.0 [SUBSLOT 1] The SubCard is not present [SUBSLOT 2] HIM-CL2P(E) (Hardware)Ver.B, Upgrading restrictions and guidelines None.
Condition: This symptom might occur when session control is enabled on the AAA server and a RADIUS key is configured on device. RTD066507 Symptom: On an SR6616-X, the display device manuinfo fan command fails to be executed. Condition: This symptom occurs when you execute the display device manuinfo fan command on an HSR6808.
HP 6600/HSR6600/HSR6800 Router Series Layer 2 - WAN Configuration Guide HP 6600/HSR6600/HSR6800 Router Series Layer 3 - IP Services Configuration Guide HP 6600/HSR6600/HSR6800 Router Series Layer 3 - IP Routing Configuration Guide HP 6600/HSR6600/HSR6800 Router Series IP Multicast Configuration Guide HP 6600/HSR6600/HSR6800 Router Series MPLS Configuration Guide HP 6600/HSR6600/HSR6800 Router Series ACL and QoS Configuration Guide HP 6600/HSR6600/HSR6800 Router Series Security Con
Operating system type and revision level Detailed questions Subscription service HP recommends that you register your product at the Subscriber's Choice for Business website: http://www.hp.com/go/wwalerts After registering, you will receive email notification of product enhancements, new driver versions, firmware updates, and other product resources.
Appendix A Feature list Hardware features Table 7 hardware features Item HP HSR6802(JG361A) HP HSR6804(JG362A) HP HSR6808(JG363A) Chassis Standard 19-inch rack with a distributed processing architecture MPU slots 2 (RSE-X2) 2 (RSE-X2) 2 (RSE-X2) SFE slots N/A N/A 1 (SFE-X1) Line card slots 2 4 8 Interface module slots HIM 4 8 16 MIM 8 16 32 2 GE Combo (Per FIP-600) Fixed GE 2 GE Combo (Per FIP-210) 2 GE Combo (Per FIP-110) Console 1 AUX 1 Management Ethernet 1 USB 1 CF
Item HP HSR6802(JG361A) HP HSR6804(JG362A) Altitude -60 m to 4 km (–196.85 ft to +13123.
Ethernet, Support Ethernet II, SNAP, MPLS, 802.1Q, sub-interface VLAN VLAN/Voice VLAN/Super VLAN/VLAN Mapping IEEE802.
UDP helper Basic functions: IPv6 ND, IPv6 PMTU, dual-stack forwarding, IPv6 ACL, DHCPv6 server/proxy IPv6 tunnel: manually configured IPv6 tunnel, IPv6-over-IPv4, GRE tunnel, automatic IPv6 over IPv4 tunnel, 6to4 tunnel, ISATAP tunnel, 6PE 6VPE (IPv6 MPLS L3VPN) IPv6 NATPT NAT64 Static routing Dynamic routing protocols: RIPng, OSPFv3, IS-ISv6, BGP4+ IPv6 multicast protocols: MLDv1/v2, PIM6-DM, PIM6-SM, PIM6-SSM Traffic classification: based on port, MAC address, IP address, IP priority, DSCP priority, TCP/
SSH 1.5/2.
Configuration at the CLI Configuration through the console port Telnet for configuration and remote maintenance through Ethernet port Dialing up for configuration and remote maintenance via Modem through AUX port SNMP v1/v2c/v3 Management & maintenance RMON (group 1, 2, 3 and 9 MIB) System logs Hierarchical alarms Ping and Tracert Fan status detection, maintenance, and alarming Power supply status detection, maintenance, and alarming CF card status detection and maintenance Temperature detection and alarmi
Upgrade method Remarks You must reboot the router to complete the upgrade. Upgrading from the CLI This method can interrupt ongoing network services. Use this method when the router cannot correctly start up. Upgrading from the BootWare menu Preparing for the upgrade Before you upgrade system software, complete the following tasks: Set up the upgrade environment as shown in Table 10 . Configure routes to make sure that the router and the file server can reach each other.
Figure 1 Set up the upgrade environment Upgrading from the CLI You can use the TFTP or FTP commands on the router to access the TFTP or FTP server to back up or download files. Using TFTP to upgrade software This section describes how to upgrade system software by using TFTP. Backing up the running system software image and configuration file 1. Perform the save command in any view to save the current configuration. save The current configuration will be written to the device.
4 -rw- 5 41950 -rw- 1245 Aug 21 2007 15:02:06 Nov 29 2012 13:45:52 default.diag startup.cfg 6 -rw- 19386224 May 07 2011 11:21:38 main.bin 7 -rw- 108 Mar 31 2012 16:25:50 patchstate 8 drw- - Aug 28 2012 17:04:30 seclog 36696 KB total (725624 KB free) File system type of cfa0: FAT16 This example uses the default system software image file name main.bin and the default configuration file name startup.cfg. 3. Perform the tftp put command in user view to upload the main.
This command will set the boot file. Continue? [Y/N]:y The specified file will be used as the main boot file at the next reboot on slot 0! 3. Perform the display boot-loader command in user view to verify that the file has been loaded. display boot-loader The boot file used at this reboot:cfa0:/main.bin attribute: main The boot file used next time:cfa0:/HSR6800-CMW520-R3103.bin attribute: main The boot file used next time:cfa0:/HSR6800.
4096M bytes DDR3 SDRAM Memory 8M bytes Flash Memory 128K bytes NVRAM PCB Version: Ver.B Logic Version: 139.0 Basic BootWare Version: 1.09 Extend BootWare Version: 1.09 [FIXED PORT] GE2/0/0 (Hardware)Ver.A, (Driver)1.0, (Cpld)1.0 [FIXED PORT] GE2/0/1 (Hardware)Ver.A, (Driver)1.0, (Cpld)1.0 (Driver)1.0, (Cpld)2.0 [SUBSLOT 1] The SubCard is not present [SUBSLOT 2] HIM-8GBE (Hardware)Ver.
0 drw- - Feb 18 2009 10:40:40 logfile 1 -rw- 17262936 Aug 28 2012 17:08:50 HSR6800-CMW520-R3103.bin 2 -rw- 3910 Nov 29 2012 13:45:50 system.xml 3 drw- - Sep 26 2010 11:42:34 domain1 4 -rw- 41950 Aug 21 2007 15:02:06 default.diag 5 -rw- 1245 Nov 29 2012 13:45:52 startup.cfg 6 -rw- 19386224 May 07 2011 11:21:38 main.
Upgrading the system software 1. Perform the get command in FTP client view to download the system software image file HSR6800 -CMW520-R3103.bin to the CF card on the router. [ftp] get HSR6800-CMW520-R3103.bin 227 Entering passive mode (192,168,1,2,16,71) 125 Using existing data connection 226 Closing data connection; File transfer successful. FTP: 17404928 byte(s) received in 35.685 second(s), 487.00K byte(s)/sec. [ftp] 2. Perform the quit command in FTP client view to return to user view.
Copyright (c) 2010-2013 Hewlett-Packard Development Company, L.P. HP HSR6802 uptime is 0 week, 0 day, 1 hour, 5 minutes Slot 0: RSE-X2 uptime is 0 week, 0 day, 1 hour, 5 minutes CPU type: FREESCALE P2020 1000MHz 4096M bytes DDR3 SDRAM Memory 8M bytes Flash Memory 128K bytes NVRAM PCB Version: Ver.B Basic Logic Version: 1.0 Extend Logic Version: 1.0 Basic BootWare Version: 1.04 Extend BootWare Version: 1.04 [FIXED PORT] CON (Hardware)Ver.B, (Driver)1.0, (Cpld)1.
[SUBSLOT 2] HIM-CL2P(E) (Hardware)Ver.B, (Driver)1.0, (Cpld)1.0 Upgrading from the BootWare menu You can use the following methods to upgrade software from the BootWare menu: Using TFTP/FTP to upgrade software through an Ethernet port Using XMODEM to upgrade software through the console port TIP: Upgrading through an Ethernet port is faster than through the console port.
BootWare Validating... Backup Extend BootWare is newer than Normal Extend BootWare,Update? [Y/N] Press Ctrl+B to enter extended boot menu... 2. Press Ctrl + B within three seconds after the "Press Ctrl+B to enter extended boot menu..." prompt message appears. BootWare password: Not required. Please press Enter to continue. 3. Press Enter. Password recovery capability is enabled. Note: The current operating device is cfa0 Enter < Storage Device Operation > to select device.
Item <7> BootWare Operation Menu <8> Clear Super Password Description Access the BootWare Operation menu for backing up, restoring, or upgrading BootWare. When you upgrade the system software image, BootWare is automatically upgraded. HP does not recommend upgrading BootWare separately. This document does not cover using the BootWare Operation menu. Clear all super passwords used for switching to higher user privilege levels.
Protocol (FTP or TFTP) :tftp Load File Name :main.bin : Target File Name :main.bin : Server IP Address :192.168.1.2 Local IP Address :192.168.1.1 Gateway IP Address :0.0.0.0 FTP User Name :user FTP User Password :password Table 12 Network parameter fields and shortcut keys Field Description '.' = Clear field Press a dot (.) and then Enter to clear the setting for a field. '-' = Go to previous field Press a hyphen (-) and then Enter to return to the previous field.
|<4> Update Secure Application File | |<5> Modify Ethernet Parameter | |<0> Exit To Main Menu | | | ============================================================================ Enter your choice(0-5): 4. Enter 0 to return to the BootWare menu or 1 to boot the system. Using XMODEM to upgrade software through the console port 1. Enter 2 in the BootWare menu to access the Serial submenu.
============================================================== |Note:'*'indicates the current baudrate | | | Change The HyperTerminal's Baudrate Accordingly |------------------------------------------------------| |<1> 9600(Default)* | |<2> 19200 | |<3> 38400 | |<4> 57600 | |<5> 115200 | |<0> Exit | ============================================================================ Enter your choice(0-5):5 The following messages appear: Baudrate has been changed
Figure 3 Properties dialog box 5. Select 115200 from the Bits per second list and click OK.
Figure 4 Modify the baud rate 6. Select Call > Call to reestablish the connection. Figure 5 Reestablish the connection 7. Press Enter.
Enter your choice(0-5): 8. Enter 0 to return to the Serial submenu.
Figure 8 File transfer progress 13. When the Serial submenu appears after the file transfer is complete, enter 0 at the prompt to return to the BootWare menu. Download successfully! 17404928 bytes downloaded! Input the File Name:main.bin Updating File cfa0:/main.bin.............................................. .....................................................
|Note:the operating device is cfa0 | |<1> Display All File(s) | |<2> Set Application File type | |<3> Set Configuration File type | |<4> Delete File | |<0> Exit To Main Menu | ========================================================================== Enter your choice(0-4): Table 14 File Control submenu options Item Description <1> Display All File Display all files. <2> Set Application File type Change the type of a system software image.
NOTE: You cannot remove or assign the S attribute in the File Control submenu. To change the type of a system software image: 1. Enter 2 in the File Control submenu. 'M' = MAIN 'B' = BACKUP 'S' = SECURE 'N/A' = NOT ASSIGNED ========================================================================== |NO. Size(B) Time |1 19386224 May/07/2011 11:21:38 M Type |0 Exit Name | cfa0:/main.bin | | ======================================================================== Enter file No: 2.
The file you selected is cfa0:/default.diag,Delete it? [Y/N]Y Deleting........Done! Updating Applications for the Standby MPU When the router is configured with two MPUs, you need to ensure that the main application files for the active and standby MPUs are of the same version. Otherwise, the standby MPU cannot normally start up. As a result, the active and standby MPUs cannot back up each other and file operations; hence high reliability of the device cannot be ensured.
Note that: If you do not know which file is the current main application file, upload the current main application file from the CF card of the active MPU to the file server through TFTP or FTP before updating the main application file for the standby MPU. Method 3 Use the tftp command to download the current main application file to the standby MPU, specify the file as the main application file, and reboot the standby MPU.
3 FIP-110 Normal N/A 4 4 FIP-210 Normal N/A 2 Method 4 Use the copy command to copy the main application file of the active MPU to the standby MPU, specify the file as the main application file, and reboot the standby MPU. Note that when using this method, make sure that the main application files of the active and standby MPUs are of the same version.
Handling software upgrade failures If a software upgrade fails, the system runs the old software version. To handle a software failure: 1. Check the physical ports for a loose or incorrect connection. 2. If you are using the console port for file transfer, check the HyperTerminal settings (including the baud rate and data bits) for any wrong setting. 3. Check the file transfer settings: If XMODEM is used, you must set the same baud rate for the terminal as for the console port.
Figure 9 Dealing with password loss Password lost Reboot the router to access EXTEND-BOOTWARE menu Yes Console login password lost Password recovery capability enabled? No User privilege level password lost Enter 6 to skip console login authentication Enter 8 to clear user privilege level password Enter 5 to restore the factory-default configuration Reboot the router Configure new passwords in system view Save the running configuration Examining the state of password recovery capability Reboot the
NVRAM Size : 128KB BASIC CPLD Version : 1.0 EXTEND CPLD Version : 1.0 PCB Version : Ver.B BootWare Validating... Backup Extend BootWare is newer than Normal Extend BootWare,Update? [Y/N] Press Ctrl+B to enter extended boot menu... 2. Press Ctrl + B within three seconds after the "Press Ctrl+B to enter extended boot menu..." prompt message appears. BootWare password: Not required. Please press Enter to continue. 3.
|<3> Enter Ethernet SubMenu | |<4> File Control | |<5> Restore to Factory Default Configuration | |<6> Skip Current System Configuration | |<7> BootWare Operation Menu | |<8> Clear Super Password | |<9> Storage Device Operation | |<0> Reboot | ============================================================================ Ctrl+Z: Access EXTEND-ASSISTANT MENU Ctrl+F: Format File System Enter your choice(0-9): 6 After the configuration skipping flag is set successfully, the following message app
====================================================== |<1> Boot System | |<2> Enter Serial SubMenu | |<3> Enter Ethernet SubMenu | |<4> File Control | |<5> Restore to Factory Default Configuration | |<6> Skip Current System Configuration | |<7> BootWare Operation Menu | |<8> Clear Super Password | |<9> Storage Device Operation | |<0> Reboot | ============================================================================ Ctrl+Z: Access EXTEND-ASSISTANT MENU Ctrl+F: Fo
|<6> Skip Current System Configuration | |<7> BootWare Operation Menu | |<8> Clear Super Password | |<9> Storage Device Operation | |<0> Reboot | ============================================================================ Ctrl+Z: Access EXTEND-ASSISTANT MENU Ctrl+F: Format File System Enter your choice(0-9): 5 2. At the prompt for confirmation, enter Y. The router deletes its main and backup next-startup configuration files and restores the factory-default configuration.