
HP HSR6808 Router FIPS Enclosure Installation Guide
Installing a FIPS enclosure
If the router has been mounted to a rack, remove the router from the rack first.
If an air filter has been attached to the router, remove it from the chassis.
Only use the screws and hex bolts that are supplied in the opacity shield kit to secure
the opacity shield.
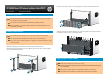
Before installing mounting plates, remove the fastening screws from where mounting plates
are to be installed on the chassis.
Attach the mounting plates to the chassis with M3 countersunk-head screws.
Installation preparation
Wear an ESD-preventive wrist strap, and make sure that the wrist strap has a good
skin contact and is well grounded.
The installation procedures must be performed by qualified personnel.
Before installation, you should read the Compliance and Safety Manual for router
compatibility information.
Applying tamper evidence labels
Attach the rear opacity shield to the mounting plates with M3 countersunk-head screws.
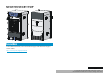
Attach the front opacity shield to where the air vents are located on the front of the chassis
and fasten the captive screws on the opacity shield.
Make sure the ambient air is above 10°C (50°F).
Clean the chassis before applying tamper evident labels. Alcohol-based cleaning pads
are recommended.
Apply tamper evidence labels to all removable components on the device.
Two tamper evidence labels are provided with the FIPS enclosure assembly.