
R3303-HP HSR6800 Routers Fundamentals Configuration Guide


68
Ste
p
Command
Remarks
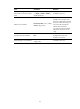
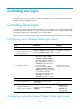
4. Configure the SNMP
access right.
• (Method 1) Specify the SNMP NMS
access right directly by configuring an
SNMP community:
snmp-agent community { read | write }
community-name [ mib-view view-name ]
[ acl acl-number | acl ipv6
ipv6-acl-number ] *
• (Method 2) Configure an SNMP group
and add a user to the SNMP group:
a. snmp-agent group { v1 | v2c }
group-name [ read-view read-view ]
[ write-view write-view ] [ notify-view
notify-view ] [ acl acl-number | acl
ipv6 ipv6-acl-number ] *
b. snmp-agent usm-user { v1 | v2c }
user-name group-name [ acl
acl-number | acl ipv6
ipv6-acl-number ] *
Use either method.
The username for method 2 is
equivalent to the community
name used for method 1, and
must be the same as the
community name configured
on the NMS.
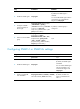
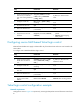
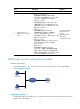
NMS login example
Network requirements
Configure the router and network management station so you can remotely manage the router through
SNMPv3.
Figure 37 Network diagram
Configuration procedure
1. Configure the router:
# Assign the IP address 1.1.1.1/24 to the router. Make sure the router and the NMS can reach
each other. (Details not shown.)
# Enter system view.
<Router> system-view
# Enable the SNMP agent.
[Router] snmp-agent
# Configure an SNMP group.
[Router] snmp-agent group v3 managev3group
# Add a user to the SNMP group.
[Router] snmp-agent usm-user v3 managev3user managev3group