
Ignite-UX Administration Guide for HP-UX 11i (B3921-90080, November 2013)


Actions Menu
To view available actions for a client, select its icon, then select the Actions menu. The actions
displayed are dependent on the status of the client, so all actions may not be available. You can
use the following actions to manage clients:
• View Install History... - Lists details of all successfully installed clients.
• Boot Client... - Boots the selected client. If no client is selected, one will be prompted for.
• Add New Client for Recovery... - Selects a client to be recovered. For more information, see
“Adding Clients for Recovery ” (page 208).
• Run Tutorial/Server Setup... - Displays the Welcome dialog box. From there, you can run the
Tutorial and Demo, or click Server Setup... to launch the Server Setup Wizard.
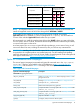
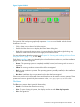
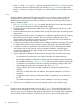
• Client Status... - The status of the selected client is polled and displayed, as in Figure 4
(page 17).
Figure 4 Client Status Dialog Box
• Install Client - Starts the HP-UX installation process for the selected client. This process is
explained in Chapter 10: “Booting and Installing HP-UX on Clients Using the Server” (page 111).
• Stop Install... - Stops the installation process on the selected client. After stopping an install,
you can reboot or halt the client.
• Create Network Recovery Archive - Creates a network recovery image using the
make_net_recovery command. See Chapter 15: “Recovery” (page 189) for more information.
• Create Tape Recovery Archive - Creates a recovery image using the make_tape_recovery
command. See Chapter 15: “Recovery” (page 189) for more information.
Introduction to the Ignite-UX Graphical User Interface 17