
HP Intelligent Management Center v5.2 Branch Intelligent Management System Administrator Guide
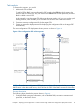


5. Click OK.
The CPE HP5820–V1 is added to BIMS as a virtual CPE. At the same time, BIMS clears the
Serial ID and CPE Name fields, reserves other CPE values, and then automatically places the
cursor over the Serial ID text box on the page.
6. To add the next virtual CPE, place your cursor over the Serial ID text box, use a barcode
scanner to scan the serial ID of the second CPE, enter the CPE name as needed, and then
click OK.
NOTE: You can specify a name for each virtual CPE. Or, you can leave the CPE Name field
blank, and then BIMS automatically sets the CPE name as the serial ID of the CPE.
7. Repeat this procedure to add remaining CPEs to BIMS.
For more information, see “Quickly adding CPEs.”
Customizing a startup configuration file for the target CPEs
This example requires you to customize a startup configuration file for all the HP5820 CPEs that
will access the data center network. In BIMS, all configuration files or segments are generated by
creating a configuration template operation.
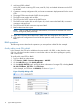
To create a configuration template:
1. Click Service > BIMS > Configuration Management > Configuration Templates.
The Configuration Templates list appears.
2. Navigate to the folder to which you want to add the configuration template. For example,
you can create a startup configuration folder for storing the configuration templates
to be created.
For more information, see “Creating a configuration template folder.”
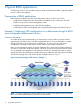
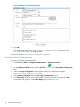
3. Click Add, and then specify parameters for the configuration template:
a. Specify a Name for the configuration template, such as hp5820_startup
configuration.cfg.
b. Set the Template Type to Configuration File.
c. Click Select Class, and then select the class HP 5820x.
d. Enter the contents of your configuration template in the Content field.
Figure 6 shows an example of adding a configuration template.
Example 1: Deploying CPE configurations in a data center through a BIMS zero-configuration deployment solution 17