
HP Intelligent Management Center v5.2 Branch Intelligent Management System Administrator Guide
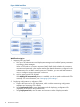
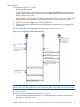

2. Add virtual CPEs to BIMS.
Add a CPE record containing CPE name, serial ID, OUI, and related information to the CPE
List of BIMS.
3. Customize a startup configuration file, and create an automatic deployment task for the virtual
CPEs.
4. The target CPE boots and sends DHCP discover packet.
5. The DHCP server replies with an Offer.
6. The CPE sends a DHCP request to the DHCP server.
7. The DHCP server replies with an ACK-Option 43, which contains the BIMS URL, connection
username, and password.
8. The CPE sends a TR-069 connection request to BIMS.
9. BIMS authenticates the request.
NOTE: After a virtual CPE passes the authentication, it becomes an available CPE which
can be managed by BIMS practically.
10. When the CPE passes the authentication, BIMS sends the configuration file to the CPE.
11. CPE applies the configuration file and sends the operation event (Success or Fail event ) to
BIMS.
BIMS operations
The following sections describe the operations you must perform in BIMS for this example.
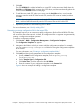
Quickly adding virtual CPEs to BIMS
In this example, the CPEs to be added are the same model—HP 5820, so they have the same
OUI. You can use a barcode scanner to scan the bar codes on the device packages to quickly
add a virtual CPEs
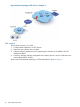
To quickly add virtual CPEs to BIMS:
1. Log on to BIMS as administrator.
2. Click Service > BIMS > Resource Management > Add CPE.
3. On the Add CPE page, click Quickly Add CPE.
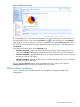
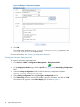
4. On the Quickly Add CPE page, specify the basic information of a target CPE, including Serial
ID, OUI, CPE Name, CPE Class, and CPE Group.
In this example, set CPE class as HP5820X, as shown in Figure 5.
Figure 5 Quickly adding a CPE
16 Typical BIMS applications