HP Intelligent Management Center TACACS+ Authentication Manager Administrator Guide Abstract This guide contains comprehensive information for network administrators, engineers, and operators working with the TAM service module. Part number: 5998-3316 Software version: IMC TAM 5.
© Copyright 2012 Hewlett-Packard Development Company, L.P. No part of this documentation may be reproduced or transmitted in any form or by any means without prior written consent of Hewlett-Packard Development Company, L.P. The information contained herein is subject to change without notice. HEWLETT-PACKARD COMPANY MAKES NO WARRANTY OF ANY KIND WITH REGARD TO THIS MATERIAL, INCLUDING, BUT NOT LIMITED TO, THE IMPLIED WARRANTIES OF MERCHANTABILITY AND FITNESS FOR A PARTICULAR PURPOSE.
Contents 1 TACACS+ Authentication Manager overview ·········································································································· 1 TAM features ····························································································································································· 1 TAM functional structure············································································································································ 2 TAM user typ
Modifying a device area or a sub-area ········································································································· 31 Deleting a device area or a sub-area ············································································································ 31 Viewing devices in a device area or sub-areas ····························································································· 32 Managing device types ···················································
Adding a sub-group ········································································································································ 57 Modifying a device user group or a sub-group ····························································································· 58 Deleting a device user group or a sub-group ································································································ 59 Viewing device users in a device user group or sub-group ··········
Binding device users with an LDAP synchronization policy ·········································································· 94 Unbinding users with an LDAP synchronization policy ················································································· 95 Synchronizing LDAP users ······························································································································ 95 Modifying LDAP user information······················································
Documents ···················································································································································· 123 Websites ······················································································································································ 123 Conventions ·························································································································································· 124 About HP IMC d
1 TACACS+ Authentication Manager overview To centrally manage network maintainers, HP delivers the TACACS+ Authentication Manager (TAM). TAM operates based on the IMC platform to provide authentication, authorization, and auditing for network maintainers. After TAM is deployed on the IMC server, the server is capable of performing TACACS+ authentication. TAM supports the following services: • Authentication—Authenticates maintainers to make sure that only valid maintainers can log in to devices.
Strict and refined user privilege control • Scenario-based authorization—Authorizes device users according to different access scenarios. Three elements define a scenario: login time, login device IP, and login device type. • Login authorization and command authorization—Login authorization controls login behaviors of device users. Command authorization specifies the commands that device users can execute. • Limit on the number of concurrent users of one account.
A device user is a network maintainer that uses account name and password to log in to manage a device. An authorization policy is a set of rules that control device user privileges. An authorization policy defines multiple access scenarios, which correspond to different authorization rules. When a device user logs in to manage a device, TAM authorizes the device user according to the authorization rule defined in the access scenario that the device user matches.
Online user management Use this function to view basic information about users that have logged in to a device, and trace the online behaviors of the users. Log management Logs include authentication logs, authorization logs, and audit logs. These logs record the device login, usage, and logoff behaviors of device users. Operators can query the logs for auditing device users.
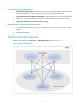
Figure 2 TAM local authentication and authorization In Figure 2, PCs in blue represent the PCs used by device users, and Devices in blue represent the manageable devices. In TAM local authentication-authorization mode, when a device user logs in to manage a device, the TAM server performs authentication for the device user. If the device user passes authentication, the TAM server uses a locally saved authorization policy to perform login authorization and command authorization for the device user.
Figure 3 LDAP authentication and TAM authorization In Figure 3, PCs in blue represent the PCs used by device users, and Devices in blue represent the manageable devices. In the LDAP authentication + TAM authorization mode, when a device user logs in to manage a device, the TAM server sends the authentication request to the LDAP server over the LDAP protocol and the LDAP server authenticates the user.
2 Device user authentication configuration guide TAM supports the following login methods: • Telnet • Console • SSH • FTP TAM supports the following authentication and authorization methods: • TAM local authentication and authorization—The device to which a user wants to log in sends the user account name and password to TAM. TAM authenticates the user to allow or deny user login. If the user is permitted login to the device, TAM performs login authorization and command authorization for the user.
Figure 4 Recommended TAM local authentication and authorization configuration procedure TAM HP recommends that you configure TACACS+ authentication and authorization in this order: 1. Add a device. 2. Add an authorization scenario. 3. Add authorization command. 4. Add an authorization policy. 5. Add a device user. Adding a device A device can cooperate with TAM to implement TACACS+ authentication and authorization only when the device is added to TAM.
Figure 5 Entering the page for configuring devices Adding an authorization scenario An authorization scenario includes three elements: device area, device type, and access period, which work together to define one scenario. Scenarios with one element different are considered different scenarios. TAM authorizes device users according to different scenarios. To enter the page for configuring authorization scenarios, select Service > TACACS+ AuthN Manager > Authorization Scenarios. See Figure 6.
To enter the page for configuring an authorization command, select Service > TACACS+ AuthN Manager > Authorization Command. See Figure 7. For more information, see "Authorization command." Figure 7 Entering the page for configuring an authorization command Adding an authorization policy An authorization policy defines multiple access scenarios and defines an authorization command for each scenario.
Figure 9 Entering the page for configuring a device user Configuring a device When you configure a device, the following order is recommended: 1. Creating a TACACS+ scheme. 2. Creating a domain. 3. Configuring scheme authentication and enabling command line authorization and accounting. Creating a TACACS+ scheme A device cooperates with the TAM server to implement TACACS+ authentication according to the configured TACACS+ scheme.
system-view [Device]hwtacacs scheme test [Device-hwtacacs-test]primary authentication 192.168.0.96 49 [Device-hwtacacs-test]primary authorization 192.168.0.96 49 [Device-hwtacacs-test]primary accounting 192.168.0.96 49 [Device-hwtacacs-test]key authentication hello [Device-hwtacacs-test]key authorization hello [Device-hwtacacs-test]key accounting hello [Device-hwtacacs-test]nas-ip 190.12.0.
Figure 10 Recommended LDAP authentication and TAM local authorization configuration procedure Configuring an LDAP server Create device user data. A device user is a network maintainer that uses account name and password to log in to manage a device. Configuring TAM HP recommends that you configure TACACS+ authentication and authorization by following this order: 1. Add a device. 2. Add an authorization scenario. 3. Add authorization command. 4. Add an authorization policy. 5. Add an LDAP user.
Figure 11 Entering the page for configuring devices Adding an authorization scenario An authorization scenario includes three elements: device area, device type, and access period, which work together to define one scenario. Scenarios with one element different are considered different scenarios. TAM authorizes device users according to different scenarios. To enter the page for configuring authorization scenarios, select Service > TACACS+ AuthN Manager > Authorization Scenarios. See Figure 12.
To enter the page for configuring an authorization command, select Service > TACACS+ AuthN Manager > Authorization Command. See Figure 13. For more information, see "Authorization command." Figure 13 Entering the page for configuring an authorization command Adding an authorization policy An authorization policy defines multiple access scenarios and defines an authorization command for each scenario.
To enter the page for configuring the LDAP server, click the Service tab, and select TACACS+ AuthN Manager > LDAP Service > LDAP Servers from the navigation tree. See Figure 15. For more information, see "Managing LDAP servers." Figure 15 Entering the page for configuring LDAP servers Adding an LDAP synchronization policy Create LDAP synchronization policies on TAM so TAM can periodically synchronize device user data from the LDAP server.
Figure 16 Entering the page for configuring LDAP synchronization policies Configuring a device When you configure a device, the following order is recommended: 1. Creating a TACACS+ scheme. 2. Creating a domain. 3. Configuring scheme authentication and enabling command line authorization and accounting. Creating a TACACS+ scheme A device cooperates with the TAM server to implement TACACS+ authentication according to the configured TACACS+ scheme.
Enable command line authorization and accounting on different interfaces according to different login methods. Configuration example Take an HP A series or H3C device as an example. The command lines needed for TACACS+ authentication and authorization are as follows: system-view [Device]hwtacacs scheme test [Device-hwtacacs-test]primary authentication 192.168.0.96 49 [Device-hwtacacs-test]primary authorization 192.168.0.96 49 [Device-hwtacacs-test]primary accounting 192.168.0.
3 Performing device-related configuration A "device", in the context of this information, refers to a network device that users log in to manage. A device can cooperate with TAM to implement TACACS+ authentication and authorization only when the device is added to TAM. Device in TAM is an element in an authorization scenario. Adding devices is a must to configure an authorization scenario. For more information about authorization scenarios, see "Authorization scenarios.
• Configuration Information—Provides the Details icon • Modify—Click the Modify icon to the details page of a device. to modify the device. Navigating the device list • Click to page forward in the device list. • Click to page forward to the end of the device list. • Click to page backward in the device list. • Click to page backward to the front of the device list. Click 8, 15, 50, 100, or 200 on the upper right side of the main pane to configure how many items per page you want to view.
1. Click the Service tab. 2. Select TACACS+ AuthN Manager > Device List from the navigation tree. The Device List displays all devices. 3. Click the Details link 4. of an access device to view its details. Device Name—Device label. If the device is managed by the IMC Platform, this field is the same as the Device Label parameter on the IMC Platform. If the device is manually added to TAM without being managed by the IMC Platform, this field is empty.
4. Configure the following common parameters in the Device Configuration area: 5. Shared Key—Enter a shared key, which is used for the device and TAM to authenticate each other. The value must be the same as what is configured on the device at the CLI. Authentication Port—Enter the port for TAM to listen for authentication, authorization, and accounting packets. The port must be the same as what is configured on the device at the CLI. The default is 49.
To remove one or more devices from the Selected Devices list, select the devices and click . To remove all the devices from the Selected Devices list, click . Selecting devices by advanced query c. Click the Advanced tab. d. Enter or select one or multiple of the following query criteria: Device IP—Enter an IPv4 address. If you select Exact Query, enter a complete IPv4 address. If not, you can enter only a portion of an IP address.
The start IP address cannot be higher than the end IP address. The two IP addresses must be on the same network with a 24-bit mask, which means the first three octets of the IP addresses must be the same. c. Click OK to return to the page for adding devices. The added devices appear in the Device List. d. Click Clear All in Device List to remove all the devices from the device list. You can click the icon of a device to delete the device. 7. Click OK. The configuration result page appears. 8.
the device on this line fails to be imported. Select Not Import from File to manually select the same device type for all imported devices. To select a device type, click the Device Type icon . The Select Device Type window appears. Select a device type and click OK. To delete a device type, click . Device type is an important part of an authorization scenario. For more information, see "Managing device types." Single Connection—Identifies whether the device supports single connections.
The page for modifying devices appears. 4. Configure the following common parameters in the Device Configuration area: 5. Device IP—IP address of the device, which cannot be modified. Shared Key—Enter a shared key, which is used for the device and TAM to authenticate each other. The value must be the same as what is configured on the device at the CLI. Authentication Port—Enter the port for TAM to listen for authentication, authorization, and accounting packets.
4. Authentication Port—Enter the port for TAM to listen for authentication, authorization, and accounting packets. The port must be the same as what is configured on the device at the CLI. The default is 49. Single Connection—Select Supported or Not Supported from the list. The former indicates that TAM supports establishing multiple sessions in one TCP connection when communicating with the device.
When the user is online, move device D from area S to area T. After the modification, the user belongs to scenario B, rather than scenario A, and controlled by the command set corresponding to scenario B. For more information about authorization scenarios, see "Authorization scenarios." For more information about authorization command, see "Authorization command." For more information about authorization policy, see "Authorization policy." To modify the area and type to which a device belongs: 1.
4 Authorization scenarios An authorization policy defines one or multiple authorization scenarios, and assigns each scenario one shell profile and one command set. Administrators can assign authorization policies to individual device users or device user groups. When a device user logs in to manage a device, TAM matches the user with a scenario and applies the shell profile and command set of the scenario to the user for device management.
Add Sub-Area—Click the Add Sub-Area icon adding a sub-area. Modify—Click the Modify icon for a device area to enter the page for to enter the page for modifying a device area. Delete—Click the Delete icon to delete a device area. The Delete icon for device areas that have no sub-areas. is available only Expanding and collapsing the device area list Click the Expand All icon in the device area list area to expand the Device Area List in a tree structure.
5. Description—Enter a brief description of the device area for easy maintenance. Click OK. Adding a sub-area You can add up to 256 device areas (including sub-areas) in TAM. You cannot add a sub-area for a device area that contains devices. To do so, move the devices to another device area first. To add a sub-area for a device area: 1. Click the Service tab. 2. Select TACACS+ AuthN Manager > Authorization Scenarios > Device Areas from the navigation tree.
• A device area that contains a device or a sub-area. To delete such a device area, move the device to another area, or delete the sub-area first. For more information about moving a device between device areas, see "Modifying the device area and type." To delete a device area or a sub-area: 1. Click the Service tab. 2. Select TACACS+ AuthN Manager > Authorization Scenarios > Device Areas from the navigation tree. The Device Area List displays all device areas. 3. Click the Delete icon 4. Click OK.
Viewing the device type list To view the device type list: 1. Click the Service tab. 2. Select TACACS+ AuthN Manager > Authorization Scenarios > Device Types from the navigation tree. The Device Type List displays all device types. Device type list contents Type Name—Device type name, which must be unique in TAM. Click the name link of a device type to view its details. Description—Description of the device type. Assign descriptive information for easy maintenance.
Adding a device type You can add up to 256 device types (including sub-types) in TAM. To add a device type: 1. Click the Service tab. 2. Select TACACS+ AuthN Manager > Authorization Scenarios > Device Types from the navigation tree. The Device Type List displays all device types. 3. Click Add in the Device Type List area. The Add Device Type page appears. 4. Configure basic information about the device type: 5. Type Name—Enter a device type name, which must be unique in TAM.
3. Click the Modify icon of the device type or sub-type you want to modify. The Modify Device Type page appears. 4. 5. Modify the device type information: Type Name—Enter a device type name, which must be unique in TAM. Parent Type Name—Cannot be modified. Description—Enter a brief description of the device type for easy maintenance. Click OK. Deleting a device type or a sub-type You cannot delete the following device types: • A device type or sub-type used by an authorization policy.
TAM applies an authorized time range policy to a device user if the device user accesses and manages the device at a time after the policy takes effect, before the policy expires, and within a time range defined in the policy. For example, if an authorized time range policy takes effect on 2012-1-1 and expires on 2013-12-31, and the time range is 10:00 to 12:00 every morning, a device user who accesses the network from 10:00 to 12:00 every morning in 2012 will be controlled by the policy.
3. Click Refresh in the Authorized Time Range List area to update the authorized time range list. Viewing authorized time range policy details To view authorized time range policy details: 1. Click the Service tab. 2. Select TACACS+ AuthN Manager > Authorization Scenarios > Authorized Time Range Policies from the navigation tree. The Authorized Time Range Policy List displays all authorized time range policies. 3.
5. Effective Time/Expiration Time—Click the Calendar icon to specify the effective time range for the policy. Or, enter the effective time range in the format of YYYY-MM-DD hh:mm. Description—Enter a brief description of the authorized time range policy for easy maintenance. Configure authorized time range information: a. Click Add in the Authorized Time Range Information area. The Authorized Time Range Policy Information window appears. b. Select an authorized time range type.
3. On the authorized time range policy list, click the Modify icon of an authorized time range policy to enter the page for modifying the authorized time range policy. 4. Modify basic information: 5. Policy Name—Enter the authorized time range policy name, which must be unique in TAM. Effective Time/Expiration Time—Click the Calendar icon to specify the effective time range for the policy. Or, enter the effective time range in the format of YYYY-MM-DD hh:mm.
5 Authorization command An authorization policy comprises authorization scenarios and authorization command. Users can log in to manage devices in different scenarios. Authorization command defines the rights that can be authorized to a user. Authorization scenarios and authorization command work together to authorize a user when the user logs in to the manage devices in different scenarios. Authorization command comprises shell profiles and command sets.
3. Auto Run—Commands that can be automatically executed after user login. Privilege Level—A privilege level corresponds to the default command set that a user can use after login. Privilege levels vary depending on vendors. For more information, see the configuration guide of the device. Modify—Click the Modify icon Delete—Click the Delete icon to modify the shell profile. to delete the shell profile. To view the latest shell profile list, click Refresh.
5. ACL—Enter an ACL ID or name. An ACL controls whether a user can log in to the device. ACL rules must be configured on the device. TAM deploys only the ACL number or name. If the request sent by a user for logging in to the device matches the permit rule of the ACL, the user can log in to the device. If it matches the deny rule of the ACL, the user cannot log in to the device. 6. Privilege Level—Select a privilege level.
6. Select a privilege level. A privilege level corresponds to the default command set that a user can use after login. Users cannot view and execute the commands not in the command set. Privilege levels vary depending on vendors. HP recommends that you see the configuration guide of the device and select a privilege level from privilege levels 0 through 15 provided by TAM. 7. Enter the idle time. If a user does not perform any operation within the idle time, the user is forced to log out. 8.
the authorized time range where the user is in according to the command execution time of the user and determines whether the user can execute the command according to the command set corresponding to the authorized time range. Assume that you configure two authorized time ranges A (08:00 to 10:00) and B (10:30 to 11:00). When a user executes a command at 09:00, the command set corresponding to authorized time range A applies.
4. Name—Name of the command. For example, the name of the display current-configuration command is display. Parameters—Command parameters. For example, the parameter of the display current-configuration command is current-configuration. If this field is displayed as *, any parameter of the command is matched. Priority—The priorities of all commands in the command set are displayed in descending order.
h. To delete a rule, click the 6. icon for the target rule. Click OK. Modifying a command set A command set immediately takes effect on online users (users that have logged in to the device) controlled by the command set, which means the modified command set is used to determine the commands that can be executed by the online users. To modify a command set: 1. Click the Service tab. 2. Select TACACS+ AuthN Manager > Authorization Command > Command Sets from the navigation tree.
6. Click OK. Copying a command set Copying a command set allows you to create a similar command set, reducing the workload. To copy a command set: 1. Click the Service tab. 2. Select TACACS+ AuthN Manager > Authorization Command > Command Sets from the navigation tree. The Command Set List displays all command sets. 3. Click the Copy icon for the command set you want to copy. The Add Command Set page appears. The command set name is Copy+source command set.
Deleting a command set You cannot delete a command set that is being used by an authorization policy. To delete the command set, remove the association between the command set and the authorization policy. To delete a command set: 1. Click the Service tab. 2. Select TACACS+ AuthN Manager > Authorization Command > Command Sets from the navigation tree. The Command Set List displays all command sets. 3. Click the Delete icon for the command set you want to delete. A confirmation dialog box appears. 4.
6 Authorization policy An authorization policy defines multiple authorization scenarios, and assigns each scenario one shell profile and one command set. Scenarios in the same authorization policy have different priorities. Administrators can assign authorization policies to individual device users or device user groups. When a device user matches one scenario in an authorization policy, TAM applies the shell profile and command set of the scenario to the user for device management.
4. Device Area/Device Type/Authorized Time Range—The combination of the three parameters uniquely identifies an authorization scenario. A user matches the scenario only when the user logs in to a device of the specified device type on the device area within the authorized time range. For more information about configuring device areas, see "Managing device areas." For more information about configuring device types, see "Managing device types.
The Device Area, Device Type, and Access Period fields cannot be modified. Shell Profile—Select a shell profile, Deny, or Default Device Configuration from the list. The shell profile controls login behaviors of the device user who matches the rule. With the Deny option, the device denies user logins.
Move Down—Click the Move Down icon for an authorization rule to reduce its priority. If a device user matches multiple scenarios, TAM applies the shell profile and command set defined in the scenario that has the highest priority to the user. j. To modify an authorization rule, click the Modify icon through d. k. To delete an authorization rule, click the Delete icon 6. for the rule and perform steps b for the rule. Click OK.
Authorization Command Set—Select an authorization command set, Unlimited, or Forbid from the list. The command set includes all authorized commands for the user to execute after login. The Unlimited option allows the user to perform any command. The Forbid option prohibits the user from performing any command. c. Click OK. Adding a user-defined authorization rule d. Click Add in the Access Authorization Info area. The Add Access Authorization window appears. e.
Deleting an authorization policy You cannot delete an authorization policy that is being used by a device user, device user group, or an LDAP synchronization policy. To delete an authorization policy: 1. Click the Service tab. 2. Select TACACS+ AuthN Manager > Authorization Policies from the navigation tree. The Authorization Policy List displays all authorization policies. 3. Click the Delete icon for the authorization policy you want to delete. A confirmation dialog box appears. 4. Click OK.
7 Managing device users Device users refer to the network maintainers who log in and manage devices. A device user is configured with an account name and a password on TAM for identity authentication of network maintainers. A network maintainer can log in to manage a device after entering the correct account name and password. A TAM administrator needs to build a properly-structured device user database for hierarchical management of device users. To do so, take the following steps: 1.
• Add Sub-Group—Click the Add Sub-Group icon to add a sub-group for the device user group. TAM does not allow operators to add a sub-group for the pre-defined group Ungrouped. • Modify—Click the Modify icon • Delete—Click the Delete icon to delete the device user group. TAM does not allow operators to delete the pre-defined group Ungrouped and groups that contain sub-groups. to modify the device user group settings. The Expand and Collapse functions 3.
Authorization Policy—Select an authorization policy or select CLI Access Not Supported. If you select a policy, all device users in the device user group use the policy. If you select CLI Access Not Supported, the device users in the device user group can only log in to the device but cannot execute commands on the device. The Authorization Policy field cannot be empty. Parent Group Name—Do not need to configure this field. A group created in this method is a level-1 group.
groups. TAM does not allow canceling the administrator's management privileges to any device user group. Select the boxes next to the operators. Selected maintainers can manage the device user group. Selected viewers can view information about the device user group. 6. Click OK.
groups. TAM does not allow canceling the administrator's management privileges to any device user group. Select the boxes next to the operators. Selected maintainers can manage the device user group/sub-group. Selected viewers can view information about the device user group/sub-group. 6. Click OK. Deleting a device user group or a sub-group After a device user group/sub-group is deleted, all device users in the group/sub-group are removed to the Ungrouped group.
3. The Device User Group List displays all device user groups. 4. Click the Operator Privileges button. The Operator List only displays all TAM maintainers and viewers. The administrator can manage all device user groups and cancelling the management privileges of the administrator is not allowed. 5. Click the Modify icon for an operator. 6. To expand all device user groups, click the Expand All icon on the top of the device user group list.
• Status—Status of the device user. Options include Normal and Cancelled. Cancelled device users cannot log in to the devices. • Modify—Click the Modify icon to modify the device user settings. Navigating the device user list • Click the Next Page icon • Click the Last Page icon • Click the Previous Page icon • Click the First Page icon to page forward in the device user list. to page forward to the end of the device user list. to page backward in the device user list.
Account Name—Enter an account name string. TAM supports for fuzzy matching for this field. For example, If you enter Sam, TAM displays all device users whose account names include Sam. Device User Group—Click the Select User Group icon . In the window that appears, expand the device user group list, select a device user group, and click OK. To unselect a group, click the Clear icon . Max.
Privilege-Increase Password—Select the status of this function. Options include Enabled and Disabled. Query fields kept empty are not used as query criteria. 5. Click Query. The Device User List displays the device users that match the query criteria. To reset the query criteria, click Reset. The Device User List displays all device users. Viewing device user details To view device user details: 1. Click the User tab. 2. Select Device User View > All Device Users from the navigation tree.
Last Logoff—Last time the device user logged off, in the format of YYYY-MM-DD hh:mm. If the device user never logs in to the device, the last offline time is the time when the device user was created. Expiration Date—Date when the device user will expire and become invalid, in the format of YYYY-MM-DD. If the device user never expires, this field displays nothing. Max. Online Users—Enter the maximum number of device users allowed to use the same account name to log in to the device.
8. Click the Select User Group icon and then click OK. , expand the device user group list, select a device user group, 9. View the authorization policy of the device user group in the Group Authorization Policy field. This field is automatically populated after a device user group is selected. 10. Select an authorization policy from the User Authorization Policy list. Options include CLI Access Not Supported and specific authorization policies: 11.
TAM automatically resolves the columns in the file and displays the result in the list of each parameter. Account Name—Select a column number. TAM will read account names from the specified column in the file. You cannot manually enter account names. User Name—Select a column number for TAM to read user name information, or select Not import from file and then manually enter a user name. If you manually enter a user name, all imported device users will use this user name.
7. Click Preview. The import result preview page appears, which contains the first 10 records. You can see whether the import result is that you expected. 8. If yes, click Close to return to the device user importing page. 9. Click OK. TAM starts to import device users. If the number of device users to be imported is large, the import process will take a while. Wait for TAM to finish the import operation.
This limit specifies the maximum number of device users allowed to use the same account name to log in to the device. If you keep this field empty, no limit will be applied to the number of concurrent device users. 12. Enter an expiration date in the format of YYYY-MM-DD, or click the Calendar icon one. to select The device user cannot log in to the device once the expiration date is reached. If you keep this field empty, the device user never expires. 13.
This limit specifies the maximum number of device users allowed to use the same account name to log in to the device. If you keep this field blank, no limit will be applied to the number of concurrent device users. 8. Select the Privilege Increase Password box, and then select Enable or Disable from the list. If you select Enable, you must enter a password twice to set the privilege increase password. 9. Click OK.
The period of time is determined by the TAM system parameter Cancelled User Lifetime. After the specified period elapses, the device user information is completely deleted from the TAM. For more information about TAM system parameters, see "Configuring system parameters." To view cancelled device users in TAM, go to the advanced query page of device users, and then select Cancelled from the Status list, use the default setting of other parameters, and click Query.
Viewing blacklist users To view blacklist users: 1. Click the User tab. 2. Select Device User View > Blacklisted Users from the navigation tree. The Blacklisted User List displays all blacklist users. Blacklisted user list contents • Account Name—Account name of the blacklist user. Click the account name link to view the device user details. For more information about device user details, see "Viewing device user details." • Device User Group—Device user group to which the device user belongs.
Account Name—Enter an account name string. TAM supports for fuzzy matching for this field. For example, If you enter Sam, TAM displays all blacklist users whose account names include Sam. Device User Group—Click the Select User Group icon . In the window that appears, expand the device user group list, select a device user group, and click OK. To unselect a group, click the Clear icon . Reason for Blacklist—Select a reason why the device user is blacklisted.
The Blacklisted User List displays all blacklist users. 3. Click the Details icon for a blacklist user to view the blacklist user details. Blacklisted user parameters • Account Name—Account name of the blacklist user. • User Name—Name of the blacklist user. • Device User Group—Device user group to which the blacklist user belongs. • Reason for Blacklist—Why the device user is blacklisted. Options include Locked by Operator and Malicious Login Attempts.
The Blacklisted User List displays all blacklist users. 3. Select the boxes to the left of the account names of the device users you want to unblacklist. 4. Click Unblacklist. 5. Click OK in the dialog box that appears. The operation result page displays the number of device users successfully unblacklisted and that failed to be unblacklisted. If there is a failure, click Download to view or save the error logs. An error log records the reason for an unblacklist failure.
8 LDAP authentication LDAP Overview IMC TAM can work with an LDAP server to provide authentication service for device users. In TAM authentication, user data is stored in the TAM database, as shown in Figure 17. Figure 17 TAM authentication In LDAP authentication, user data is stored in the LDAP server. In a network that uses an LDAP server for user management, you can synchronize user accounts from the LDAP server to TAM instead of manually adding them. Users that use these accounts are called LDAP users.
Managing LDAP servers An LDAP server stores user data and verifies user identities in LDAP authentication. Viewing the LDAP server list To view the LDAP server list: 1. Click the Service tab. 2. Select TACACS+ AuthN Manager > LDAP Service > LDAP Servers from the navigation tree. The LDAP Server List displays all LDAP servers. LDAP Server List contents Server Name—LDAP server name. Click the name link of an LDAP server to view its details.
Viewing LDAP server details To view detailed information about an LDAP server: 1. Click the Service tab. 2. Select TACACS+ AuthN Manager > LDAP Service > LDAP Servers from the navigation tree. The LDAP Server List displays all LDAP servers. 3. Click the name link of an LDAP server to enter the LDAP server details page. Basic Information Server Name—LDAP server name. Version—Version of the LDAP protocol running on the LDAP server. TAM supports LDAPv2 and LDAPv3.
Figure 19 How Reconnect Interval works Connection Wait Timeout—Time period within which if TAM fails to connect to the LDAP server, the connection attempt is considered failed. Sync Wait Timeout—Maximum duration of each synchronization. The sync wait timer starts when TAM starts synchronizing user data from the LDAP server. When this timer expires, TAM stops the synchronization, regardless of whether the synchronization is complete or not. If no time limit is specified, this field displays 0.
Auto Back to Primary setting is Yes, TAM automatically switches back to the primary server after the server becomes available. If the setting is No, TAM continues to use the backup server. 4. Interval—Minimum interval (in hours) between a primary-to-backup switchover and an automatic backup-to-primary switchover. This setting takes effect only when auto back to primary is enabled.
LDAP server to TAM. This operation is available on the LDAP Server List page. For more information, see "Viewing the LDAP server list." 5. Connection Wait Timeout—Enter the maximum duration of each connection attempt. If TAM fails to connect to the LDAP server within this period, the connection attempt is considered failed. Sync Wait Timeout—Enter the maximum duration of each synchronization process. The sync wait timer starts when TAM starts synchronizing user data from the LDAP server.
Testing connectivity to an LDAP server To test the connectivity to an LDAP server: 1. Click the Service tab. 2. Select TACACS+ AuthN Manager > LDAP Service > LDAP Servers from the navigation tree. The LDAP Server List displays all LDAP servers. 3. Click the Test link for the LDAP server. The test result appears at the top of the page. If the LDAP server fails to be connected, follow the displayed tips to check for LDAP server configuration errors.
expires, TAM stops the synchronization, regardless of whether the synchronization is complete or not. If you do not want to set a time limit, set the timer to 0. 5. Modify backup server information: Base DN—Enter the absolute path of the directory that stores user data on the LDAP server. Admin DN—Enter the absolute path that locates the administrator on the LDAP server. Admin Password—Enter the administrator password.
Deleting an LDAP server Deleting an LDAP server removes the association between TAM and the LDAP server. You cannot delete LDAP servers that are assigned to synchronization policies. To delete an LDAP server: 1. Click the Service tab. 2. Select TACACS+ AuthN Manager > LDAP Service > LDAP Servers from the navigation tree. The LDAP Server List displays all LDAP servers. 3. Click the Delete icon for the LDAP server you want to delete. A confirmation dialog box appears. 4. Click OK.
3. Synchronize—Click the Synchronize link to execute the synchronization policy. Modify—Click the Modify icon Delete—Click the Delete icon to modify the synchronization policy. to delete the synchronization policy. Click Refresh in the Sync Policy List area to update the Sync Policy List. Viewing LDAP synchronization policy details To view detailed information about an LDAP synchronization policy: 1. Click the Service tab. 2.
Device User Information 4. Account Name—Attribute description used on the LDAP server for user account names. TAM gets the values of this attribute as the account names of the device users. User Name—Username attribute description used on the LDAP server. TAM gets the values of this attribute as the usernames of the device users. An empty field indicates that user names are not synchronized from the LDAP server.
You can also use a complex filter in the form (operator(attribute1=value)(attribute2=value)) or (operator(attribute1=value)(operator(attribute2=value))) for advanced filtering. The operator can be & (AND), | (OR), or ! (NOT). For example, the filter (&(objectclass=a*)(!(cn=b*))) enables TAM to synchronize any entry that has an objectclass attribute value starting with a and a cn attribute value not starting with b. The default filter varies with the LDAP server type.
7. User Authorization Policy—Select an existing authorization policy, or CLI Access Not Supported from the list. If you select a specific authorization policy, the device users are controlled by the policy. If you select CLI Access Not Supported, the device users can log in to the device but cannot execute any command. If you leave this field empty, the device users use the authorization policy assigned to the device user group to which the user belongs.
and the Synchronize New Device Users option are mutually exclusive. If you have a limited number of licenses, use this option to save user licenses. Sync Options-Synchronize New Device Users—Select this option to have TAM synchronize all the new policy-matching users from the LDAP server. If this option is not selected, TAM does not synchronize any new user from the LDAP server. This option and the On-Demand Sync option are mutually exclusive.
To delete an LDAP synchronization policy: 1. Click the Service tab. 2. Select TACACS+ AuthN Manager > LDAP Service > Sync Policies from the navigation tree. The Sync Policy List displays all LDAP synchronization policies. 3. Click the Delete icon for the synchronization policy you want to delete. A confirmation dialog box appears. 4. Click OK.
Validating on-demand synchronization policies TAM allows you to validate all newly added or modified on-demand synchronization policies in bulk. To validate an on-demand synchronization policy: 1. Click the Service tab. 2. Select TACACS+ AuthN Manager > LDAP Service > Sync Policies from the navigation tree. The Sync Policy List displays all LDAP synchronization policies. 3. Click On-Demand Sync in the Sync Policy List area. A confirmation dialog box appears. 4. Click OK.
Status—Device user account state: Normal, or Cancelled. Normal indicates that the user account can be used for device login. Cancelled indicates that the user account is already deleted and cannot be used for device login. Modify—Click the Modify icon user information.
Device User Group—Device user group to which the LDAP user belongs. Policy Name—Name of the LDAP synchronization policy the LDAP user is bound with. Click the name link of a policy to view its details. For more information about LDAP synchronization policy details, see "Viewing LDAP synchronization policy details." Status in LDAP Server—State of the LDAP user during last synchronization, Existent or Inexistent. If the user exists on the LDAP server, the field displays Existent.
To view an LDAP user details in the all bound user list: 1. Click the User tab. 2. Select Device User View > LDAP Users from the navigation tree. The All Bound User List displays all LDAP users. 3. Click the account name of an LDAP user whose detailed information you want to view. Device user details contents • Account Name—Account name of the LDAP user. When an LDAP user is blacklisted, the account name of the user is followed by Blacklisted Users. • User Name—Real name of the LDAP user.
• Add to Blacklist—This link appears only when the LDAP user is not blacklisted. Click Add to Blacklist. A confirmation dialog box appears. Click OK to add the LDAP user to the blacklist. • Remove from Blacklist—This link appears only when the LDAP user is blacklisted. Click Remove from Blacklist. A confirmation dialog box appears. Click OK to remove the LDAP user from the blacklist. • Authentication Log—Click the link to view the authentication log list of the LDAP user.
The newly bound users appear in the Bound User List, with a state of Unknown. 9. Click the Sync All link to start synchronization. This process may take a few minutes or hours, depending on the amount of user data. When the synchronization stops, if the newly bound user exists on the LDAP server, the user status will change from Unknown to Existent. Otherwise, the user status will change to Inexistent.
Modifying LDAP user information Modifying the device user information does not affect the shell profile that has applied to the device user, but affects the command set to be applied. If, after the modification, the device user is controlled by a different authorization policy, the user will be controlled by command set of the scenario that the user matches in the new authorization policy.
TAM retains the information of a cancelled user for a specified time for audit. The lifetime of a cancelled user is determined by the system parameter Cancelled User Lifetime. For information about system parameters, see "Configuring system parameters." Operators can view the list of cancelled users through advanced query: set the query criterion Status to Cancelled, keep the default settings for other criteria, and then click Query.
A confirmation dialog box appears. 5. Click OK. Releasing an LDAP user from the blacklist A blacklisted user can log in to and manage a device after being released from the blacklist. You can follow the same procedures to release a blacklisted LDAP user from the blacklist in the device user list, all bound user list, and the bound user list of a specific synchronization policy. The following information uses the all bound user list as an example. To release an LDAP user from the blacklist: 1.
Base DN—This field is automatically populated with the absolute path of the directory that stores user data in the selected LDAP server. Sub-Base DN—Enter the absolute path of the subdirectory that stores user data on the LDAP server and make sure it is in the base DN directory or be the same as the base DN directory. TAM synchronizes the user data under sub-base DN rather than base DN. The DNs of attributes vary with LDAP servers.
9 Managing online users An online user is a device user that has passed the TAM authentication and logged in to the device. Operators can view, trace, and maintain online users in the online user list. Viewing the online user list To view the online user list: 1. Click the User tab. 2. Select Device User View > All Online Users from the navigation tree. The Online User List displays all online users.
online user cannot log in to any other devices. Remove from Blacklist releases an online user from the blacklist. Details opens the Online User Details page. Navigating the online user list Click to page forward in the online user list. Click Click to page backward in the online user list. Click to page backward to the front of the online user list. to page forward to the end of the online user list.
Account Name—Enter the account name. TAM supports fuzzy matching for this field. For example, if you enter Sam, all online users with the account name containing Sam are queried. Device User Group—Click the icon. The Select User Group window appears. Select a group and click OK. To delete a user group, click . Authorization Policy—Select the authorization policy that the online user is using or select CLI Access Not Supported from the list. Login Name—Enter the login name.
The Online User Details page appears. Online user details Account Name—Name of the account. Username—Real name of the online user. Device User Group—Device user group to which the online user belongs. Authorization Policy—Authorization policy that is being used by the online user. Device IP—IP address of the device to which the online user logs in. User IP Address—IP address of the online user. 4. Login Name—Username sent by the device to TAM.
• You can manually clear the online information about halted users in the online user list. When you manually clear online information about a user, make sure the user has logged out. If you clear the online information about a user that has not logged out, the user can still manage the device, and TAM records the command line authorization and audit logs of the user. For more information about audit logs, see "Managing audit logs." To manually clear online user information: 1. Click the User tab. 2.
10 Managing logs TAM records the following types of logs when a device user logs in to manage a device: • Authentication log—Records device user login successes and failures. An authentication failure log also provides the reason for the failure. • Authorization log—Includes login authorization logs and CLI authorization logs. After a device is enabled with the login authorization function, TAM authorizes login privilege levels for login users and records login authorization logs.
Click to page forward in the authentication log list. Click Click to page backward in the authentication log list. Click to page backward to the front of the authentication log list. to page forward to the end of the authentication log list. Click 8, 15, 50, 100, or 200 on the upper right corner of the main pane to configure how many items per page you want to view. Querying authentication logs TAM provides basic query and advanced query for authentication logs.
3. Click the Advanced Query link on the upper right side of the Query Authentication Logs area. 4. You can perform an advanced query if you see Basic Query on the upper right side of the Query Authentication Logs area. 5. Enter or select one or multiple of the following query criteria: Account Name—Enter the account name of the device user. TAM supports fuzzy matching for this field. For example, if you enter sam, all authentication logs with account names containing sam are queried.
authenticated for increasing user privilege level. None indicates any other authentication service. TAM only supports Login and Enable. If a field is empty, this field does not serve as a query criterion. 6. Click Query. The Authentication Log List displays all authentication logs matching the query criteria. To clear the query criteria, click Reset. The Authentication Log List displays all authentication logs. Viewing authentication log details To view detailed information about an authentication log: 1.
is authenticated for increasing user privilege level. None indicates the user is authenticated for other purposes. TAM only supports Login and Enable. 4. Session ID—Session ID used for packet exchanges between the device and TAM. For one authentication action, the device and TAM use the same session ID. Sequence Number—Sequence number of the packets exchanged between the device and TAM in the same session ID. Click Back to return to Authentication Log List.
• CLI authorization logs—After a device is enabled with the CLI authorization function, each time a user executes a command, TAM checks whether the user has the right to execute the command and records a CLI authorization log. An authorization log result can be Permit or Deny. An authorization Deny log also provides the reason for the deny action. Authorization logs can be exported to a file for future audit. Viewing the authorization log list To view the authorization log list: 1. Click the User tab.
Click 8, 15, 50, 100, or 200 on the upper right corner of the main pane to configure how many items per page you want to view. Querying authorization logs TAM provides basic query and advanced query for authorization logs. Basic query criteria include several key parameters for quick search. Advanced query offers various query criteria for precise match. Basic query To perform basic query for authorization logs: 1. Click the User tab. 2.
Account Name—Enter the account name of the device user. TAM supports fuzzy matching for this field. For example, if you enter sam, all authorization logs with account names containing sam are queried. Result—Select an authorization result, Permit or Deny from the list. Authorization Time From/To—Enter an authorization time range for a device user, in the format of YYYY-MM-DD hh:mm. Or select an authorization time range. Click the Calendar icon on the left.
The Authorization Log List displays all authorization logs matching the query criteria. To clear the query criteria, click Reset. The Authorization Log List displays all authorization logs. Viewing authorization log details To view detailed information about an authorization log: 1. Click the User tab. 2. Select Device User View > Log Management > AuthZ Logs from the navigation tree. The Authorization Log List displays all authorization logs. 3.
Exporting authorization logs The authorization log export function allows operators to get a list of authorization logs to be exported through the query function, and then export all authorization logs in the authorization log list to an export file. To export authorization logs: 1. Click the User tab. 2. Select Device User View > Log Management > AuthZ Logs from the navigation tree. The Authorization Log List displays all authorization logs. 3.
Viewing the audit log list To view the audit log list: 1. Click the User tab. 2. Select Device User View > Log Management > Audit Logs from the navigation tree. The Audit Log List displays all audit logs. Audit log list contents Login Name—Username sent by the device to TAM, which is not the username that a device user entered when logging in to the device. Login name of a device user contains redundant information, and needs to be extracted.
Basic query To perform basic query for audit logs: 1. Click the User tab. 2. Select Device User View > Log Management > Audit Logs from the navigation tree. The Audit Log List displays all audit logs. 3. Click the Basic Query link on the upper right side of the Query Audit Logs area. You can perform a basic query if you see Advanced Query on the upper right side of the Query Audit Logs area. 4.
Audit Time From/To—Enter an audit time range for a device user, in the format of YYYY-MM-DD hh:mm. Or select an audit time range. Click the Calendar icon on the left. On the upper part of the window that appears, select the date, and on the lower part, enter the time. The date and time determine the start time of the audit time range. Click the Calendar icon on the right. On the upper part of the window that appears, select the date, and on the lower part, enter the time.
Audit log details contents Account Name—Account name of the device user. Accounts with the name followed by #delete0# are cancelled accounts. Device User Group—Device user group to which the device user belongs. Privilege Level—Privilege level of the device user. CLI—Command executed by the device user. This field displays a value only when the Audit Type is Enter Command At CLI. Audit Time—Date and time when the audit was performed, in the format of YYYY-MM-DD hh:mm:ss.
For more information about querying audit logs, see "Querying audit logs." 4. Select a target File Format, TXT (text file) or CSV (CSV file). Windows uses Excel to open CSV files by default. Excel automatically adjusts the display format according to the contents. For example, 123456789123456789 will be displayed as 1.23457E+17 (scientific notation). In this case, you can select to display the data in text format. 5. Select a Separator for the text file.
11 Configuring global system settings The global system settings determine the operation of the TAM system and its services. Global system settings include: • System parameters • System operation log parameters • System configuration validation Configuring system parameters System parameters are related to all services in TAM, and must be properly configured to guarantee normal operation of services. To configure the system parameters: 1. Click the Service tab. 2.
5. Estimated Authorized Time Range—Set the estimated authorized time range for authorized time range policies. TAM computes at every 00:00 the permitted access period in the estimated time range for each authorized time range policy, and stores the result in a temporary table.
To configure the TAM system operation log parameters: 1. Click the Service tab. 2. Select TACACS+ AuthN Manager > System Parameters > System Configuration from the navigation tree. The System Configuration list displays all system configurations. 3. Click the Configure icon 4. Configure the system operation log parameters: 5. for the System Operation Log Parameters entry. Log Level—Select a level from the list for the TAM system operation logs.
12 Support and other resources Contacting HP For worldwide technical support information, see the HP support website: http://www.hp.
Conventions The following information describes the conventions used in this documentation set. GUI conventions Convention Description Boldface Window names, button names, field names, and menu items are in bold text. For example, the Select Devices window appears; click OK. > Multi-level menus are separated by angle brackets. For example, User Access Manager > Portal Service > Server.
Documents Purposes Oracle 11g Installation and Configuration Guide(for Linux) Guides you through installing Oracle 11g on Linux for IMC. Oracle 11g R2 Installation and Configuration Guide(for Linux) Guides you through installing Oracle 11g R2 on Linux for IMC. MySQL 5.5 Installation and Configuration Guide (for Linux) Guides you through installing MySQL 5.5 on Linux for IMC. MySQL 5.5 Installation and Configuration Guide (for Windows) Guides you through installing MySQL 5.5 on Windows for IMC.
Index ABCDEILMOQRSTUVW Configuring an LDAP server,13 Configuring authorized time range policies,35 Configuring device user groups,55 Configuring device users,60 Configuring LDAP authentication + TAM local authorization,12 Configuring system operation log parameters,121 Configuring system parameters,120 Configuring TAM,13 Configuring TAM local authentication and authorization,7 Configuring the blacklist user function,70 Configuring the PC of the device user,18 Configuring the PC of the device user,12 Contact
L Querying online users,101 LDAP authentication + TAM local authorization,5 LDAP Overview,75 R Regrouping device users,69 Related information,123 Releasing a blacklisted user,104 Log management,4 Login authorization and command authorization,3 Login methods and authentication-authorization methods,4 Releasing an LDAP user from the blacklist,98 Removing device users from the blacklist,73 M S Managing audit logs,114 Managing authentication logs,105 Managing authorization logs,109 Managing device areas
Viewing Viewing Viewing Viewing devices of a device type or sub-types,35 LDAP server details,77 LDAP synchronization policy details,84 LDAP user details,92 Viewing Viewing Viewing Viewing the the the the device device device device Viewing Viewing Viewing Viewing LDAP users,90 online user details,102 shell profile details,41 the audit log list,115 Viewing Viewing Viewing Viewing the the the the device user list,60 LDAP server list,76 LDAP synchronization policy list,83 online user list,100 Viewing