
HP Intelligent Management Center v5.1 TACACS+ Authentication Manager Administrator Guide

67
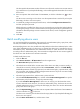
7. Click Preview.
The import result preview page appears, which contains the first 10 records. You can see whether
the import result is that you expected.
8. If yes, click Close to return to the device user importing page.
9. Click OK.
TAM starts to import device users. If the number of device users to be imported is large, the import
process will take a while. Wait for TAM to finish the import operation. Then, the import result page
appears, showing the number of device users successfully imported and that failed to be imported.
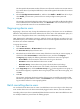
If a failure occurs, click the Download link. You can download or directly view the operation logs
to identify the reason for the failure.
Modifying a device user
After you change the authorization policy of a device user, TAM controls the online device user as
follows:
• TAM still applies the shell profile configured in the original authorization policy to the online user.
• TAM applies the authorization scenario and command set in the new authorization policy to the
online user.
TAM determines the authorization scenario to which the device user belongs according to the new
authorization policy. The command set configured for the new scenario applies to the device user
when the device user executes commands.
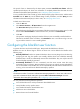
To modify a device user:
1. Click the User tab.
2. Select Device User View > All Device Users from the navigation tree.
The Device User List displays all device users.
3. Click the Modify icon for the device user that you want to modify.
4. The account name is not allowed to be changed.
5. Enter a user name for the device user.
The user name of a device user is a name that identifies the device user in TAM.
6. Enter a login password.
The device user uses the password to log in to the device.
7. Enter the same login password again.
8. Click the Select User Group icon , expand the device user group list, select a device user group,
and then click OK.
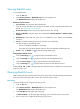
9. View the authorization policy of the device user group. This field is automatically populated after
a device user group is selected.
10. Select an authorization policy from the User Authorization Policy list.
Options include CLI Access Not Supported and specific authorization policies. You can also keep
this field empty. If you select CLI Access Not Supported, the device user can only log in to the device
but cannot execute commands on the device. If you select an authorization policy, the device user
uses the selected authorization policy. If you keep this field empty, the device user uses the
authorization policy of the device user group (see step 9).
11. Enter an online user limit.