
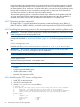
HP Insight Cluster Management Utility v7.1 User Guide


4.8.10 Booting the compute nodes
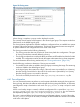
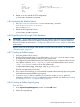
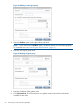
From the GUI
1. Select the compute nodes you added to the diskless logical group.
2. Right-click to launch a boot command on these nodes.
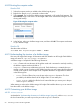
3. Select network. The list of all the diskless images registered in HP Insight CMU appears. The
cmu network image is also listed. The HP Insight CMU classic network boot image is used for
cloning and backup.
Figure 29 Booting the compute nodes
4. In the list box, select your diskless image name, and then click OK. The compute nodes start
on your diskless image.
From the CLI
Start the nodes as follows:
cmu> boot net "<myTestImage>" node1 - noden
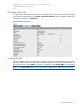
4.8.11 Understanding the structure of a diskless image
Like every HP Insight CMU image, all directories and files related to an HP Insight CMU diskless
image are stored in /opt/cmu/image/<imageName>.
A diskless image is composed of the following directories:
• root—Contains the root directory of the golden node and is mounted in read-only mode by
the diskless compute nodes and used as '/'.
• snapshot—Contains one subdirectory per node. Each subdirectory is created when you
register a node or a set of nodes into the diskless logical group and contains the files mounted
in read/write mode for each compute node. Snapshot directories are populated as defined
in the following files:
◦ files—The list of files to be put in the per node snapshot directories. This list is
provided by the diskless feature of HP Insight CMU. Do not modify this.
◦ files.custom—Add to this file the list of custom files that you want to put in the per
node snapshot directory.
When starting a node with a diskless image, HP Insight CMU modifies the dhcptab to network
boot the nodes on the diskless image.
4.8.12 Customizing your diskless image
4.8.12.1 files.custom
As described in “Understanding the structure of a diskless image” (page 60), add to files.custom
the list of custom files you want to put in the per node snapshot directories.
60 Provisioning a cluster with HP Insight CMU